In the summer of past few years, I have been leading photography workshop in Disco Bay, in collaboration with Iceland Photo Tours. Disko Bay is a bay in the Western coast of Greenland, with Ilulissat Icefjord located adjacent to it. Ilulissat Icefjord, the UNESCO World Heritage Site, is the most productive glacier in the Northern Hemisphere, with the glacier flows rate of 20 to 35 m per day, resulting in around 20 billion tons of icebergs calved off and many of them drifting around Disko Bay. Our workshops based in Ilulissat, the third largest city in Greenland with the population of just 4600 people. In our workshops, we were cruising in the Disko Bay in two sailing yachts. We usually start out the day after the dinner, when the midnight sun and golden hours is approaching. In mid-July, the golden hours last for 6 hours! The midnight sun is low in horizon, rendering incredible soft tone and colorful throughout the night. Sailing around the Disko Bay is an amazing experience, highly dense area of icebergs is just like a huge sculpture garden. Every iceberg is unique masterpiece of nature creation, you can find castles, towers, arches, dragons, any shapes you can ever imagined. Photographing icebergs from the boat is a rewarding experience, but it can be challenging in term of technical and aesthetical point of views. I’ve had the incredible fortune of traveling not just to Greenland, but to many places where the icebergs dominate the landscape. In this article, I have put together my image collection from Greenland and some useful tips on photographing icebergs that I gained over past few years.
Tips 1: Season and Time
Ilulissat is located in 69o North, about 350 km north of Arctic Circle. For over 2 months in the summer, from mid of May till mid of July, the sun doesn’t set at night, we called it midnight sun. I led the workshop around mid of July, in this particular time of the year, the sun stays low in the horizon throughout the night. When the sun is in between +6o to -6o around the horizon, we called it golden hour. The golden hour in Ilulissat in mid-July last for about 6 hours, started around 10:30PM and end around 4:30PM. Therefore, we use to start sailing around 9:00PM and that give us plenty of time to explore before the golden hour arrived.
During golden hour, due to the low angle of the sun, the blue and violet lights get scattered in atmosphere, leaving mostly red and orange light reaching the ground (Image 1 – 3). Golden hour is characteristic with soft, colorful and low contrast (shadows are less likely to under-exposed and highlights are less likely to over-exposed) lights. In landscape photography, golden hour and blue hour (when the sun is -6o to -8o relative to horizon) are collectively known as magical hour.
If you want to know exactly when is the golden hour, there are plenty of smartphone apps or online tools available, for example, PhotoPills and The Photographer Ephemeris. Just to key in location and date, these tools will tell you the information, like time of golden hour and blue hour, angle of sun, and so on, this information is important to plan your photography session.
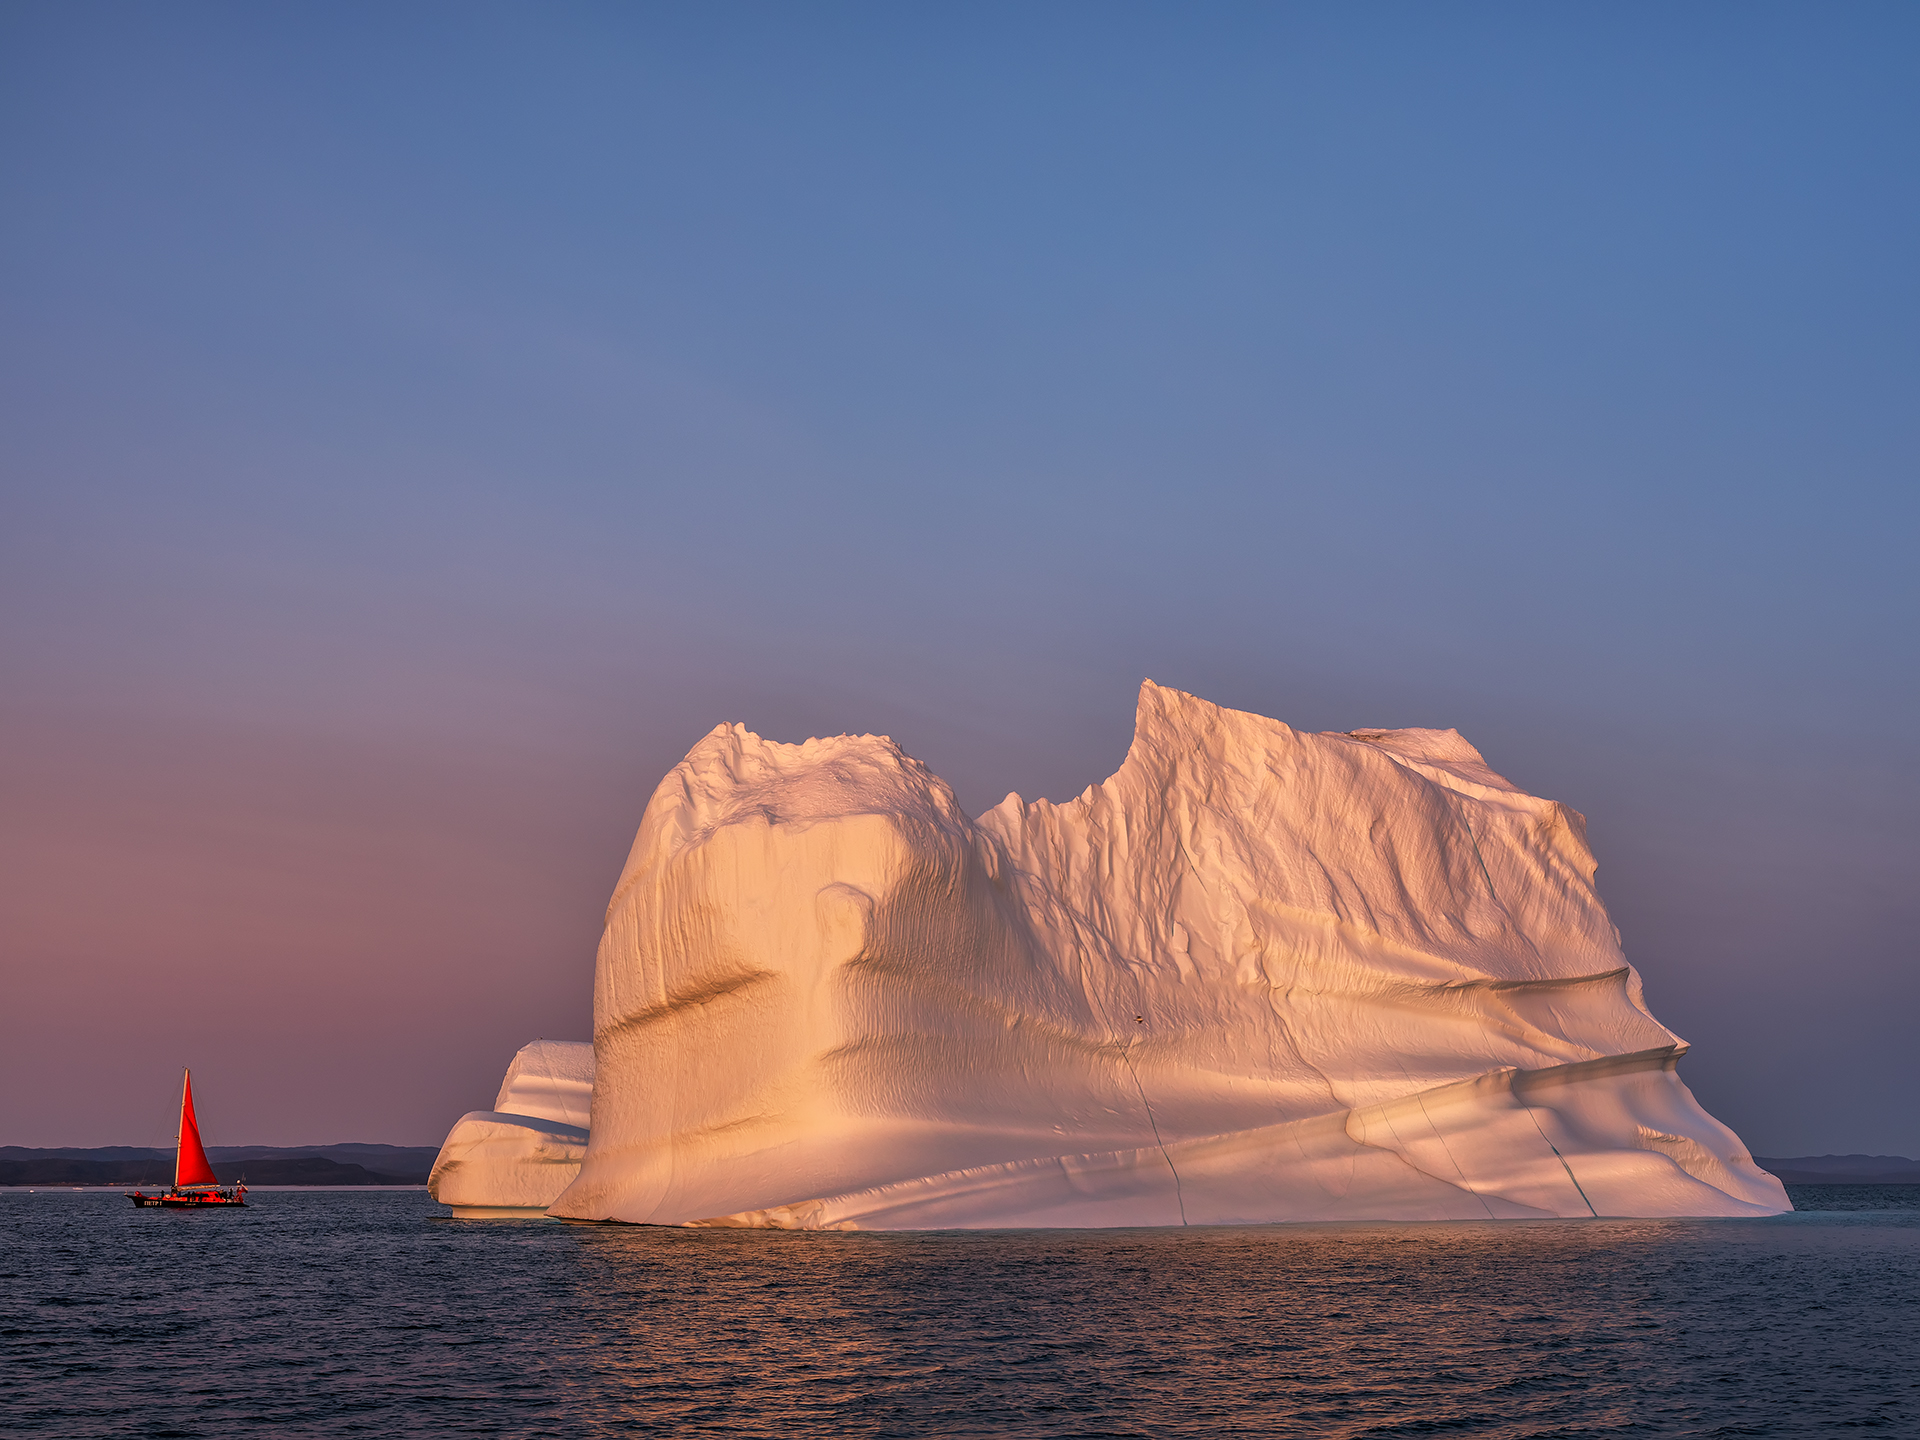 Image 1: Fujifilm GFX 50R, Fujifilm GF 32-64mm @52mm, ISO-200, f/8, 1/100s
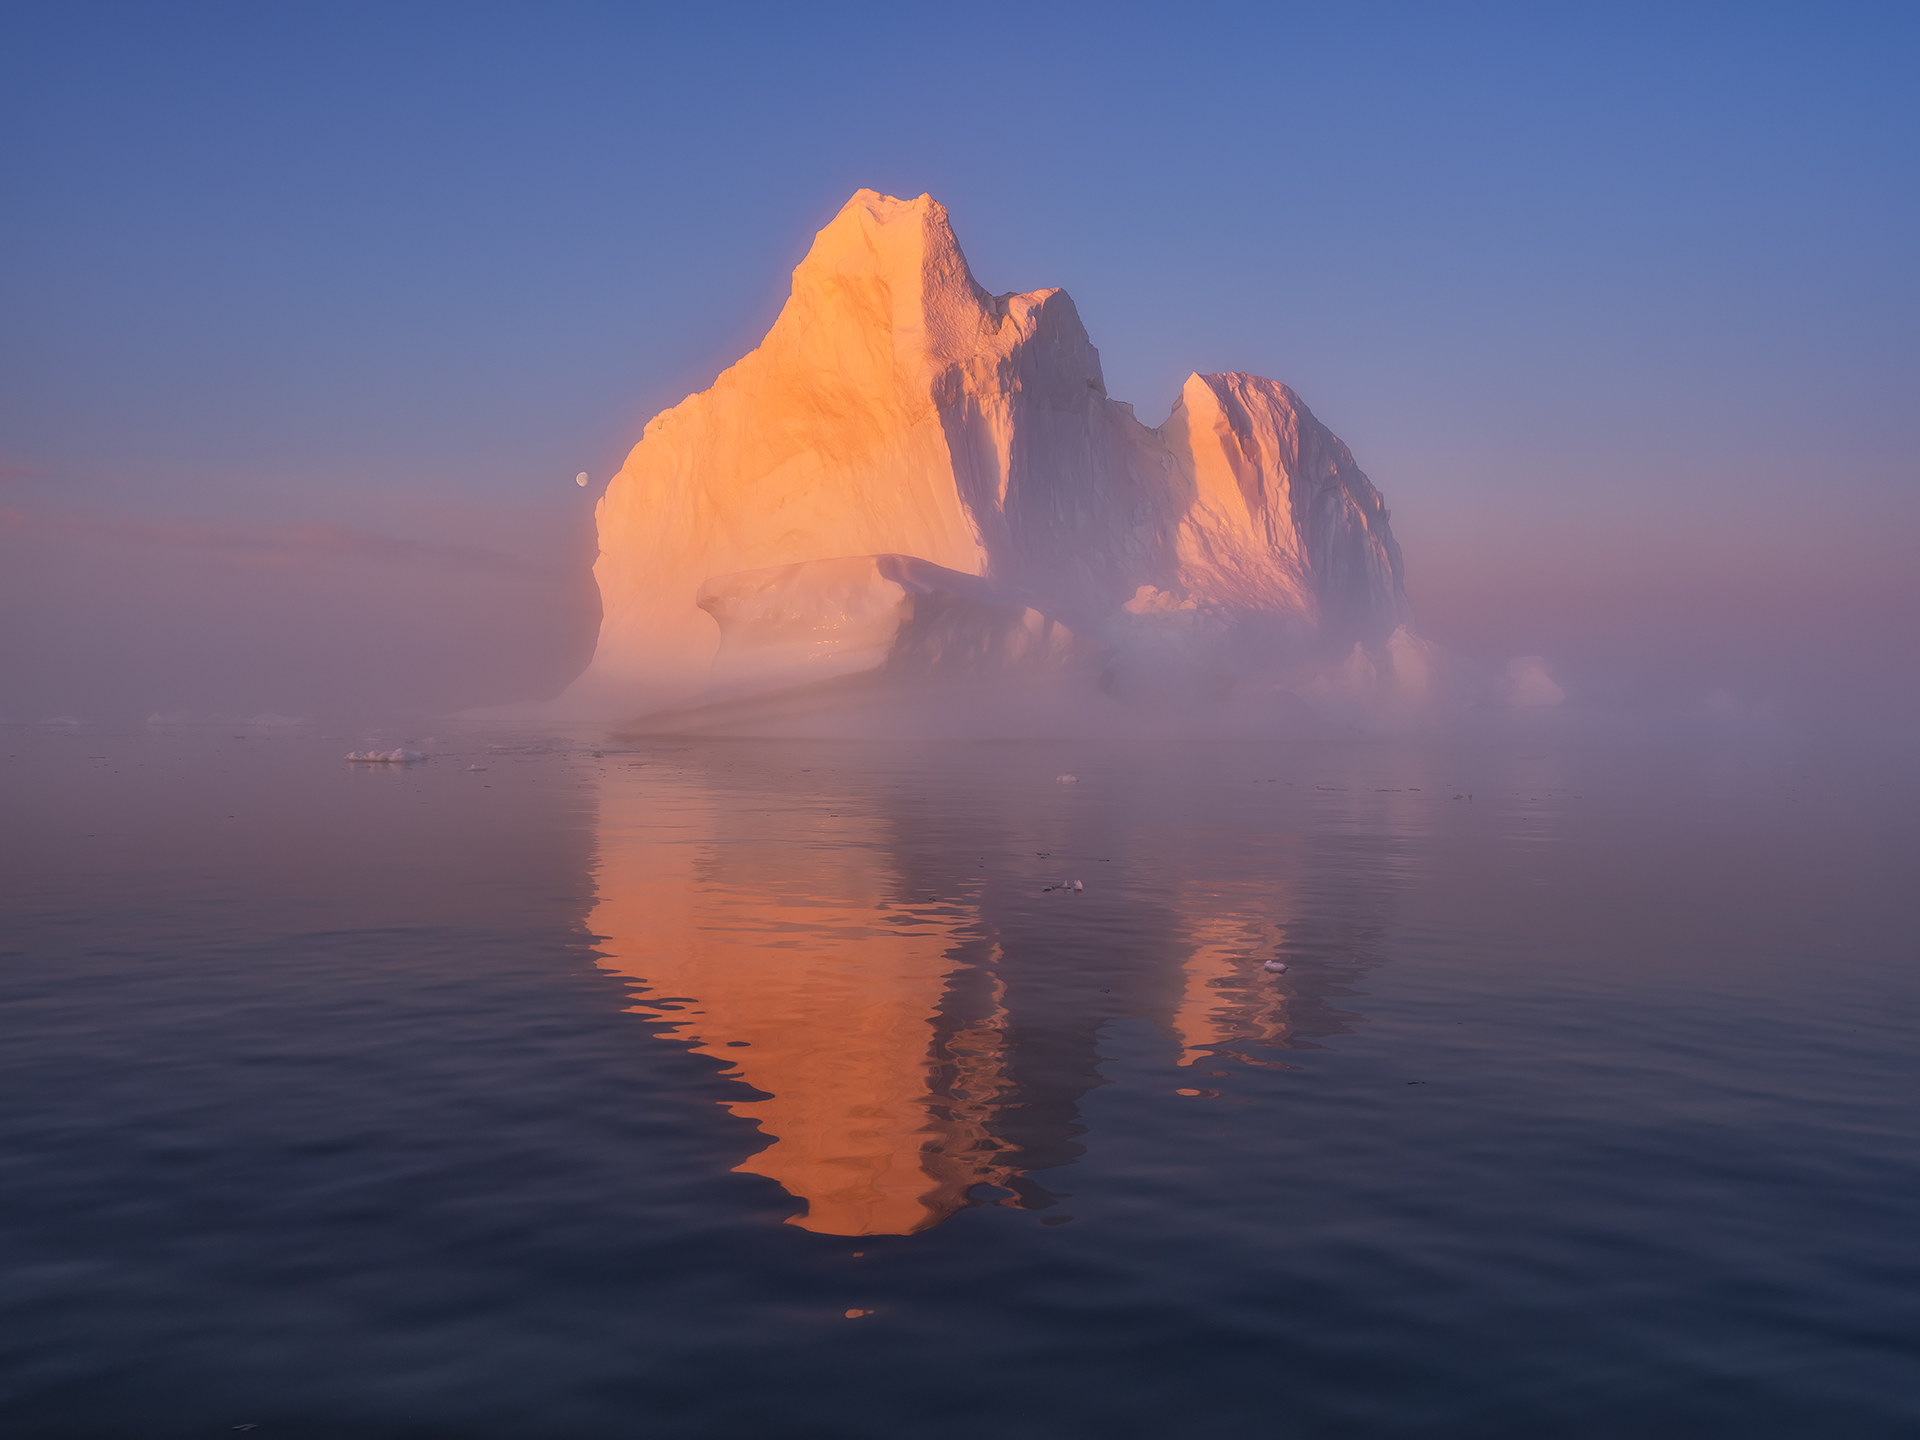 Image 2: Fujifilm GFX 50R, Fujifilm GF 32-64mm @34mm, ISO-250, f/10, 1/100s
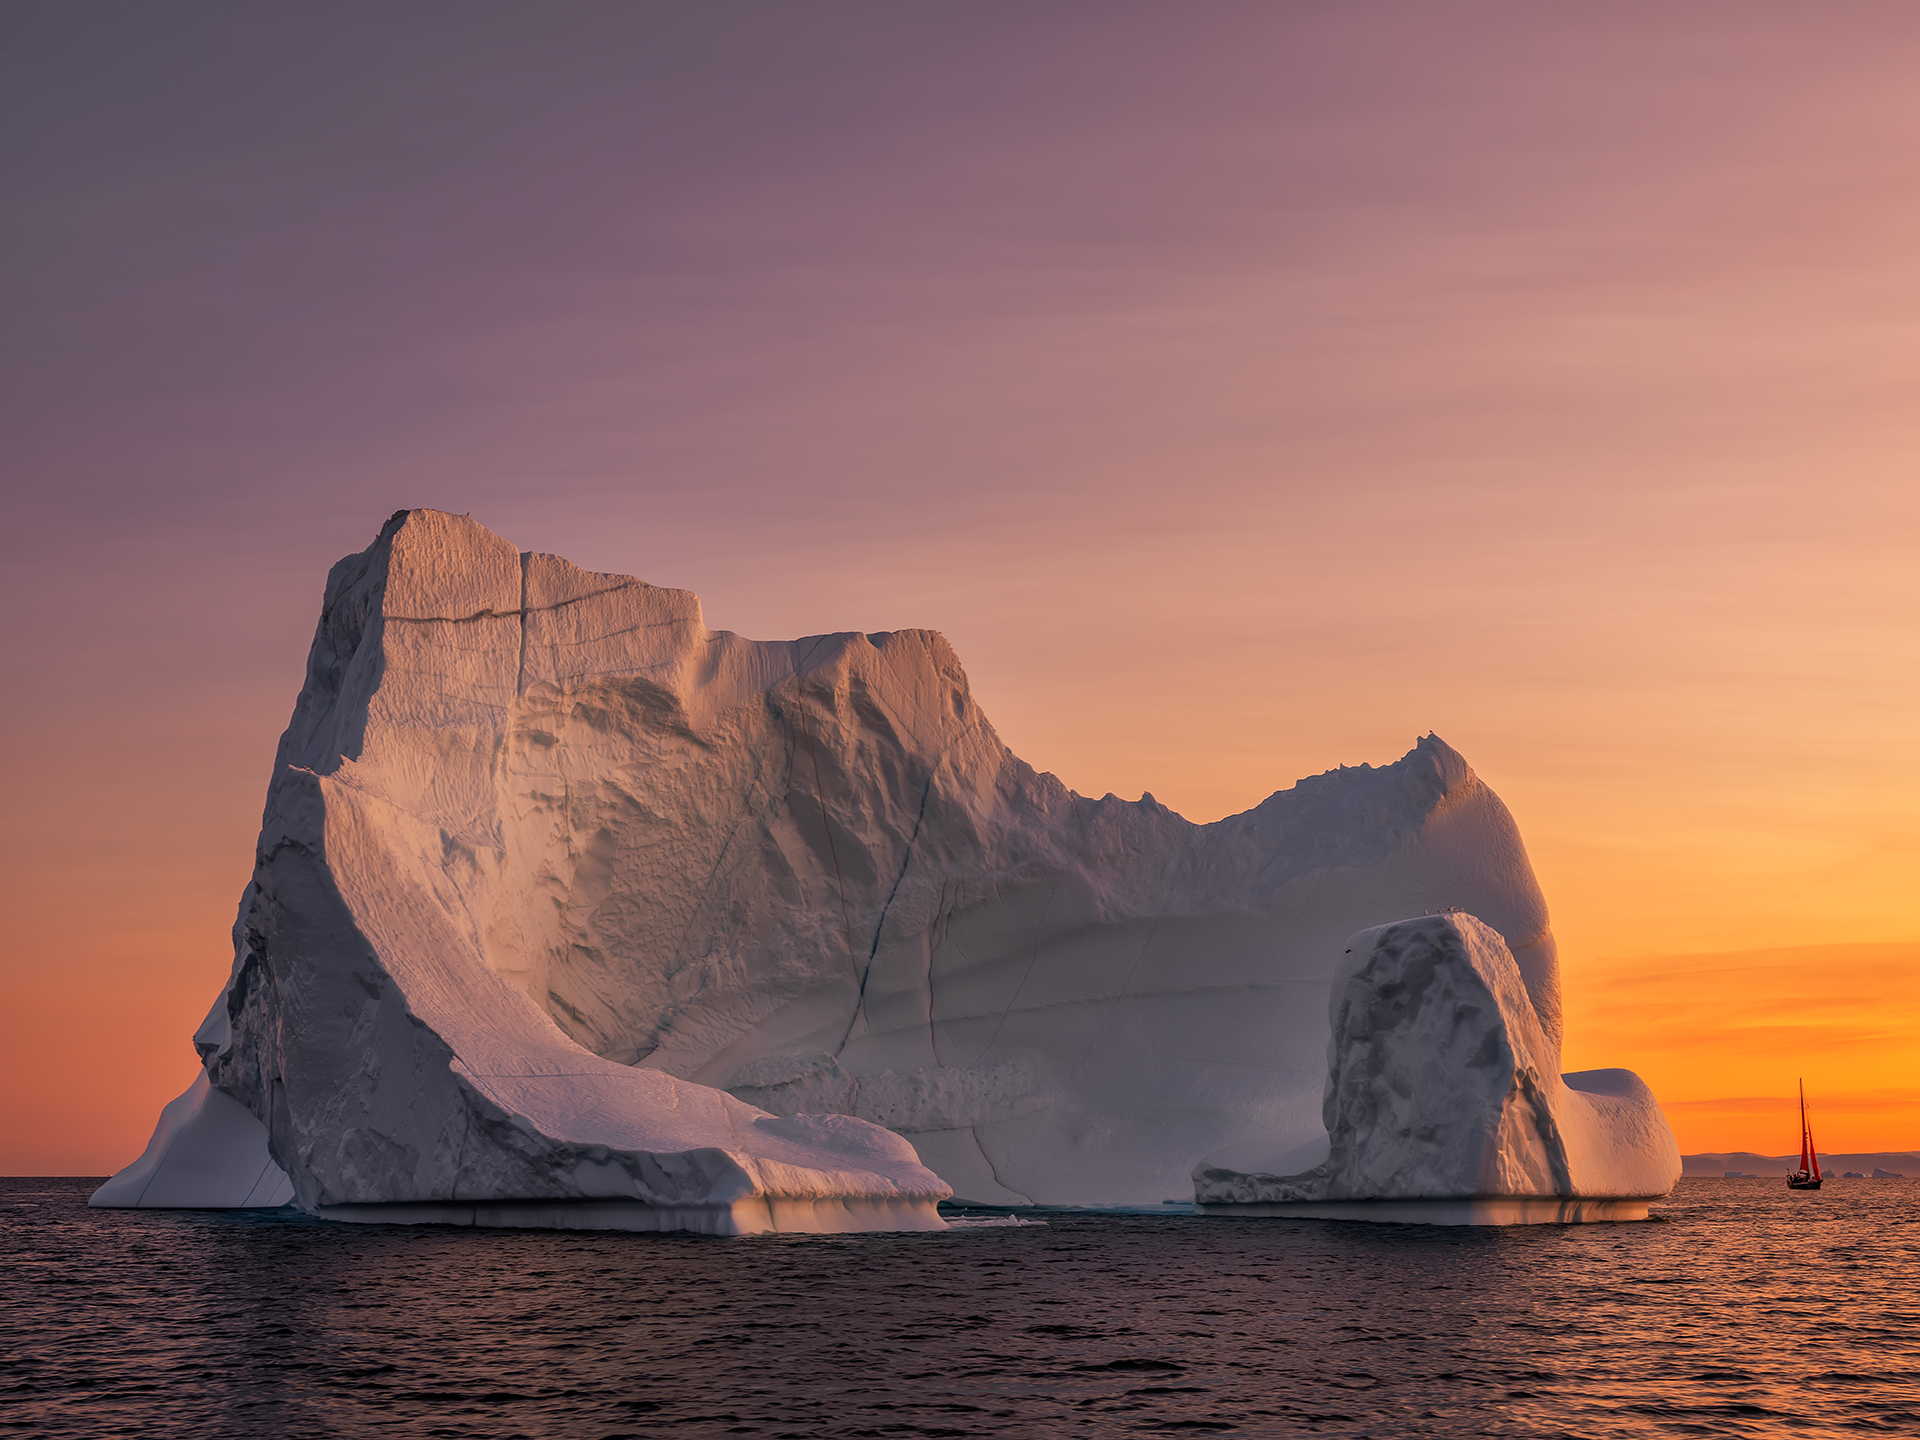 Image 3: Fujifilm GFX 50R, Fujifilm GF 32-64mm @46mm, ISO-200, f/8, 1/80s
Tips 2: Weather and Light
Long golden hour doesn’t guarantee epic golden tone all the time. Weather conditions, such as cloud and fog, affect the lights directly. There are no bad lights, all the lights are different, they have their unique characteristic that create different atmosphere and emotion. You just need to fully utilize them. I have seen participants have lost their interest when the day is cloudy or foggy and sat in the cabin; but I have also seen the best images created in these weather condition.
Different lights and weather conditions evoke different moods and emotions. Warm tone during golden hour render the sense of energetic and dynamic (Image 4). In the clear day, the sunlight casts beautiful warm and golden tone on the icebergs (Image 5). Cool tone during blue hour render the sense of calm, peaceful and static (Image 6). Foggy day render the sense of mysterious and dreamy (Image 7). Cloudy and stormy day render the sense of depress and moody (Image 8).
Remember, “there’s no such thing as bad light, just misunderstood light”, as Don McCullin said.
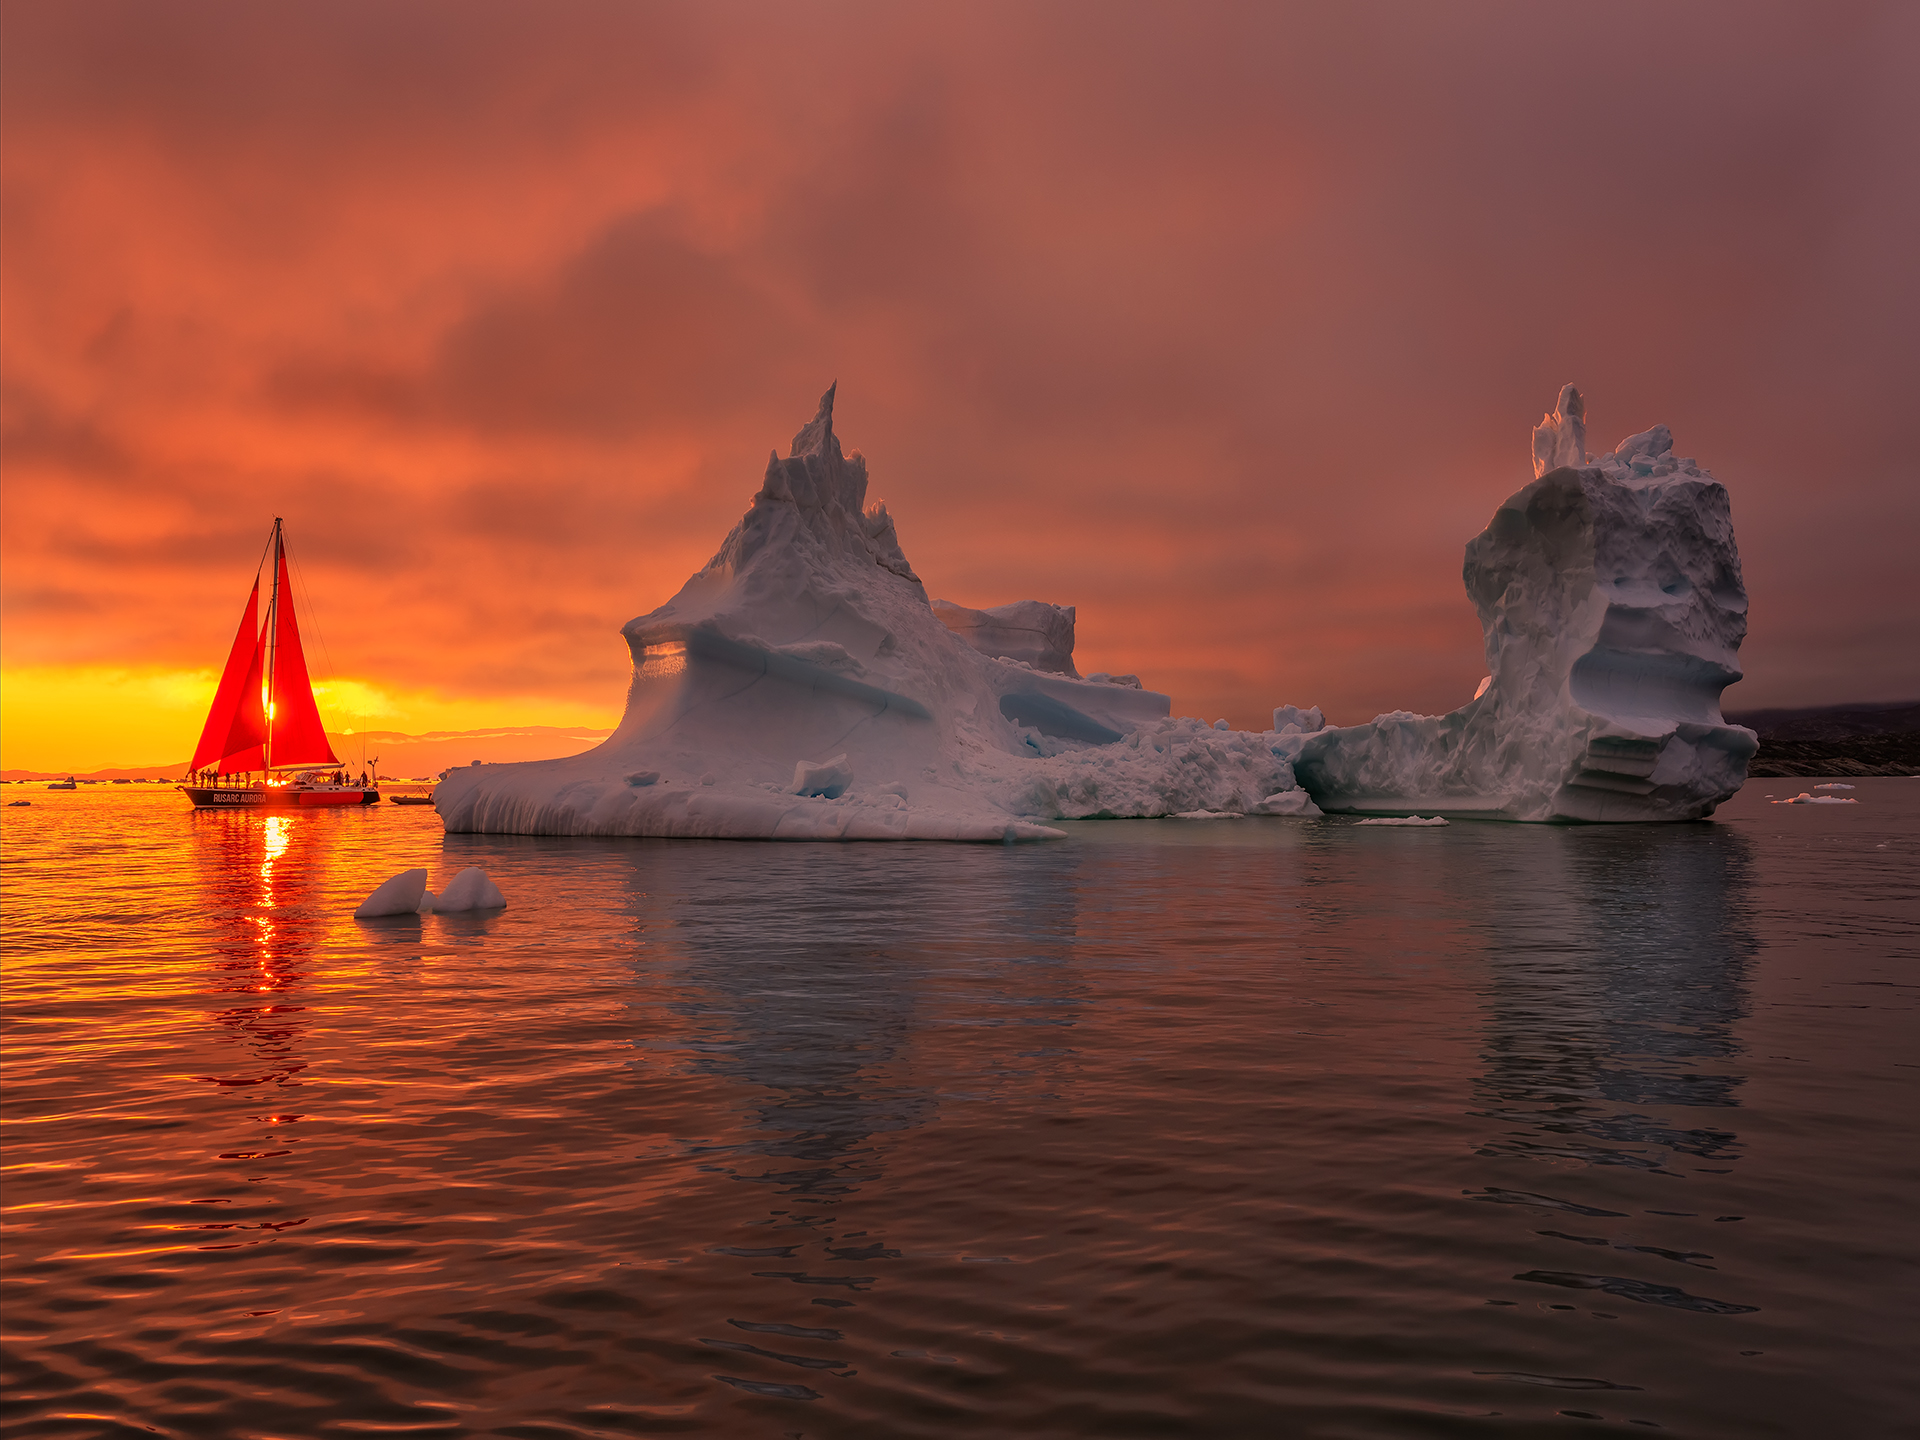 Image 4: Fujifilm GFX 50R, Fujifilm GF 32-64mm @33mm, ISO-400, f/8, 1/160s
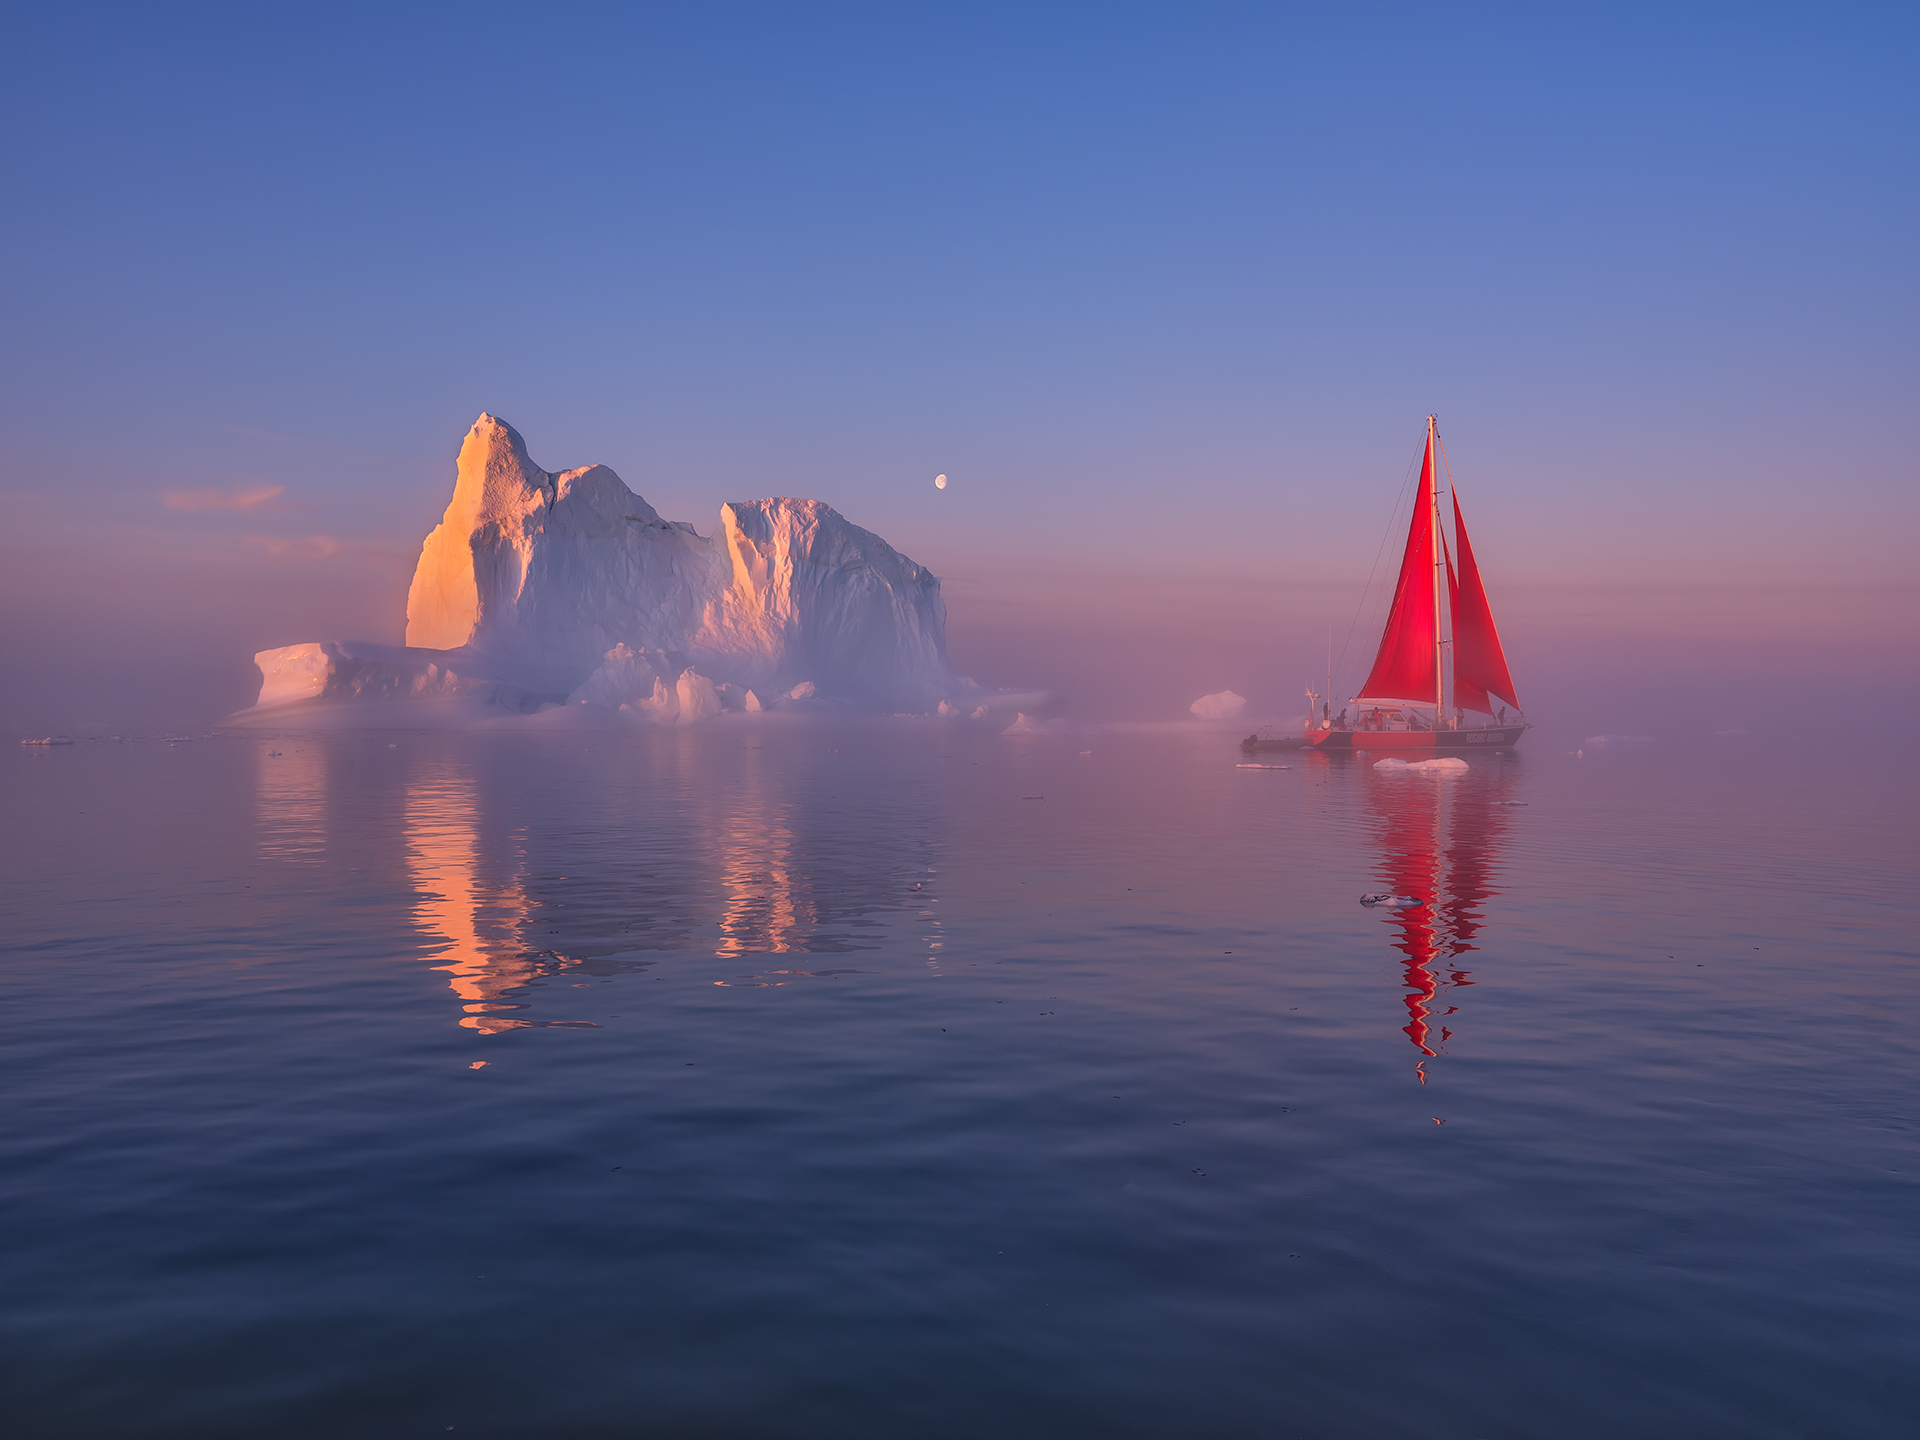 Image 5: Fujifilm GFX 50R, Fujifilm GF 32-64mm @36mm, ISO-250, f/10, 1/100s
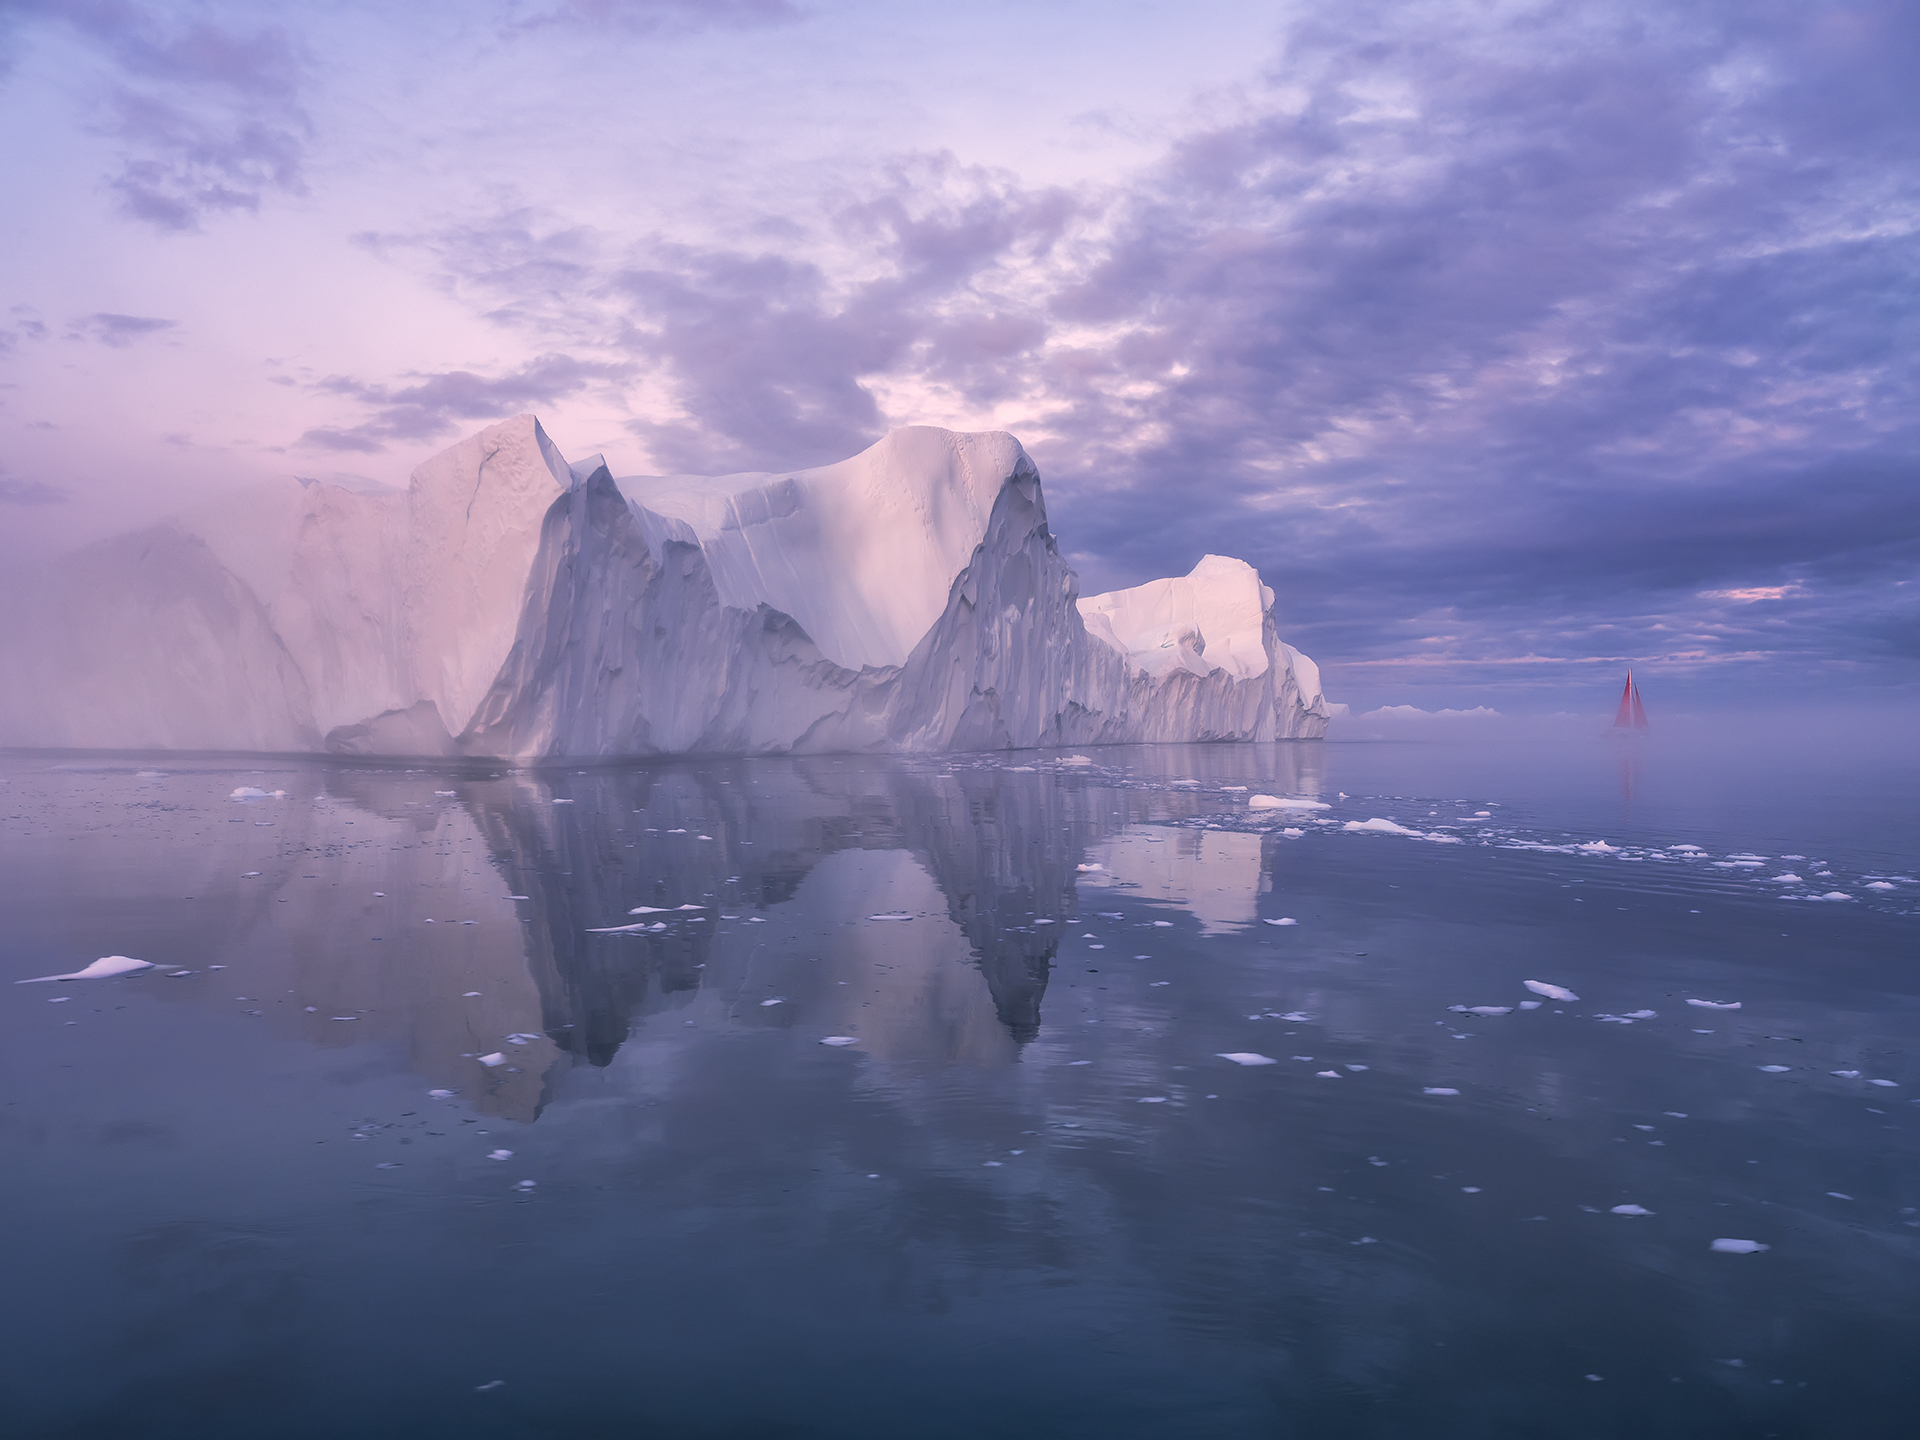 Image 6: Fujifilm GFX 50R, Fujifilm GF 32-64mm @32mm, ISO-250, f/9, 1/50s
 Image 7: Fujifilm GFX 50R, Fujifilm GF 32-64mm @40mm, ISO-320, f/9, 1/80s
 Image 8: Fujifilm GFX 50R, Fujifilm GF 32-64mm @64mm, ISO-800, f/10, 1/80s
Tips 3: Choice of Lenses
In every of my workshop, I strongly recommended everyone to bring two camera bodies for two very good reasons. First, you have travel thousands of miles to the middle of nowhere, accidents happened and what if you break your camera in the first or second days? This is the time when you are blaming yourself why don’t you bring a second camera body! Secondly, just like in the Greenland workshop, to be flexible in shooting. I always suggest my clients to mount a wide angle or standard lens on one body, and a telephoto lens on the second body. Always use zoom lenses, I don’t recommend fixed lenses. Flexibility is the priority in a sailing tour.
Wide angle lens (11-24mm, 12-24mm or 14-24mm) allow you to photograph when the icebergs or other subjects are close to you; or a particularly nice-looking iceberg is huge; or when you want to include some ice chunks as your foreground elements. I have seen an amazing image from my buddy, Raymond Hoffmann, who capture an image of humpback whale appears very close to our boat, with the nice looking iceberg in the background. He had the wide angle lens on one of his cameras. This moment just last for a few seconds, you don’t have time to change the lens, and you don’t have the second chance. “Luck is where opportunity meets preparation” as quote by Seneca!
Standard lens (24-70mm) is most frequently used throughout the workshop, taken into consideration the average distance of our subjects with the boats. Telephoto lens (70-200mm or 100-400mm) is useful when the subjects are far away (Image 9); or when you want to use the lens compression to capture a bigger sun or moon (Image 10 and 11); or when you want to do a close up shot of an interesting part of iceberg – the intimate landscape (Image 12 and 13).
 Image 9: Fujifilm GFX 50R, Fujifilm GF 100-200mm @100mm, ISO-320, f/9, 1/100s
 Image 10: Fujifilm GFX 50R, Fujifilm GF 100-200mm, Fujifilm GF 1.4x @222mm, ISO-250, f/9, 1/800s
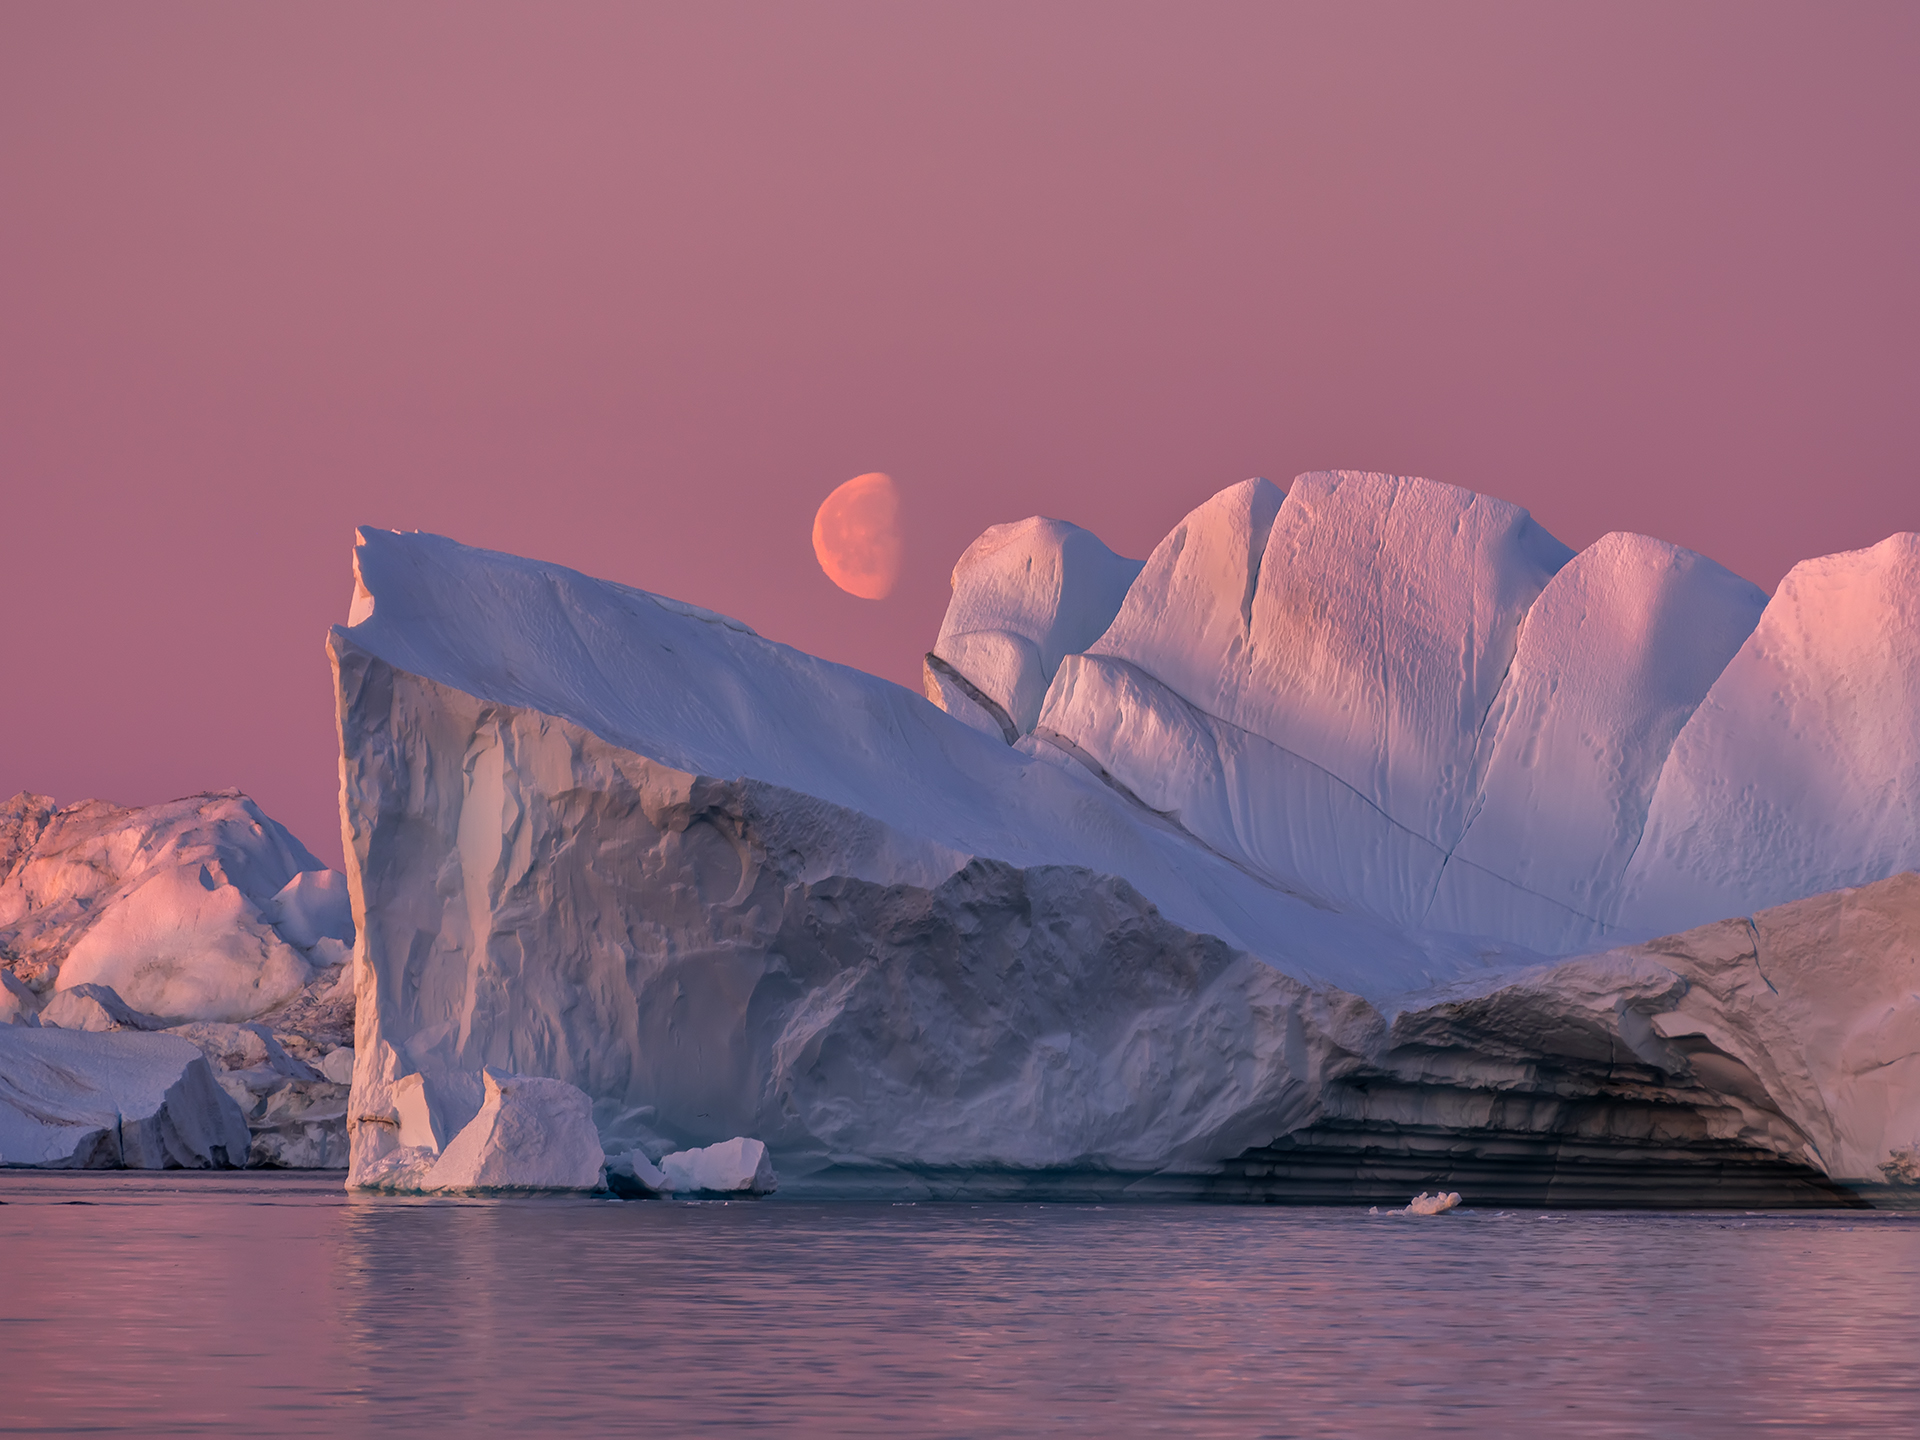 Image 11: Fujifilm GFX 50R, Fujifilm GF 100-200mm, Fujifilm GF 1.4x @280mm, ISO-200, f/9, 1/40s
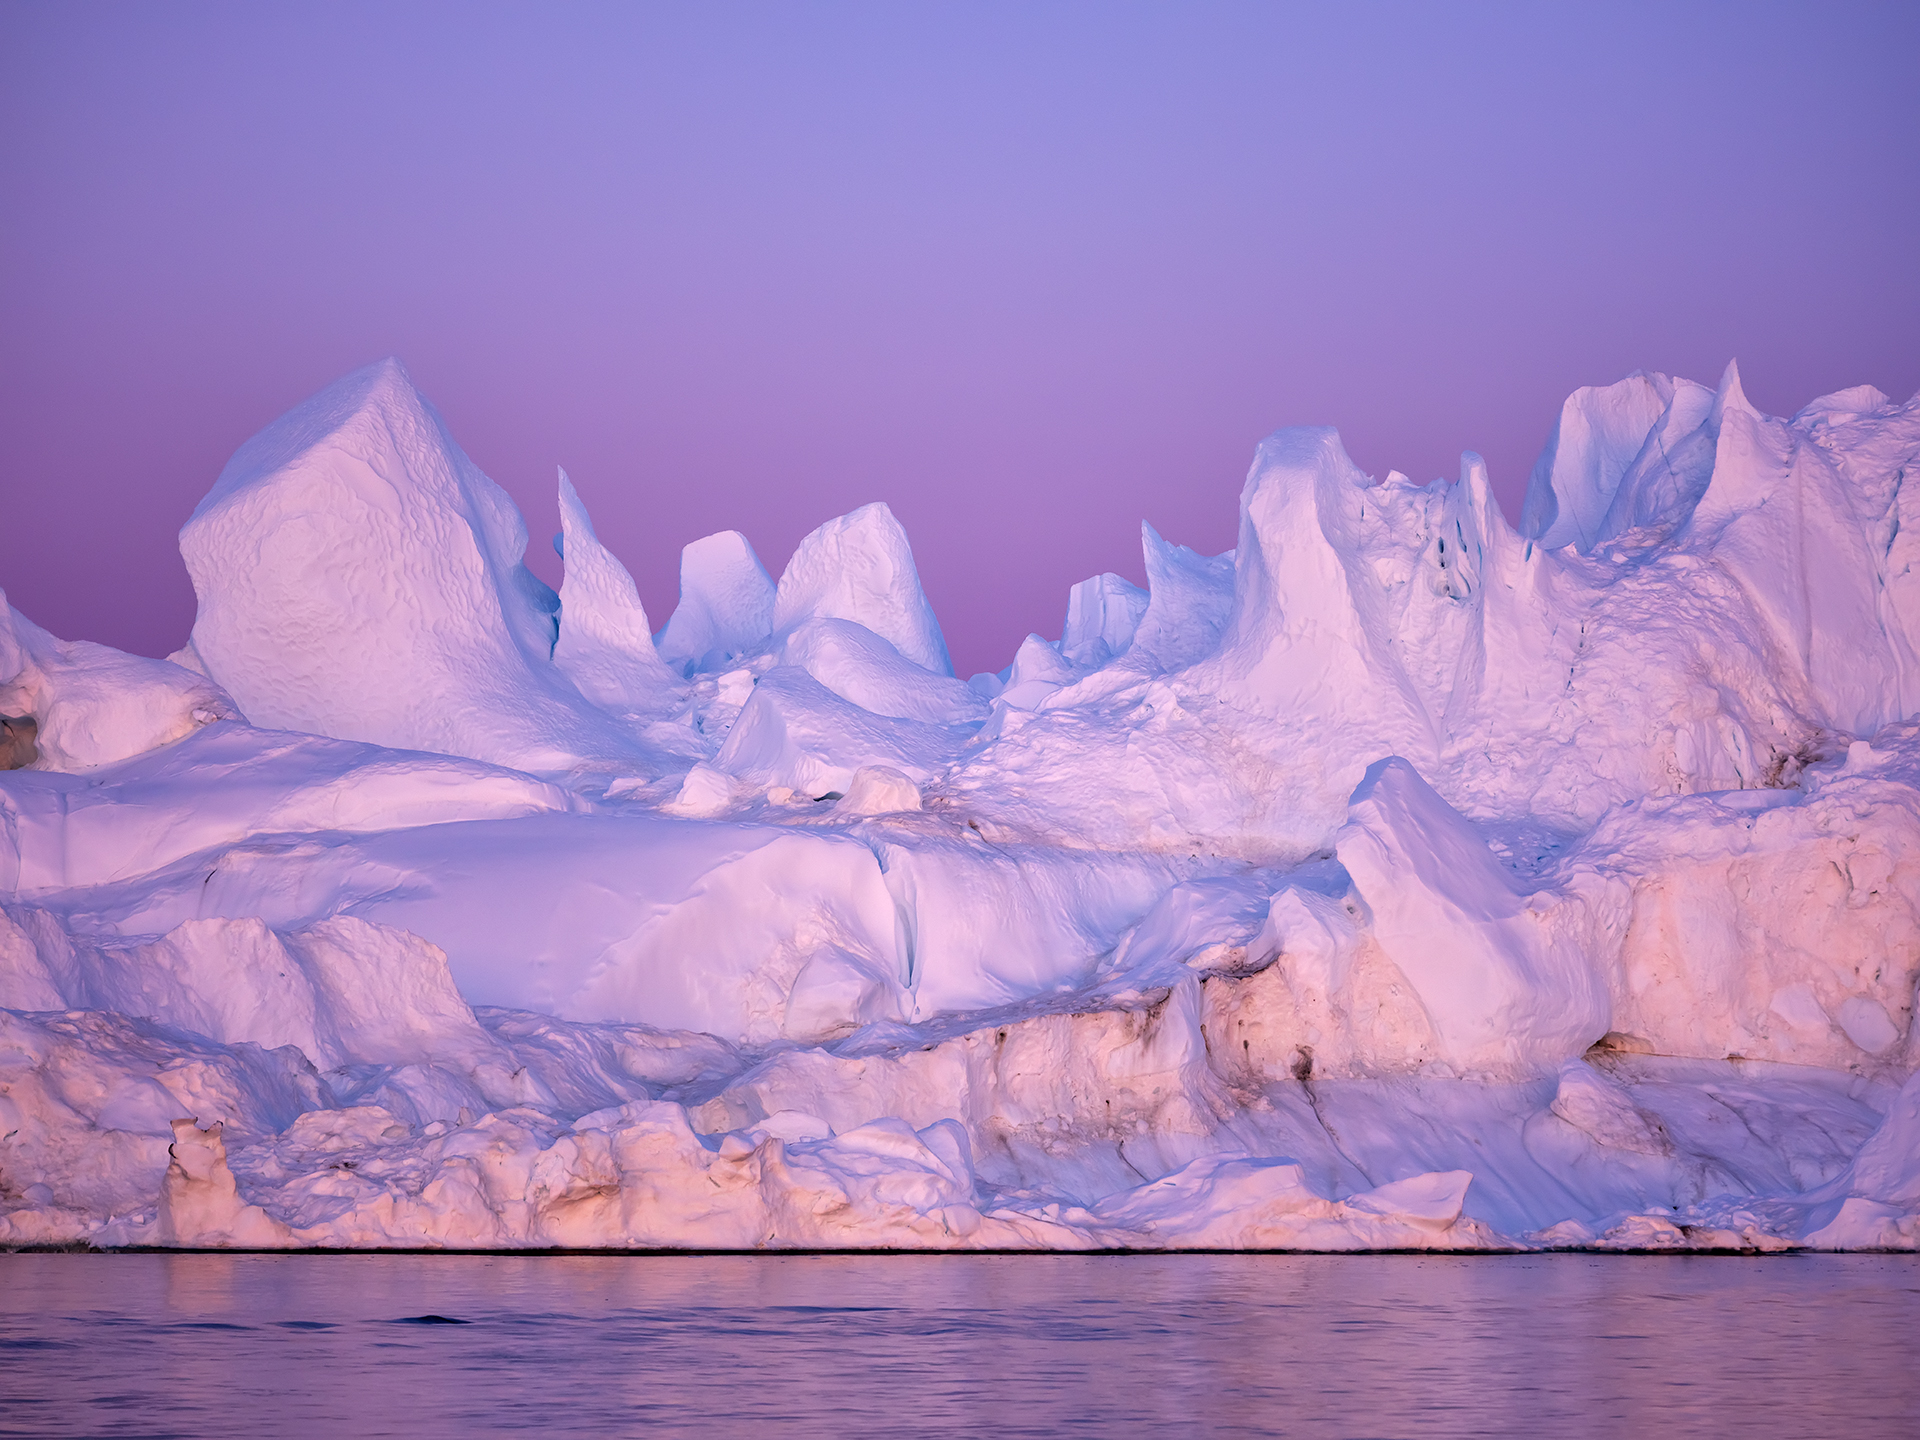 Image 12: Fujifilm GFX 50R, Fujifilm GF 100-200mm @140mm, ISO-400, f/8, 1/100s
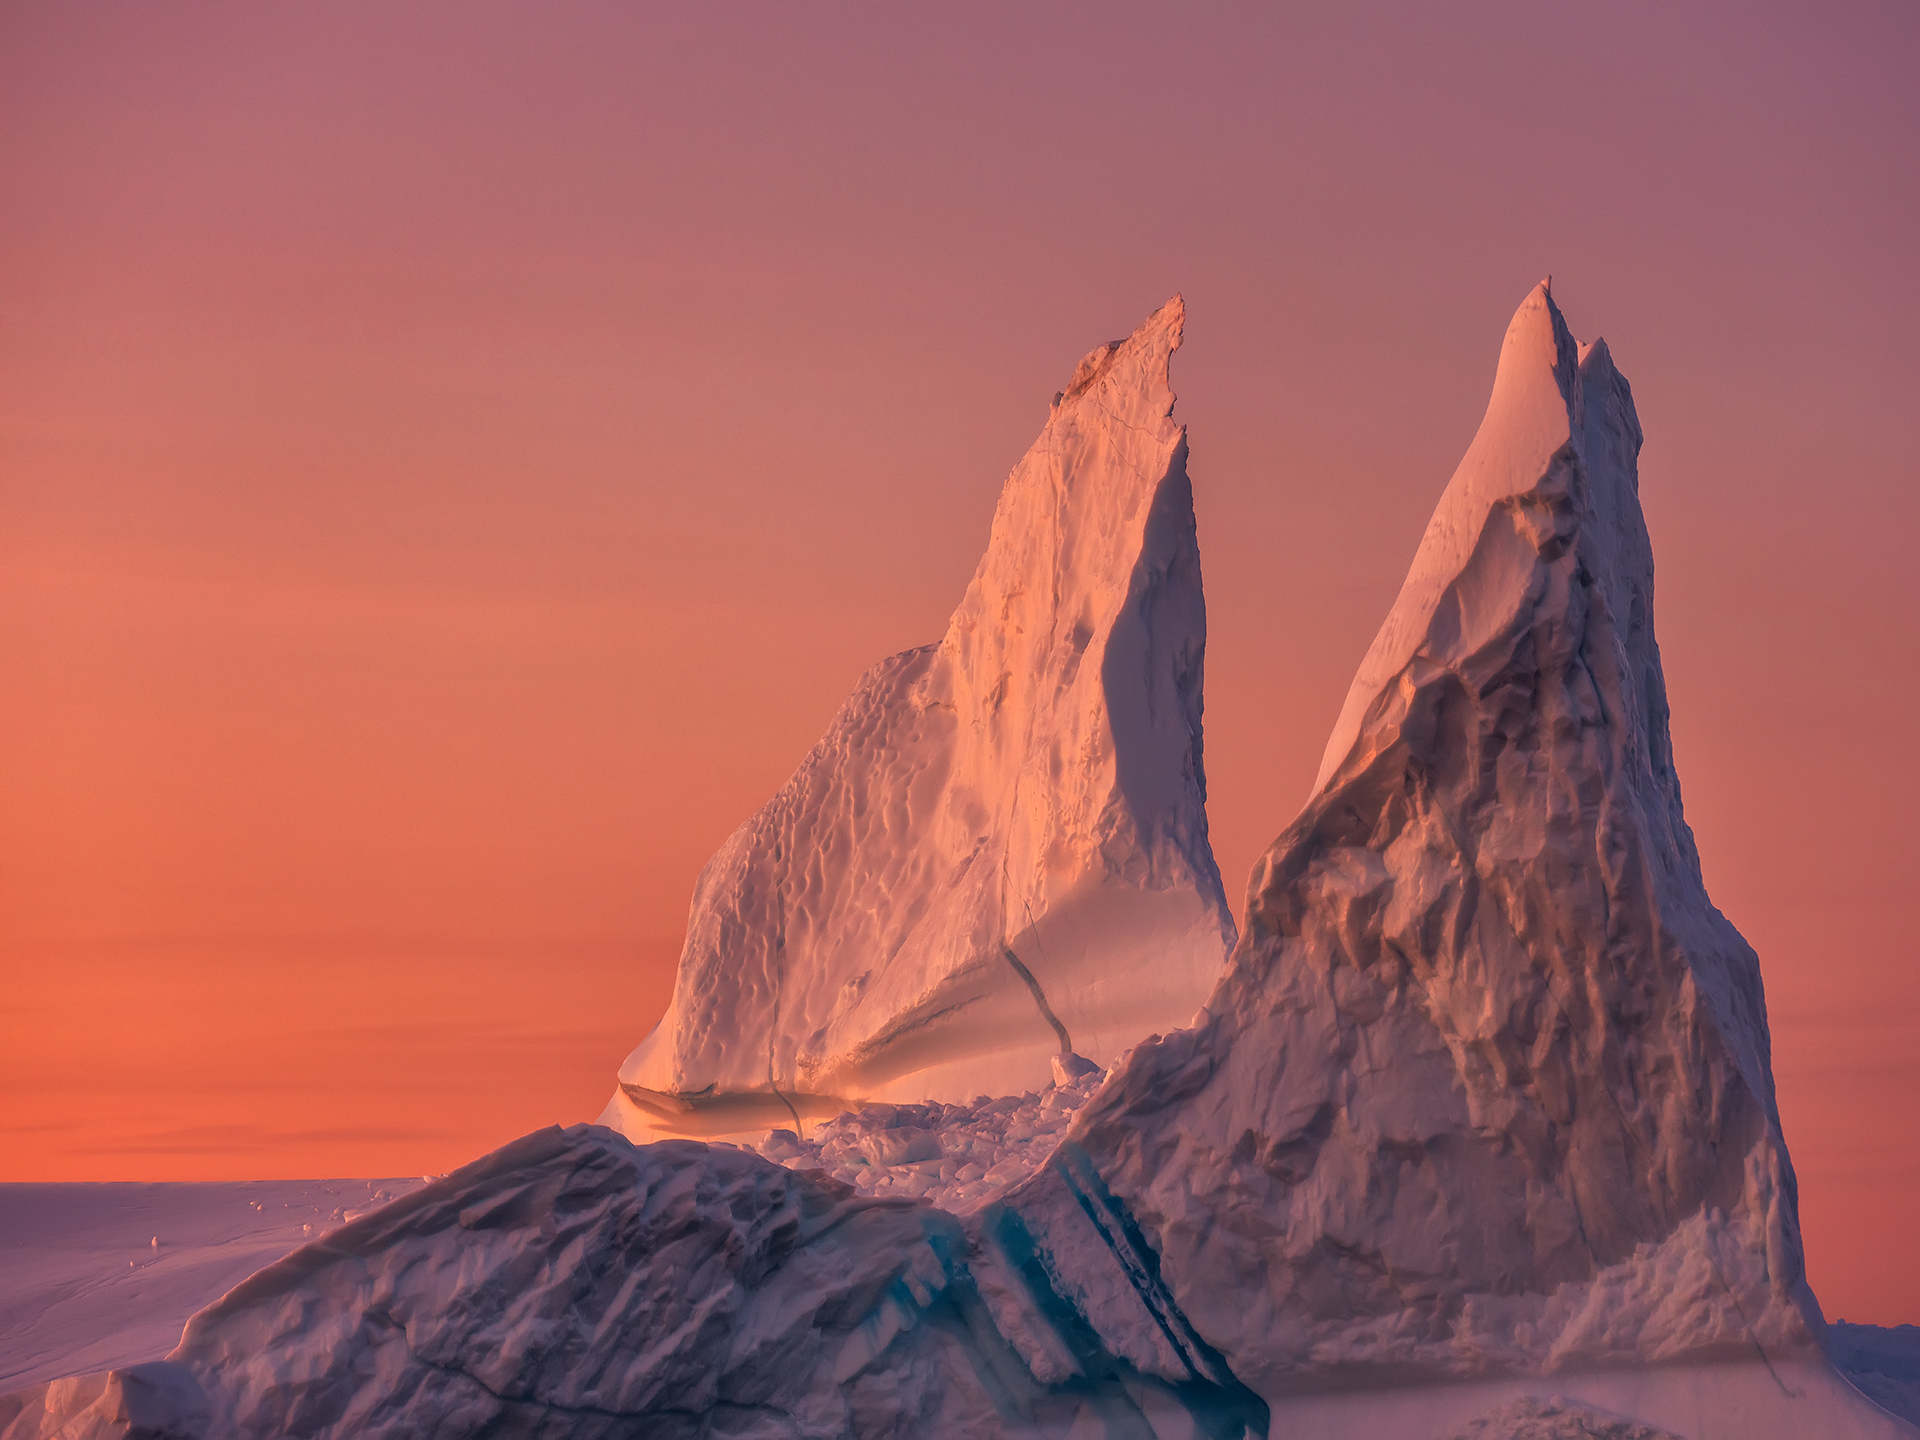 Image 13: Fujifilm GFX 50R, Fujifilm GF 100-200mm @120mm, ISO-640, f/8, 1/125s
Tips 4: Check Your Shutter Speed
Traditionally, the reciprocal number of effective focal length is referred to safe handheld shutter speed. For example, with 100mm lens, you have to use shutter speed of at least 1/100s to ensure the images are sharp. This is the guide, not the rule. If you are using an APS-C camera, you may need a faster shutter speed to handle the crop factor (1/150s for a 1.5x crop factor camera with 100mm lens). If you are using high megapixels camera, you may also need a faster shutter speed. On the other hand, if your camera body or lens has image stabilizer, you can decrease the shutter speed in exchange of lower ISO sensitivity (1/25s for a 4-stops 100mm image stabilizer lens). Again, this is just a guide, not the rule. If you have less stable hand, you may want to increase the speed. It is easy to check the safe handheld shutter speed that works for you, just by zooming in the image to 100% and to check the sharpness.
When you are shooting from the boat, you may want double the reciprocal number of effective focal length to cope with the “shaking” factors of the moving boat or waves. For example, with 32mm focal length, I have used the shutter speed of at least 1/60s (Image 15).
In the low light condition, you may increase the ISO sensitivity to cope with safe handheld shutter speed. Here’s a little trick to use lower ISO in the low light condition. I use to set the slower shutter speed and lower ISO, with the high speed continuous shooting mode, you will be able to get a few sharp images out of a bunch of them. It is a “hit and miss” technique but it is useful to lower ISO in low light condition (Image 16).
 Image 14: Fujifilm GFX 50R, Fujifilm GF 32-64mm @32mm, ISO-200, f/9, 1/60s
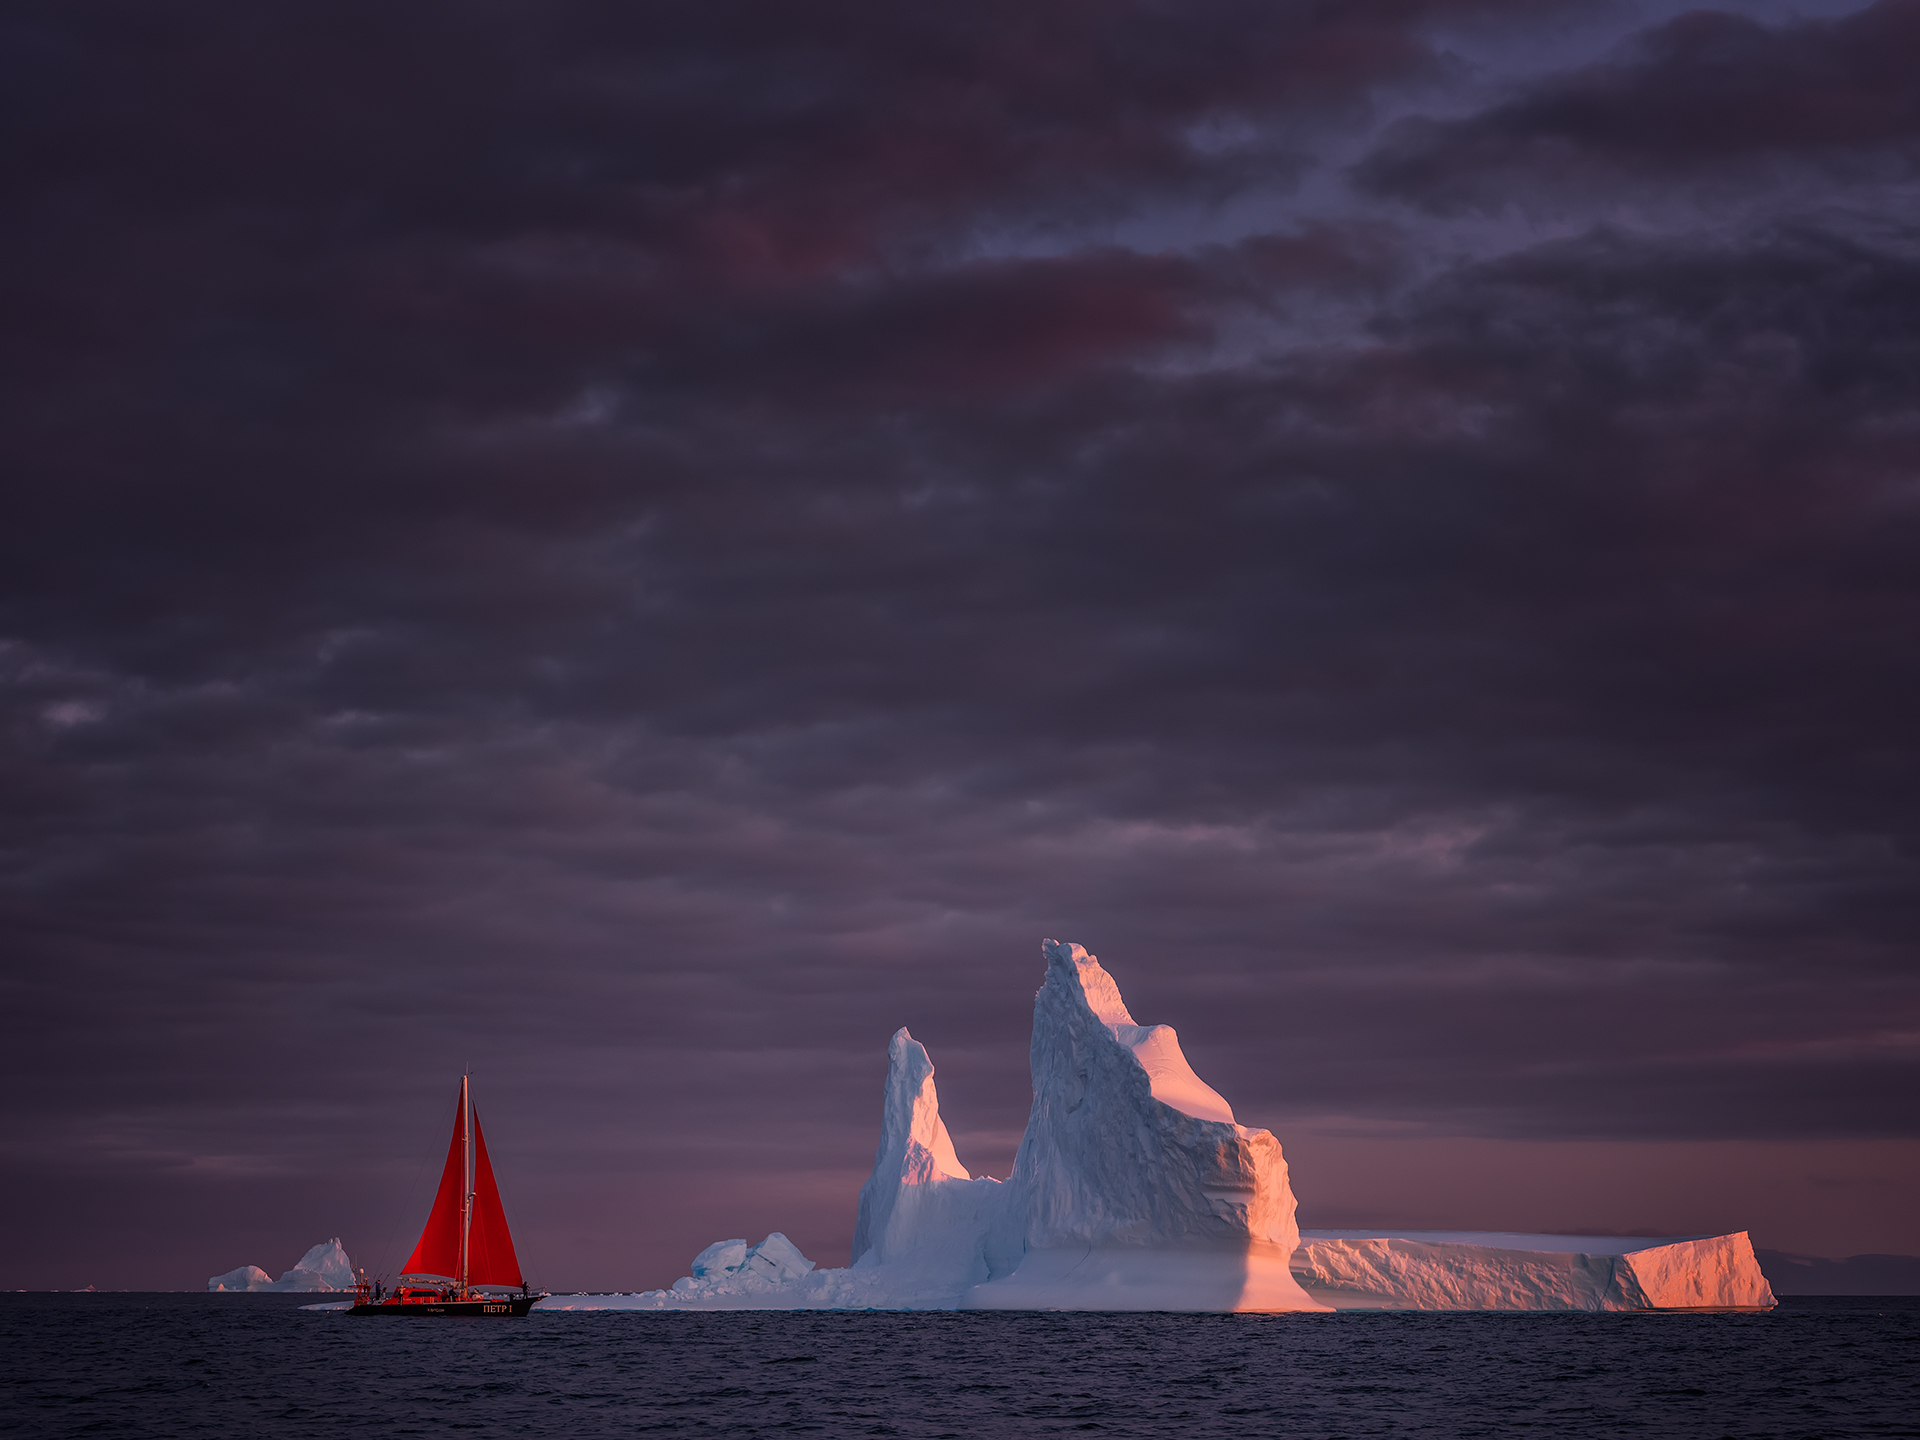 Image 15: Fujifilm GFX 50R, Fujifilm GF 100-200mm @100mm, ISO-400, f/8, 1/125s
Tips 5: Sense of Scale
We have two sailing boats in our workshop, not just as a transportation but also as models. The red sail is so eye-catching and photogenic, when we placed the boat adjacent to interesting looking icebergs, it is just picture perfect! However, there are several considerations when we are posing the boat.
Our world is three-dimensional, but the photo is two-dimensional. To convey the sense of scale in photography, you need to portray the objects in relative distances. We often use objects of known size, for example to use a hiker as the reference to show how big is the mountain. Although the sense of scale doesn’t necessary reflect the real situation, but it’s often created enormously strong visual impact.
When we place the iceberg in between us and the sail boat, we create the illusion that the iceberg is bigger than the sail boat (Image 16). The further the sail boat (or we are closer to the iceberg), the smaller it is captured in the image, therefore creating stronger sense of scale. The idea is to express the magnificence and dignity of iceberg. Iceberg, in this case, is the protagonist, and the sail boat act as a reference object. On the other hand, if we place the sail boat in between us and the iceberg, the boat looks bigger than the iceberg (Image 17). This, in turn, emphasize on sail boat, while iceberg acts as the backdrop.
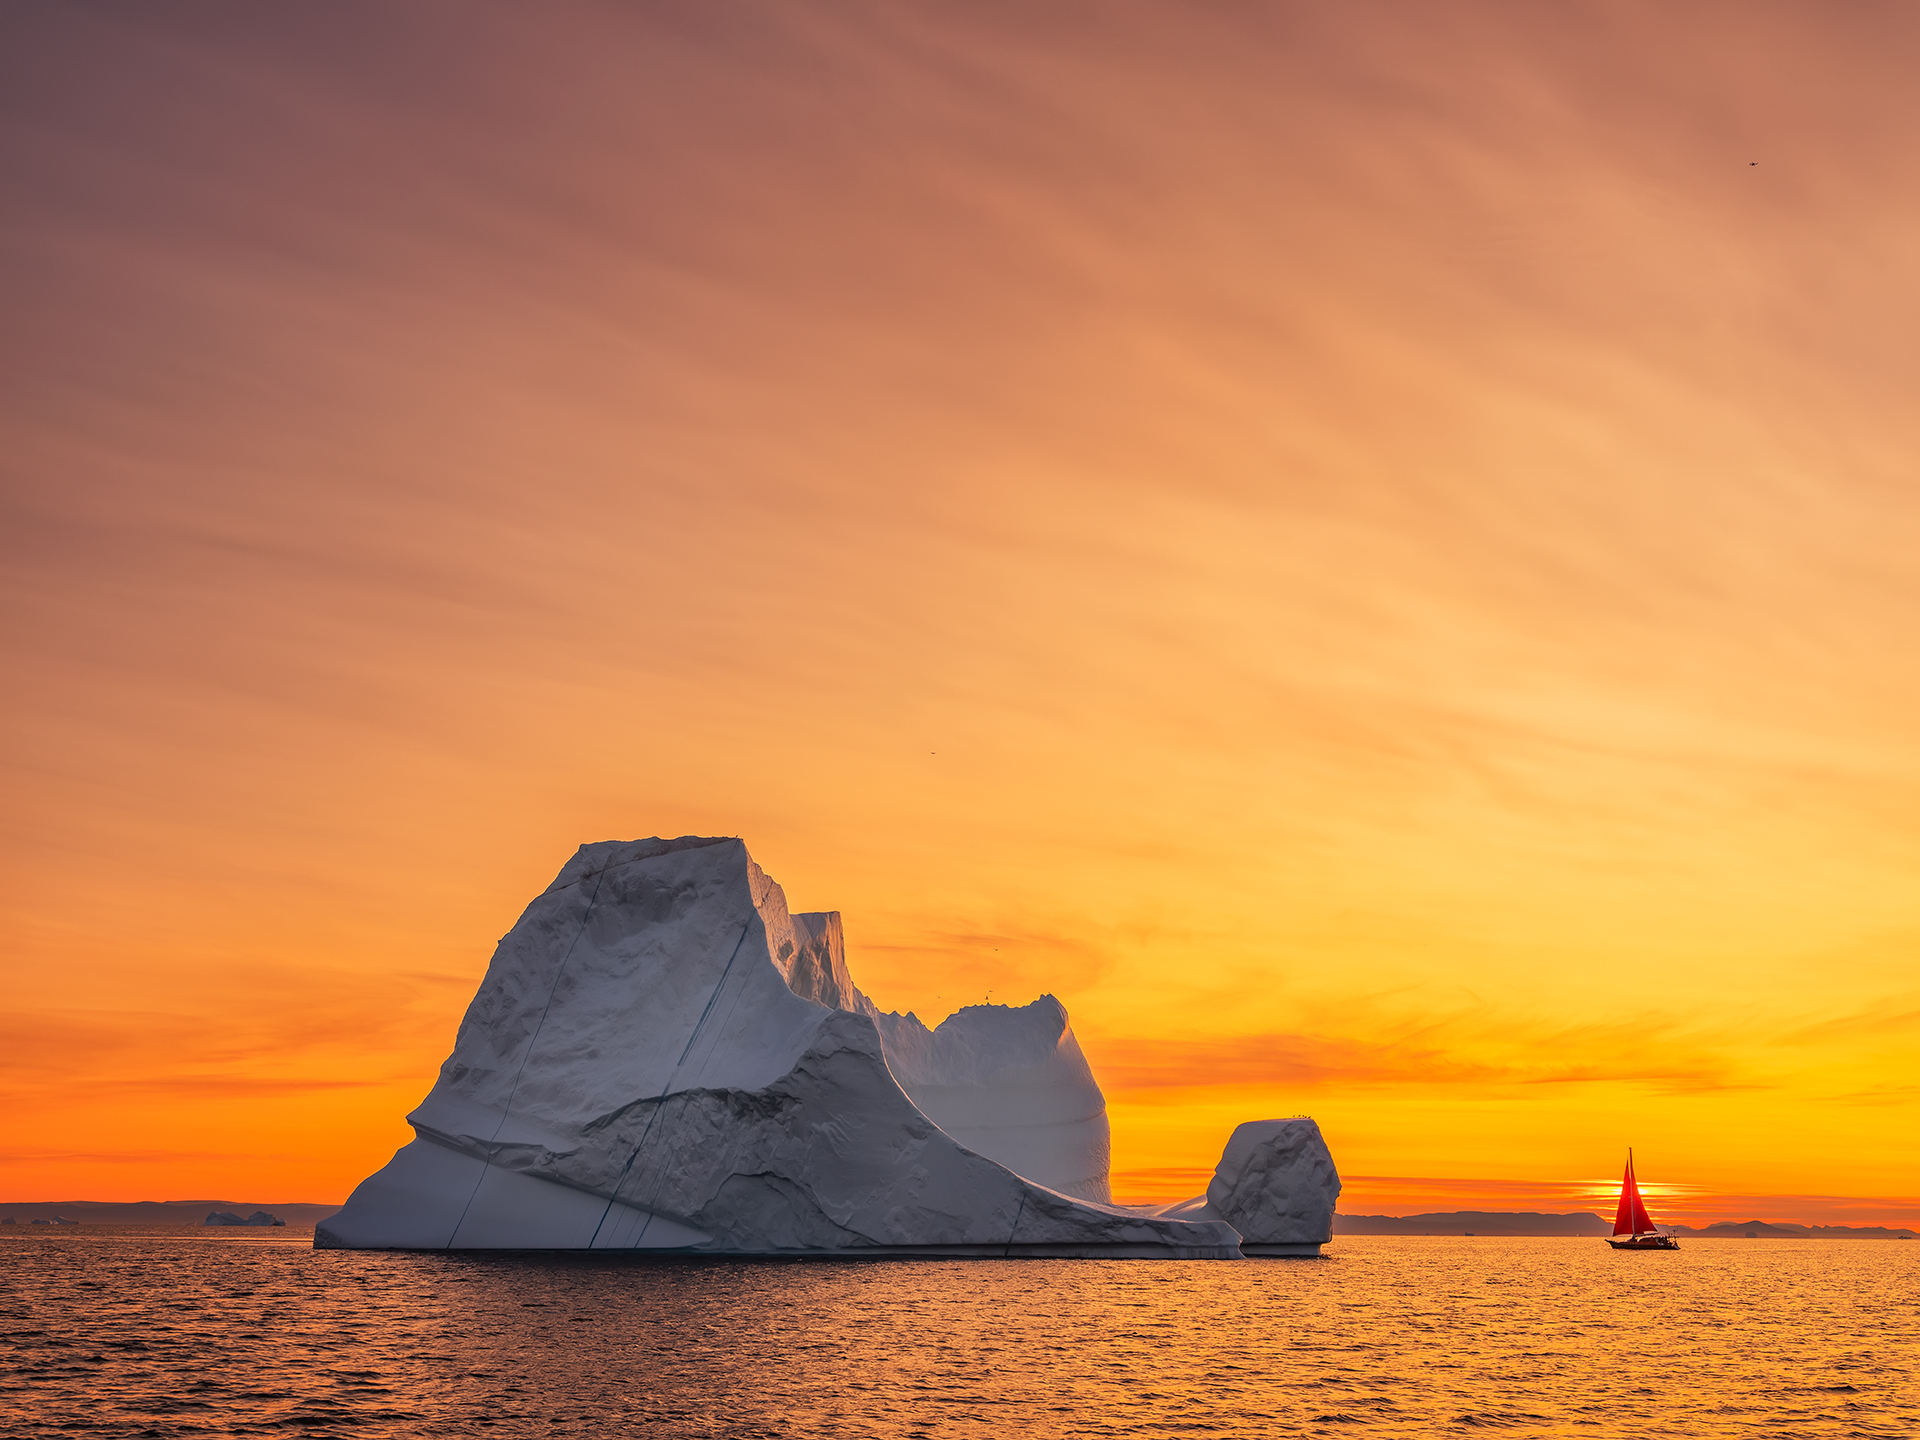 Image 16: Fujifilm GFX 50R, Fujifilm GF 32-64mm @43mm, ISO-200, f/8, 1/160s
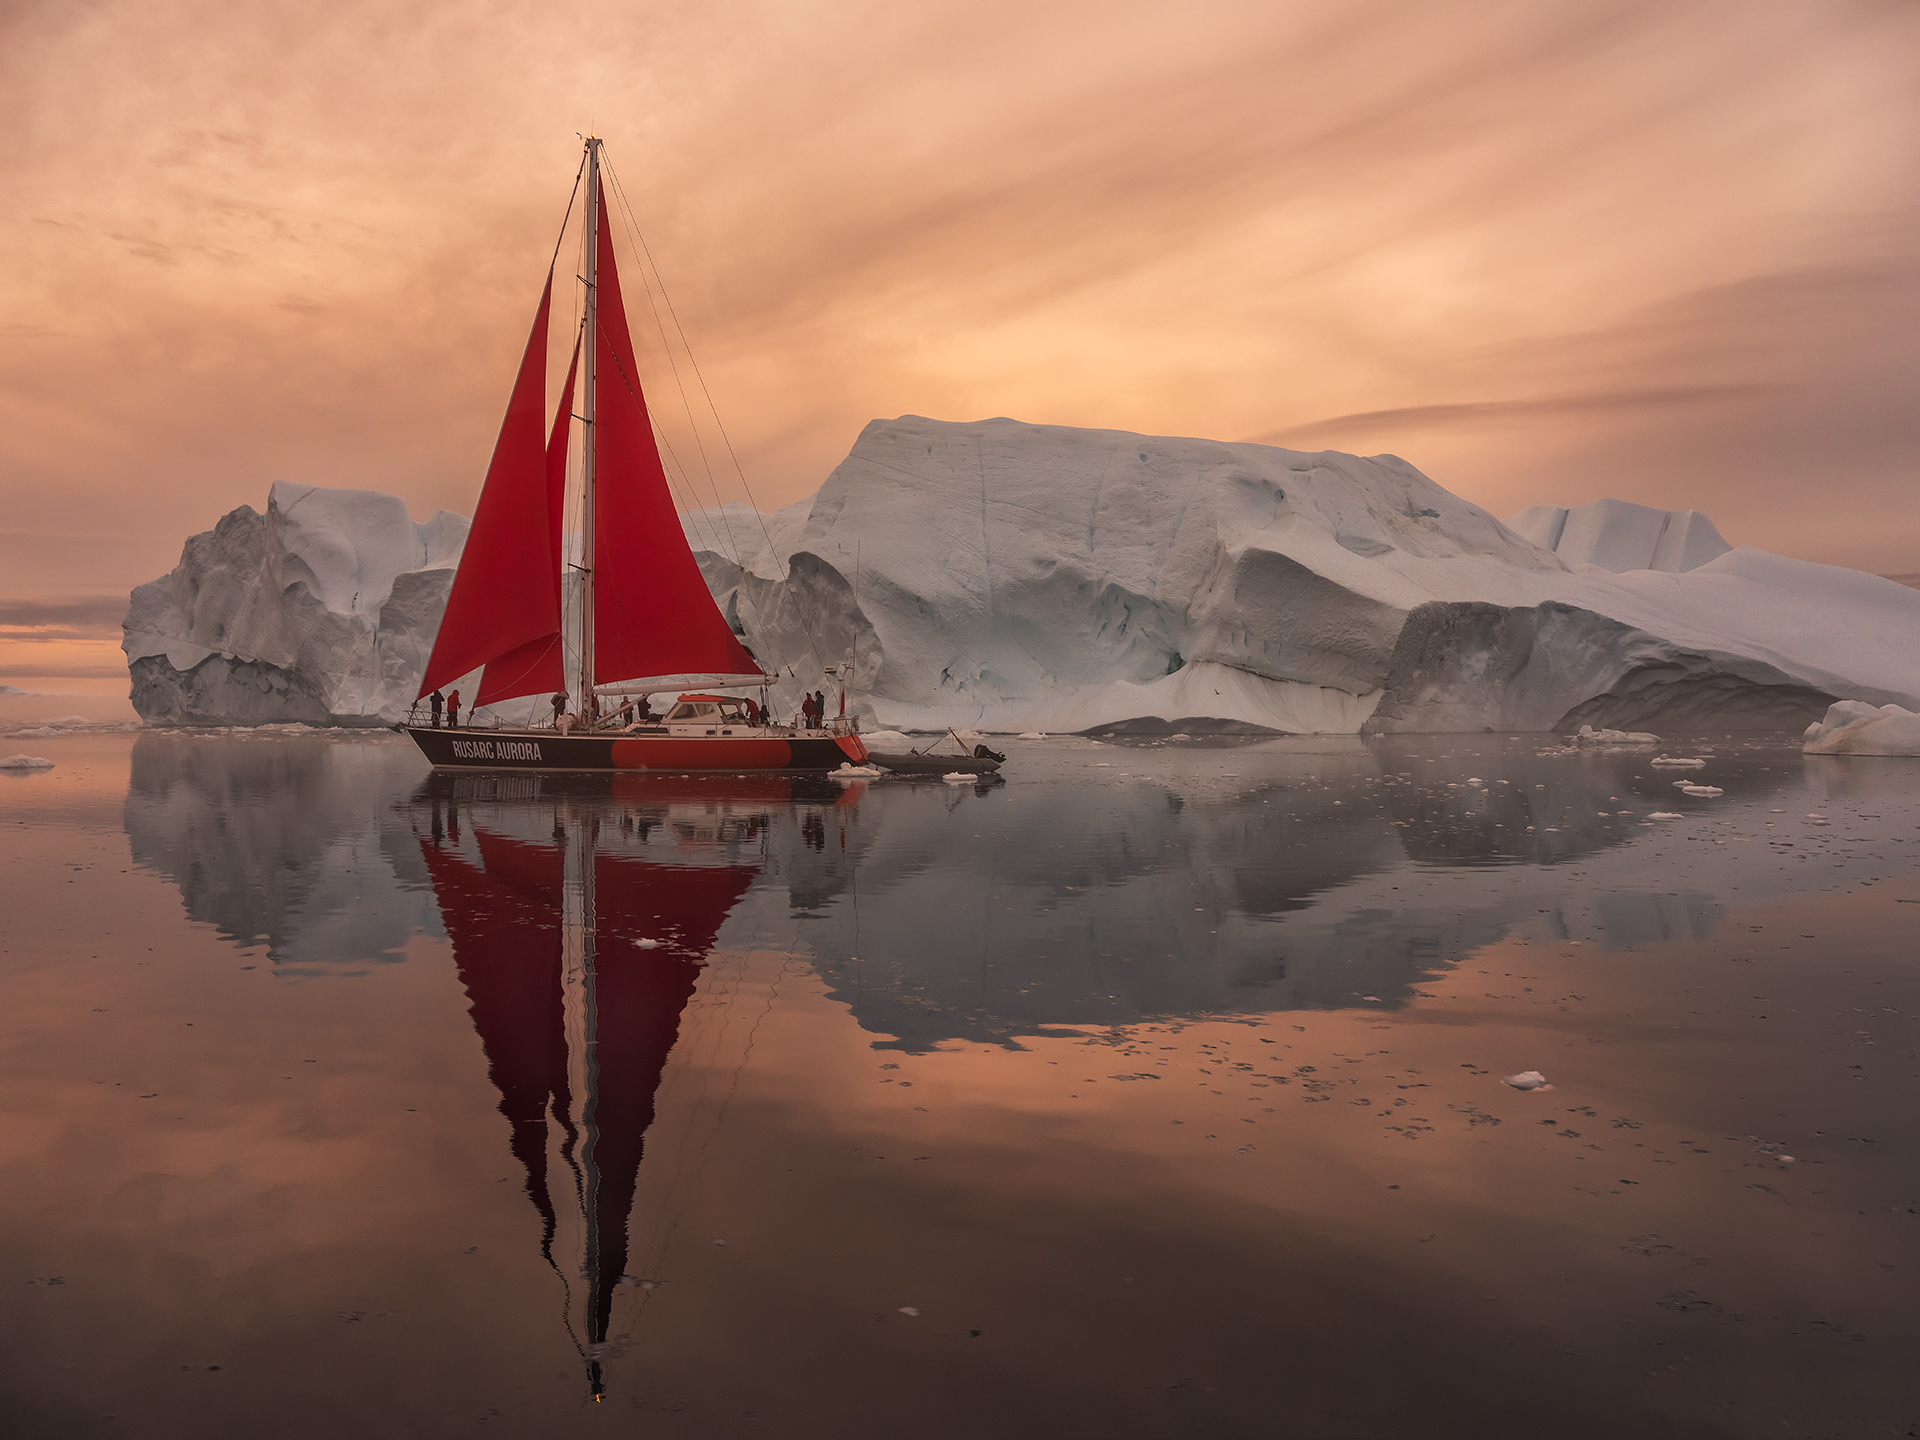 Image 17: Fujifilm GFX 50R, Fujifilm GF 32-64mm @32mm, ISO-500, f/8, 1/50s
Tips 6: Composition: Symmetry or Rule of Third?
Reflection is commonly seen in the calm water especially in the area closer to shore or sheltered by huge icebergs. When you see reflection of an interesting looking iceberg, symmetrical composition may be your first choice.
Symmetrical composition often works well with reflection for aesthetical reasons. By creating the equal visual weight on both upper and lower half of the image, symmetry create harmony atmosphere and render the sense of balance, stability and serenity (Image 18). It is impossible to smoothen the water with long exposure when shooting on the boat, or to encounter the perfectly calm ocean water. The wind and water current affects the reflection. Sometimes the pattern of ripples of one image looks better than the other, therefore capture more images and pick the best-looking pattern of ripples later on (Image 19).
The ripples can be chaotic looking especially in the open water, or unsheltered area, or in the windy day. In this case, rule of third is preferred, with one third for the water and two third for the sky (Image 20). With lesser distracting elements of ripples, the overall image become simpler and cleaner. Rule of third, in this case, creating the sense of “less is more”.
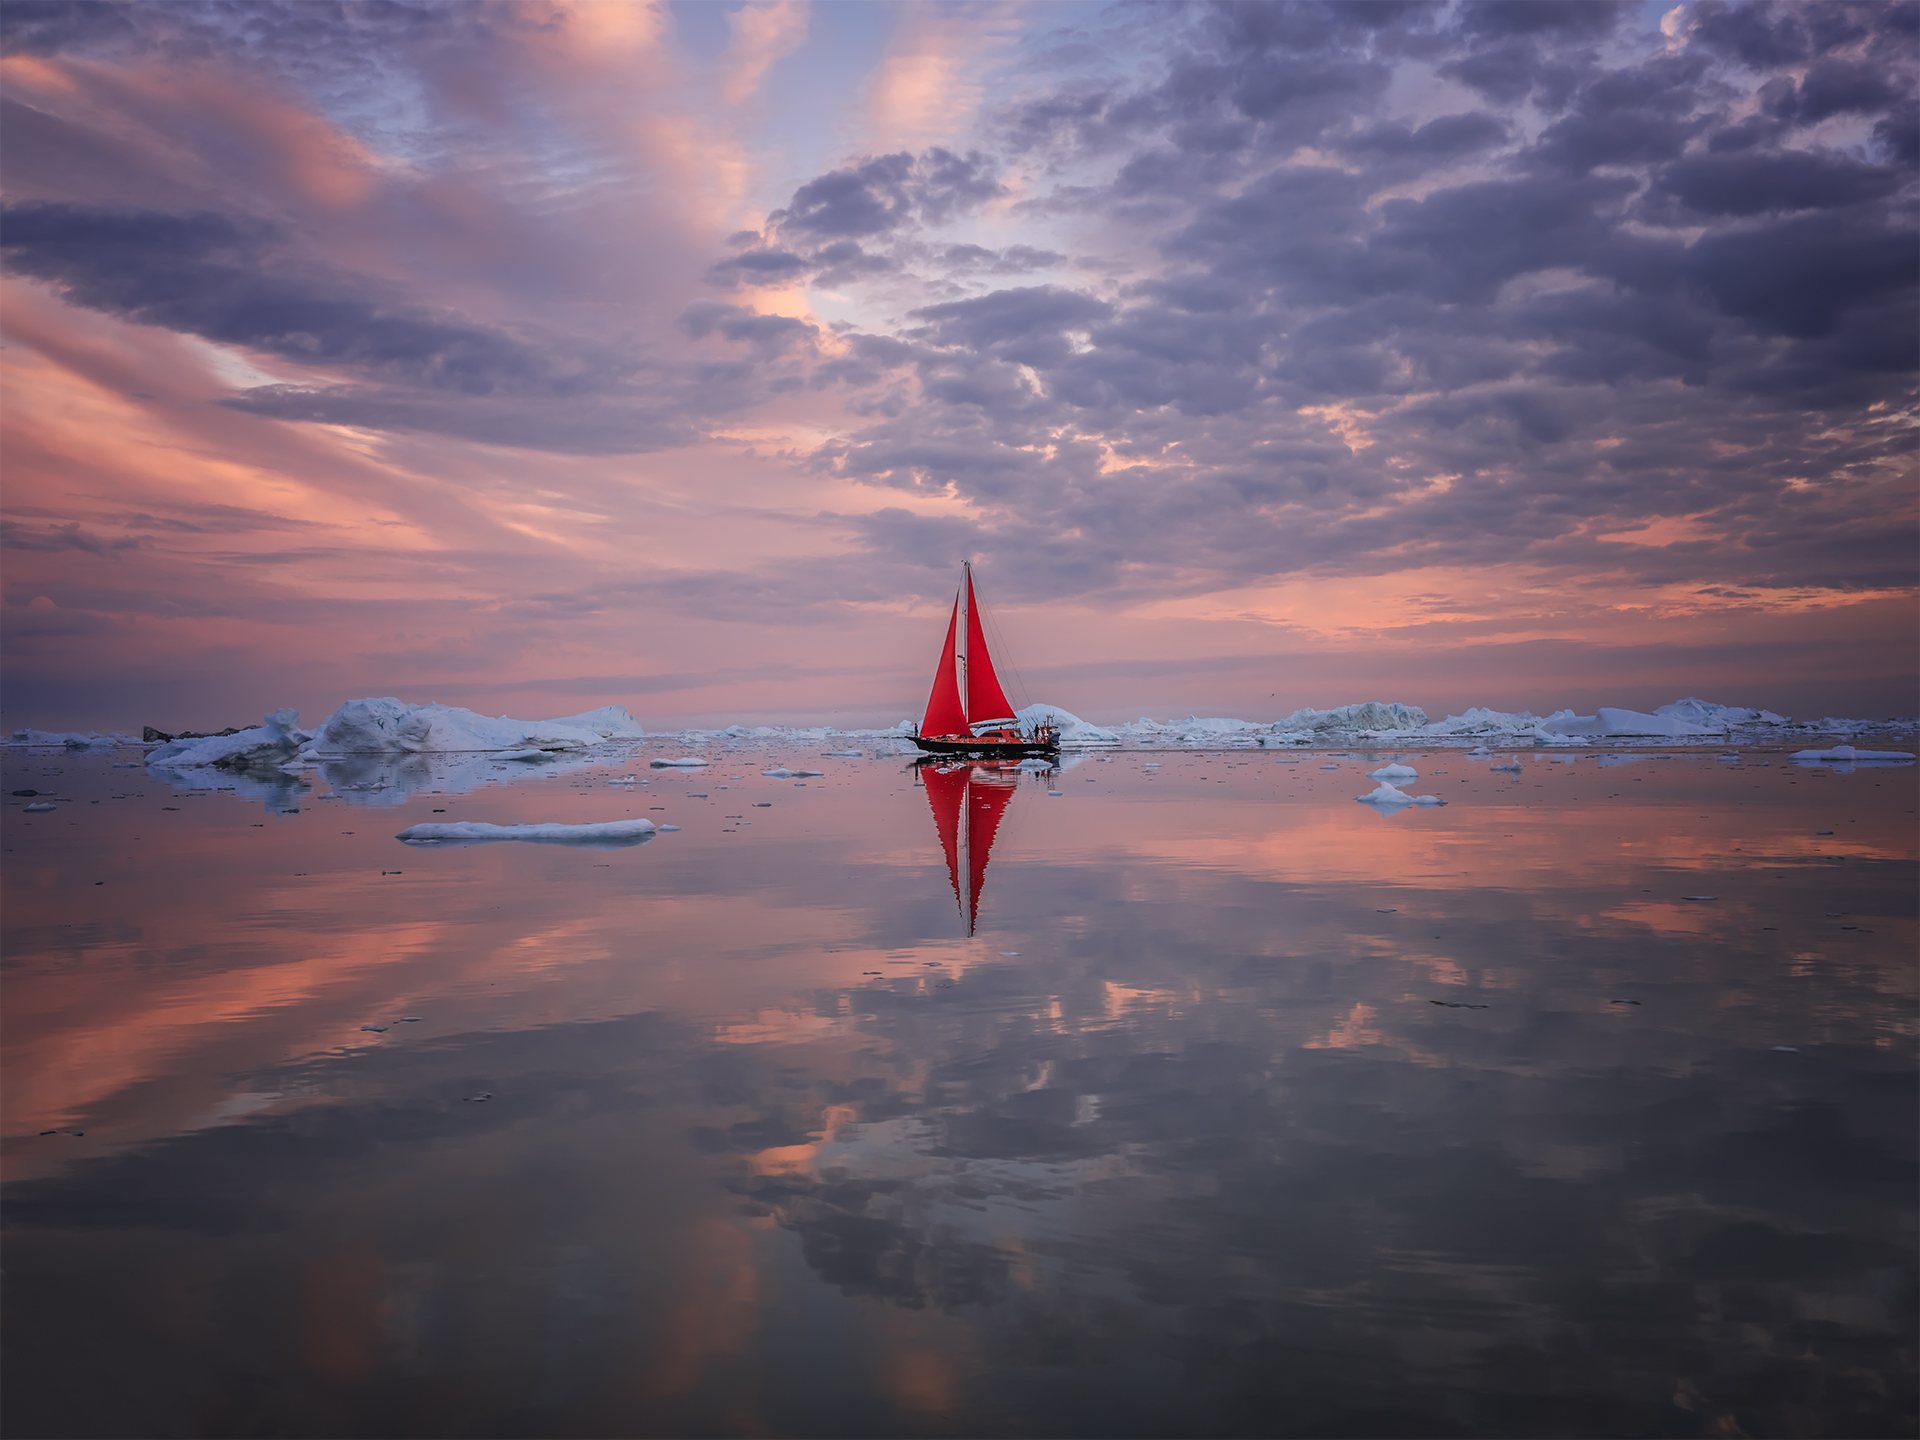 Image 18: Fujifilm GFX 50S, Fujifilm GF 32-64mm @41mm, ISO-250, f/11, 1/60s
 Image 19: Fujifilm GFX 50R, Fujifilm GF 32-64mm @64mm, ISO-320, f/9, 1/125s
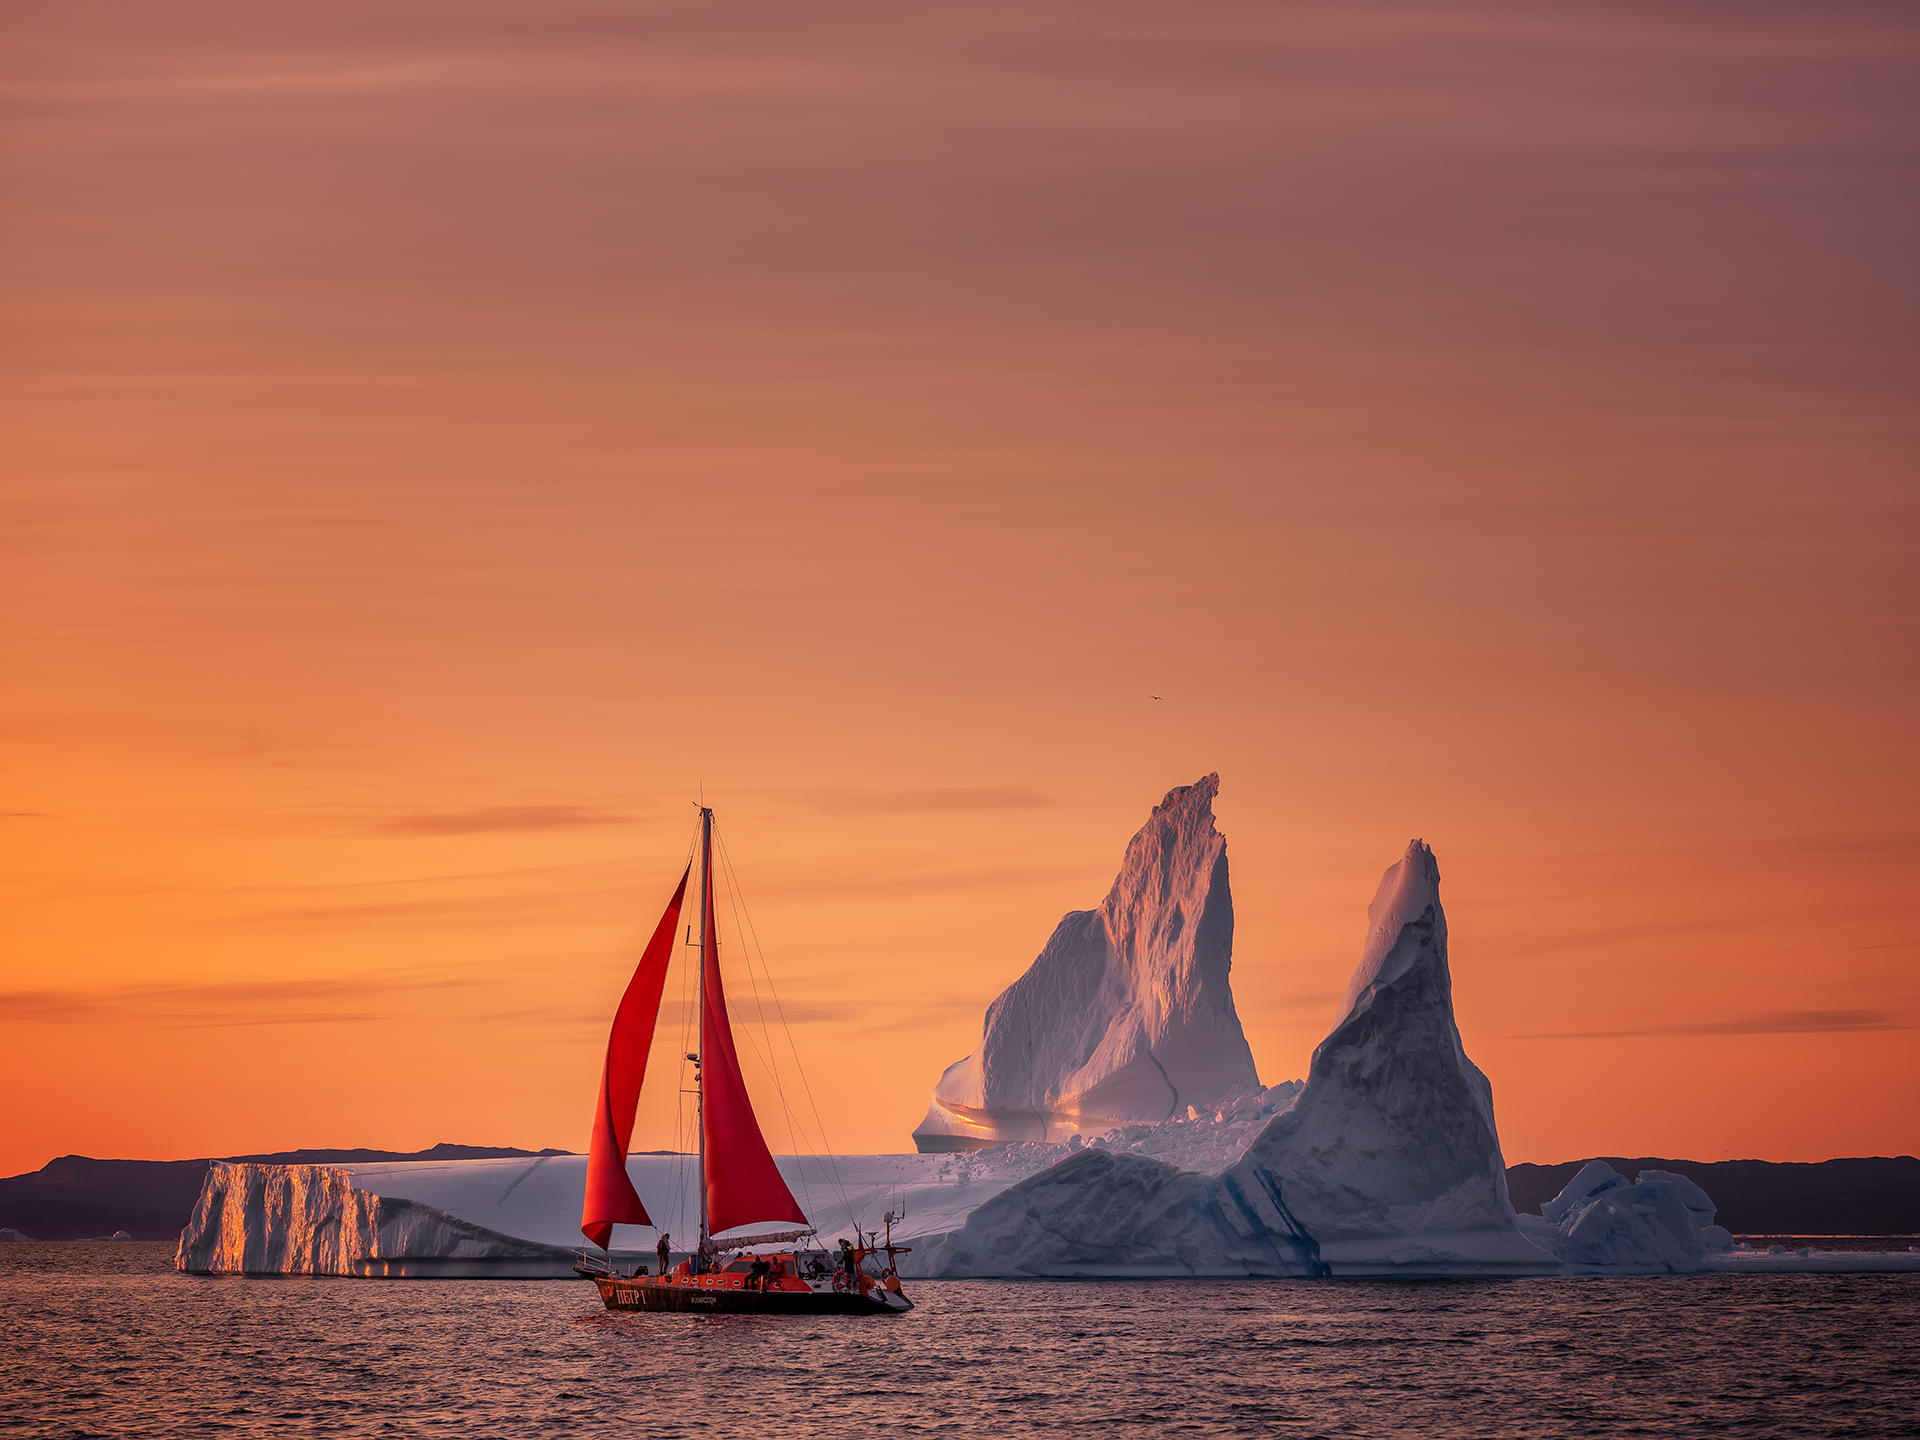 Image 20: Fujifilm GFX 50R, Fujifilm GF 100-200mm @113mm, ISO-320, f/8, 1/125s
Tips 7: Placement of Boat and Visual Balance
The red sail boat play multiple roles in our workshop other than creating sense of scale as previously mentioned. It has significant contributions to the overall visual effect and composition of the images. Most of the time, we are trying to create an image that is visually balance. Here’s a few ways to achieve it.
Psychologically, red is the color that most attracts attention and eye-catching, it is often associated with visibility and dynamism. Therefore, the red sail imposes significant visual weight in the image. By juxtaposing another object with same visual weight will create the balance to the images, it can be color, size, number of objects, and so on. In our case, by juxtaposing the red sail boat to the iceberg create visual balance to the image (Image 21). It is the strong color visual weight of red sail versus the size visual weight of iceberg.
You can also place the boat in the central of images, either in the center of giant iceberg (Image 22) or in between two icebergs (Image 23). These also create the visual balance to the images, as all the visual weight concentrated in the center of the image, just like center of gravity.
Alternatively, like in Image 24, you can place the boat to fill in the “gap” in between the three peaks of iceberg. The four peaks in the images, three iceberg and a red sail boat, together create the visual balance by spreading out the visual weight evenly in the image.
As previously mentioned, you can use the symmetrical composition to photograph reflection for creating the visual balance.
There are many ways to create visual balance, and these are just a few examples. Visual balance brings the sense of stability, tranquility and harmony, and these are the emotions we want to present to our audiences.
 Image 21: Fujifilm GFX 50R, Fujifilm GF 100-200mm @100mm, ISO-320, f/11, 1/60s
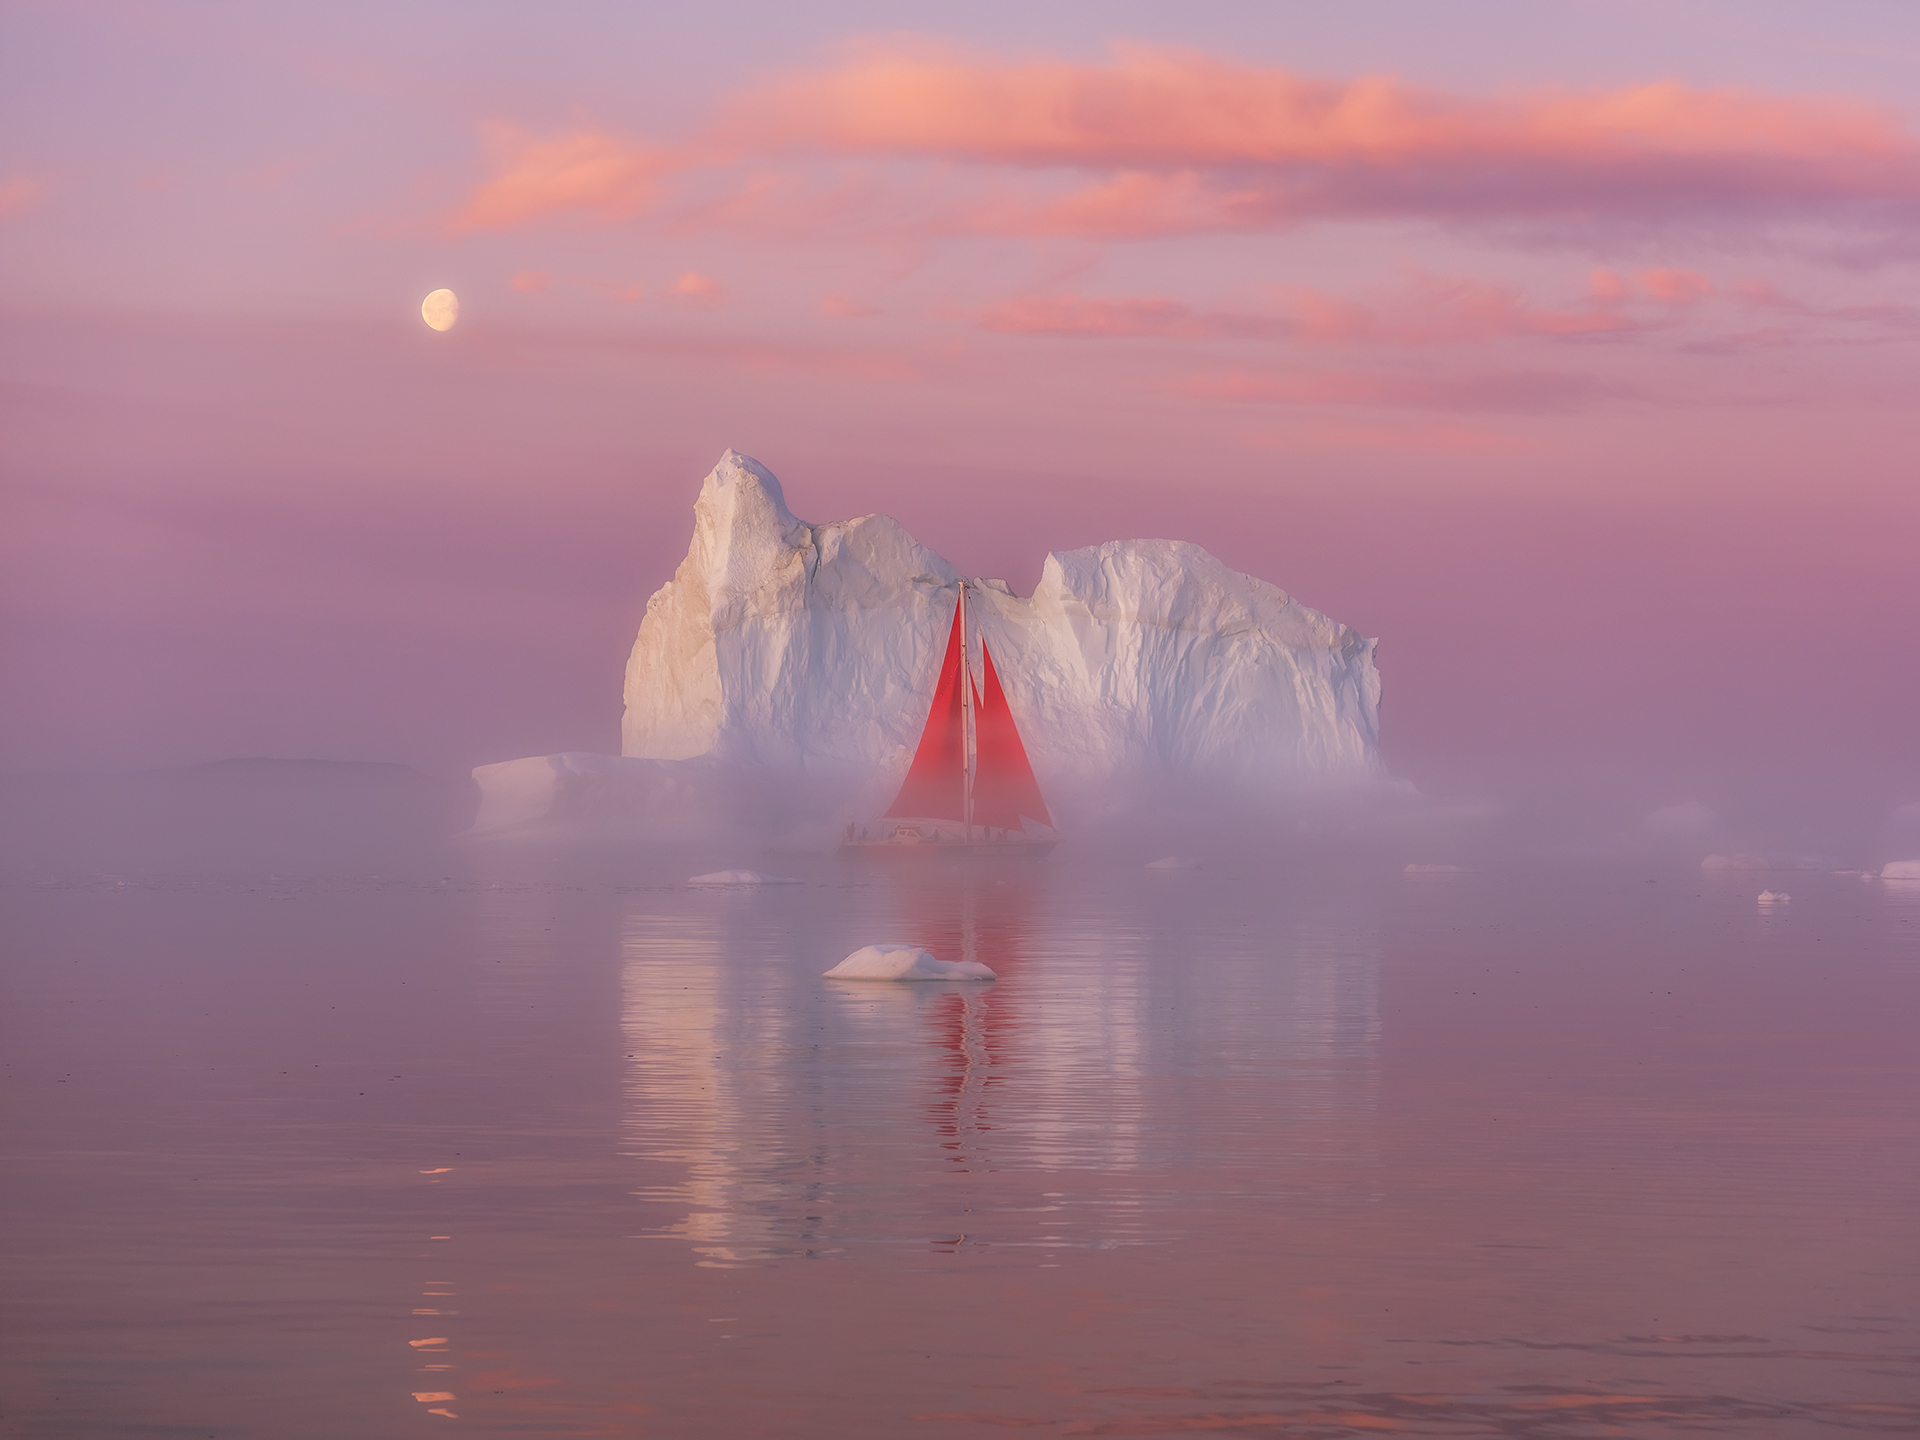 Image 21: Fujifilm GFX 50R, Fujifilm GF 100-200mm @100mm, ISO-320, f/11, 1/60s
 Image 23: Fujifilm GFX 50S, Fujifilm 32-64mm @46mm, ISO-500, f/10, 1/80s
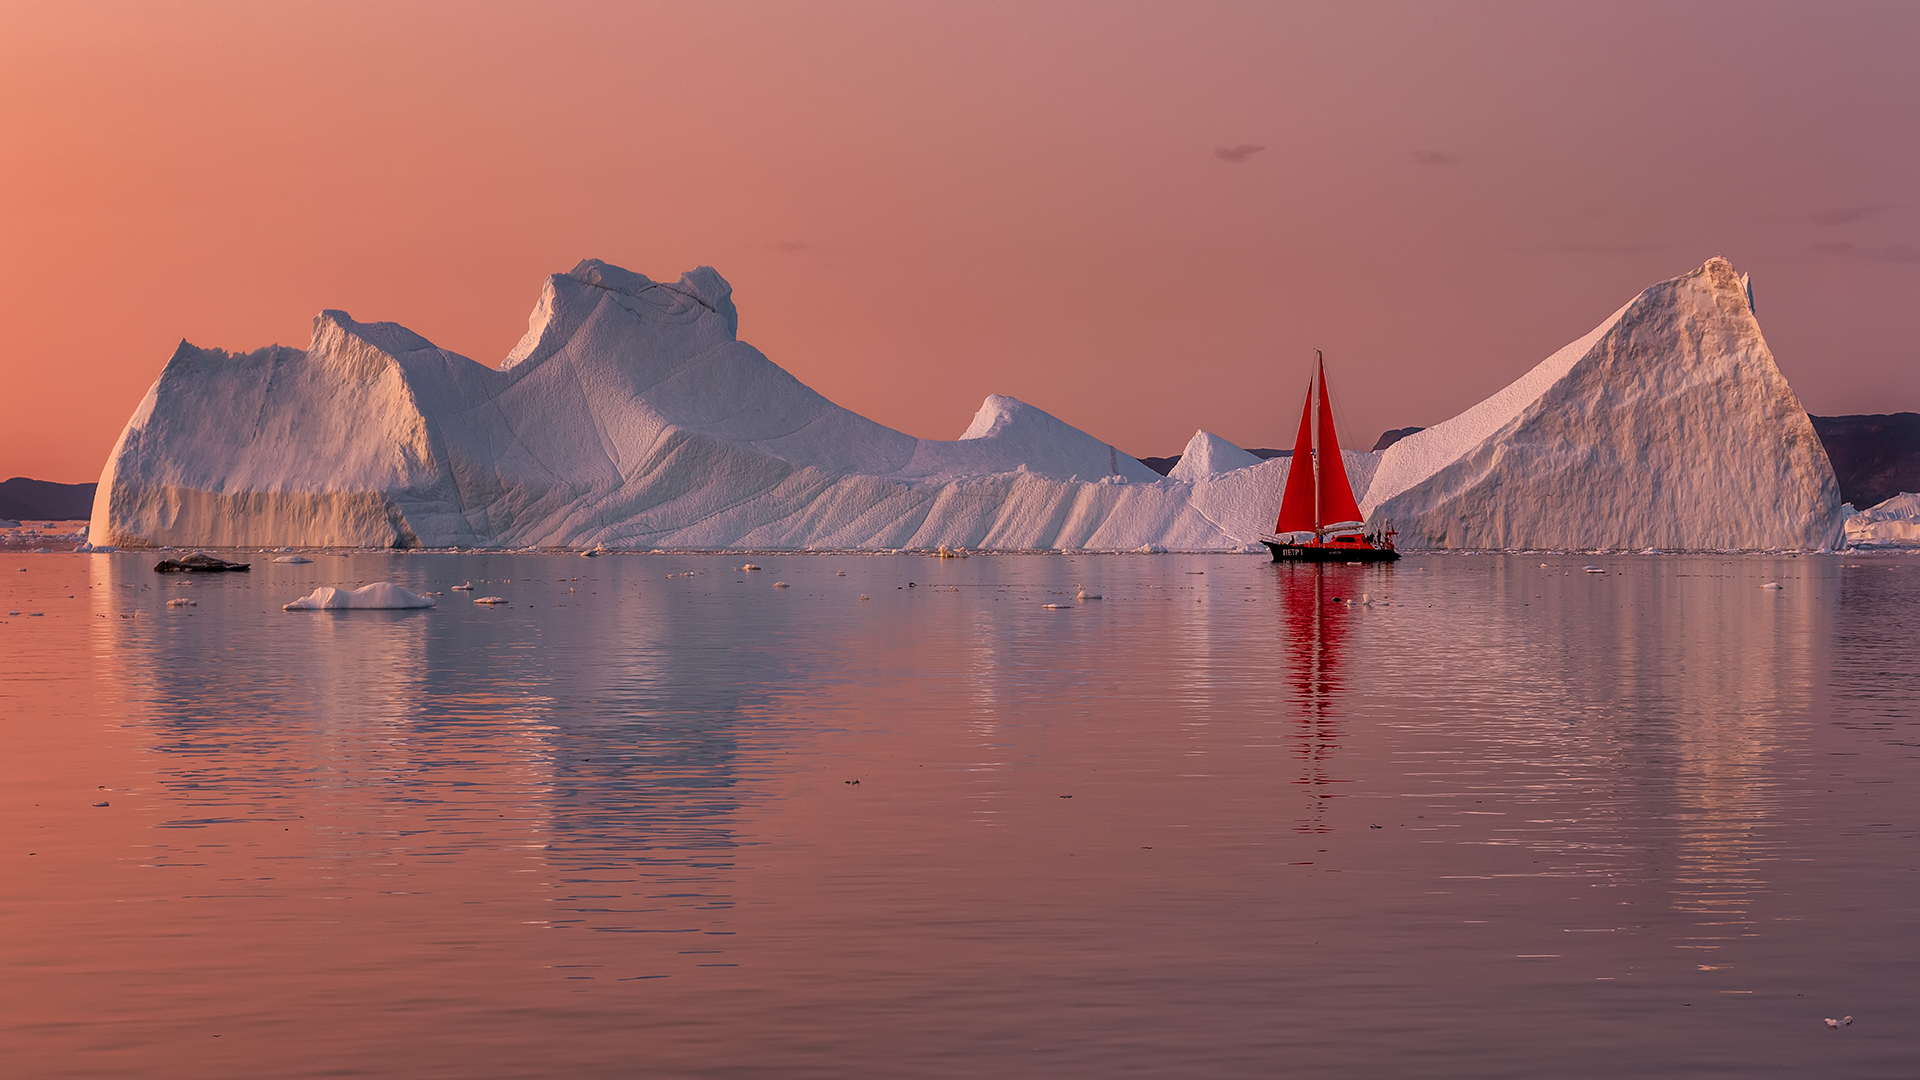 Image 24: Fujifilm GFX 50R, Fujifilm GF 32-64mm @64mm, ISO-250, f/8, 1/100s
Tips 8: Capture the Visual Character of Icebergs
Every iceberg is uniquely crafted by the power of nature, such as temperature, wind and water, therefore you can’t find two identical icebergs. Every iceberg imposes different visual character. Cruising in Disko Bay is like visiting a huge sculpture garden created by the mother nature. On one side, you see a huge ice castle (Image 25), but on the other side, you see a ice monster with big horn (Image 26), it is the playground of imagination.
Even for the same iceberg, it never looks the same from different angle. Therefore, photographing the same icebergs from different angle results in different outline of icebergs, different sky and background, as well as the lights. Sometimes, one angle looks better than the other because of cleaner background or different lights. For example, Image 27 and 28 are the same iceberg, the outline of iceberg in Image 27 looks nicer to my opinion, but the magical back-side light during golden hour in Image 28 make it a more favorable angle to photograph.
One of the most fascinating encounters is the arch. It is uncommon to see a giant arch because it took a long and meticulous process to carve the arch structure by mother nature, and the structure is relatively delicate and unstable. The arch can be small or giant, and they render additional possibility of composition. You may position the boat in a way of visual balance as previously described (Image 29). You may also position the boat inside the arch to achieve the “frame within the frame” composition (Image 30 and 31), which is the unique composition possibility for giant arch structure. Using “frame within the frame” composition can draw viewer’s attention to the subject effectively, at the same time creating the depth to an otherwise flat and dull image.
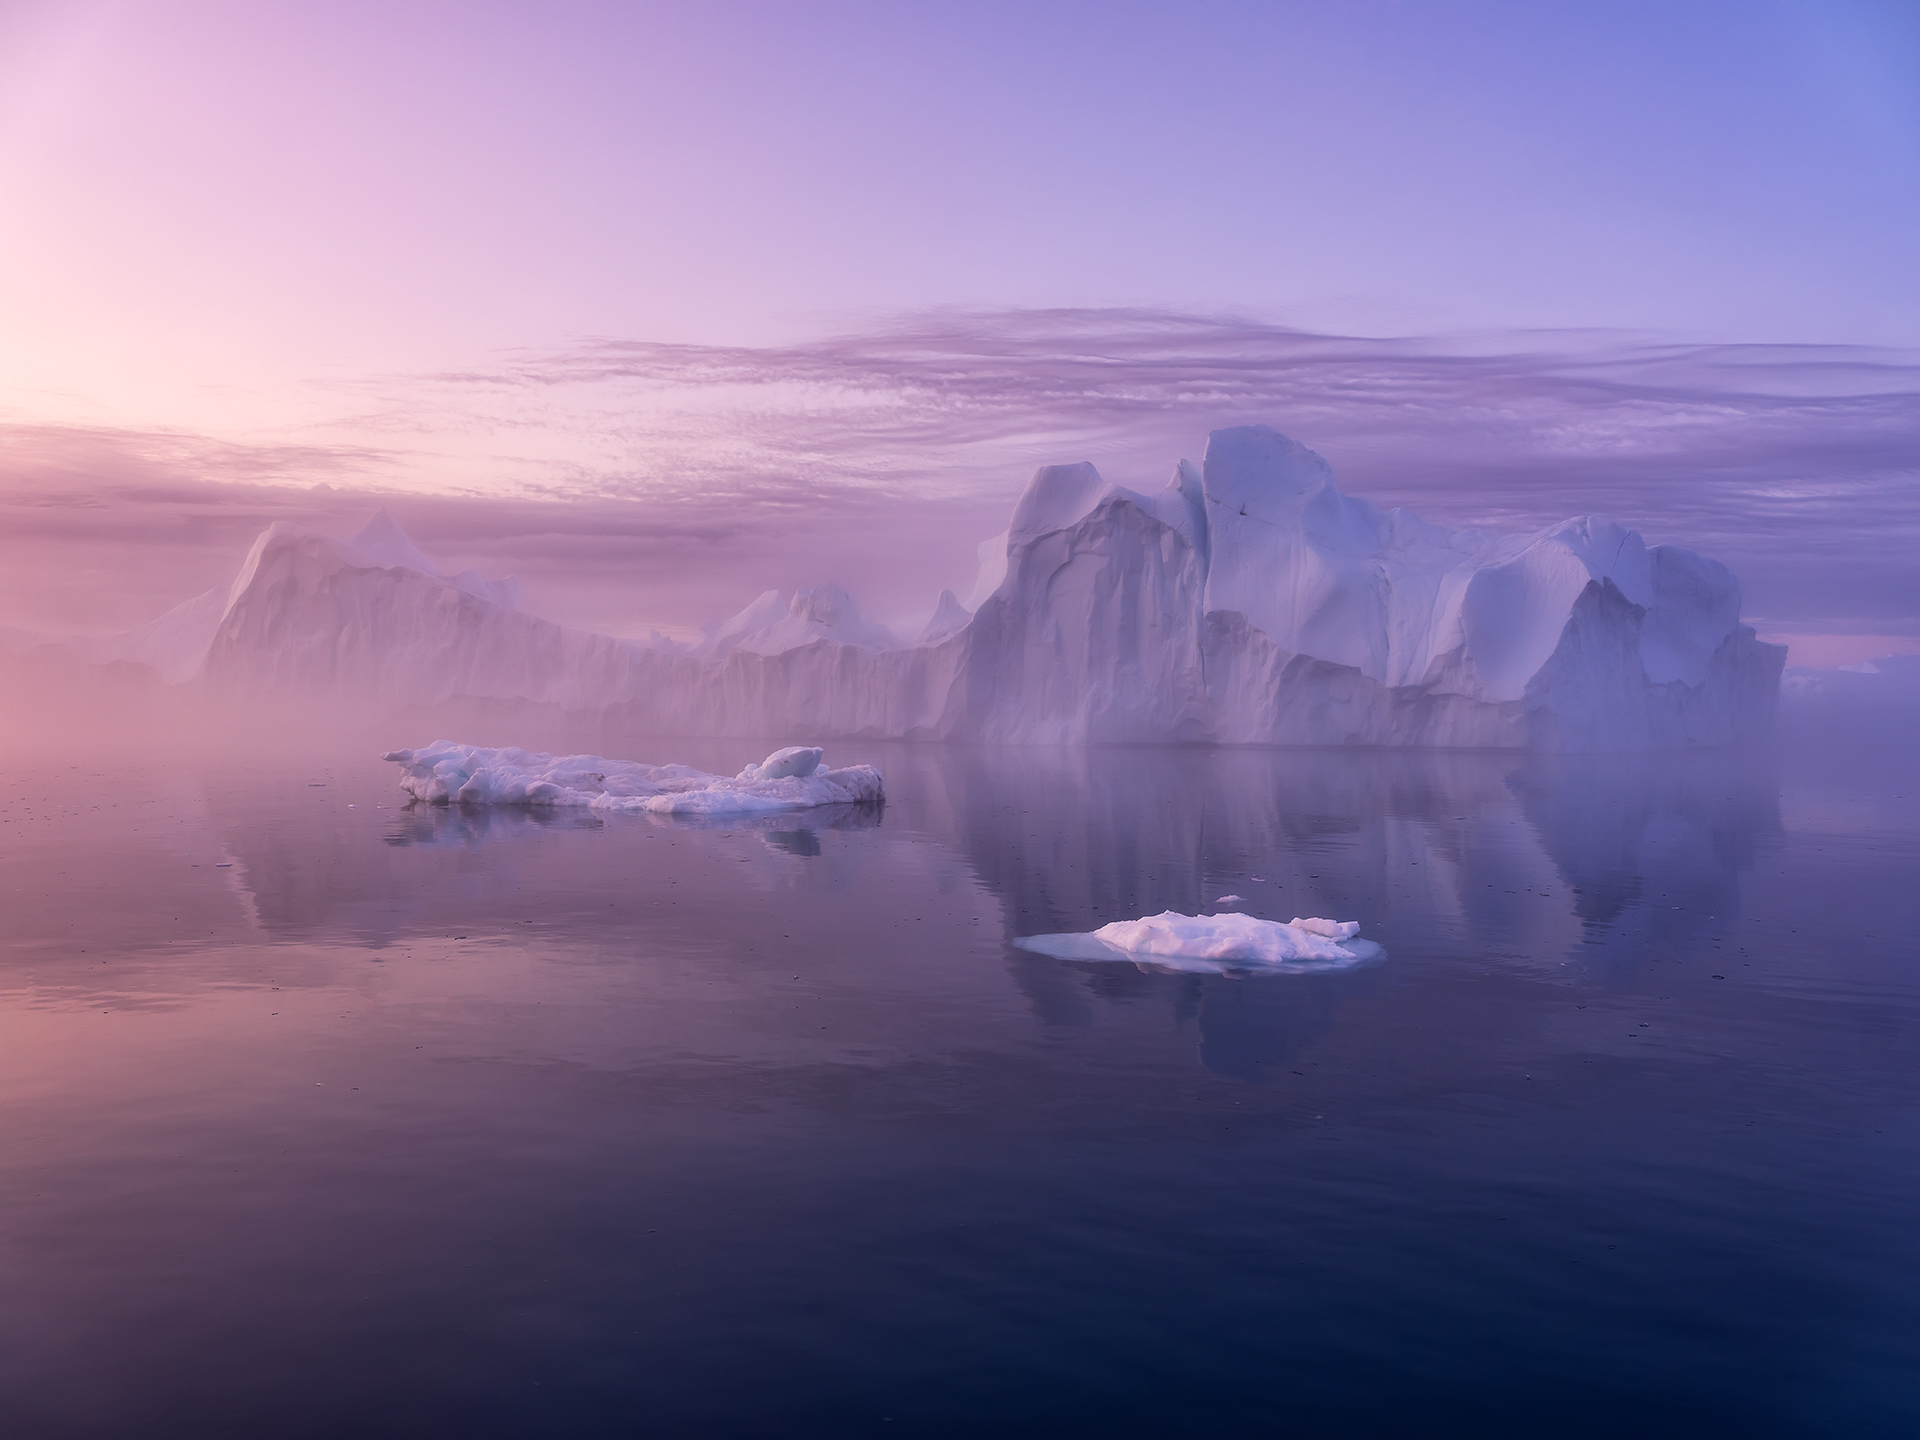 Image 25: Fujifilm GFX 50R, Fujifilm GF 32-64mm @32mm, ISO-250, f/9, 1/50s
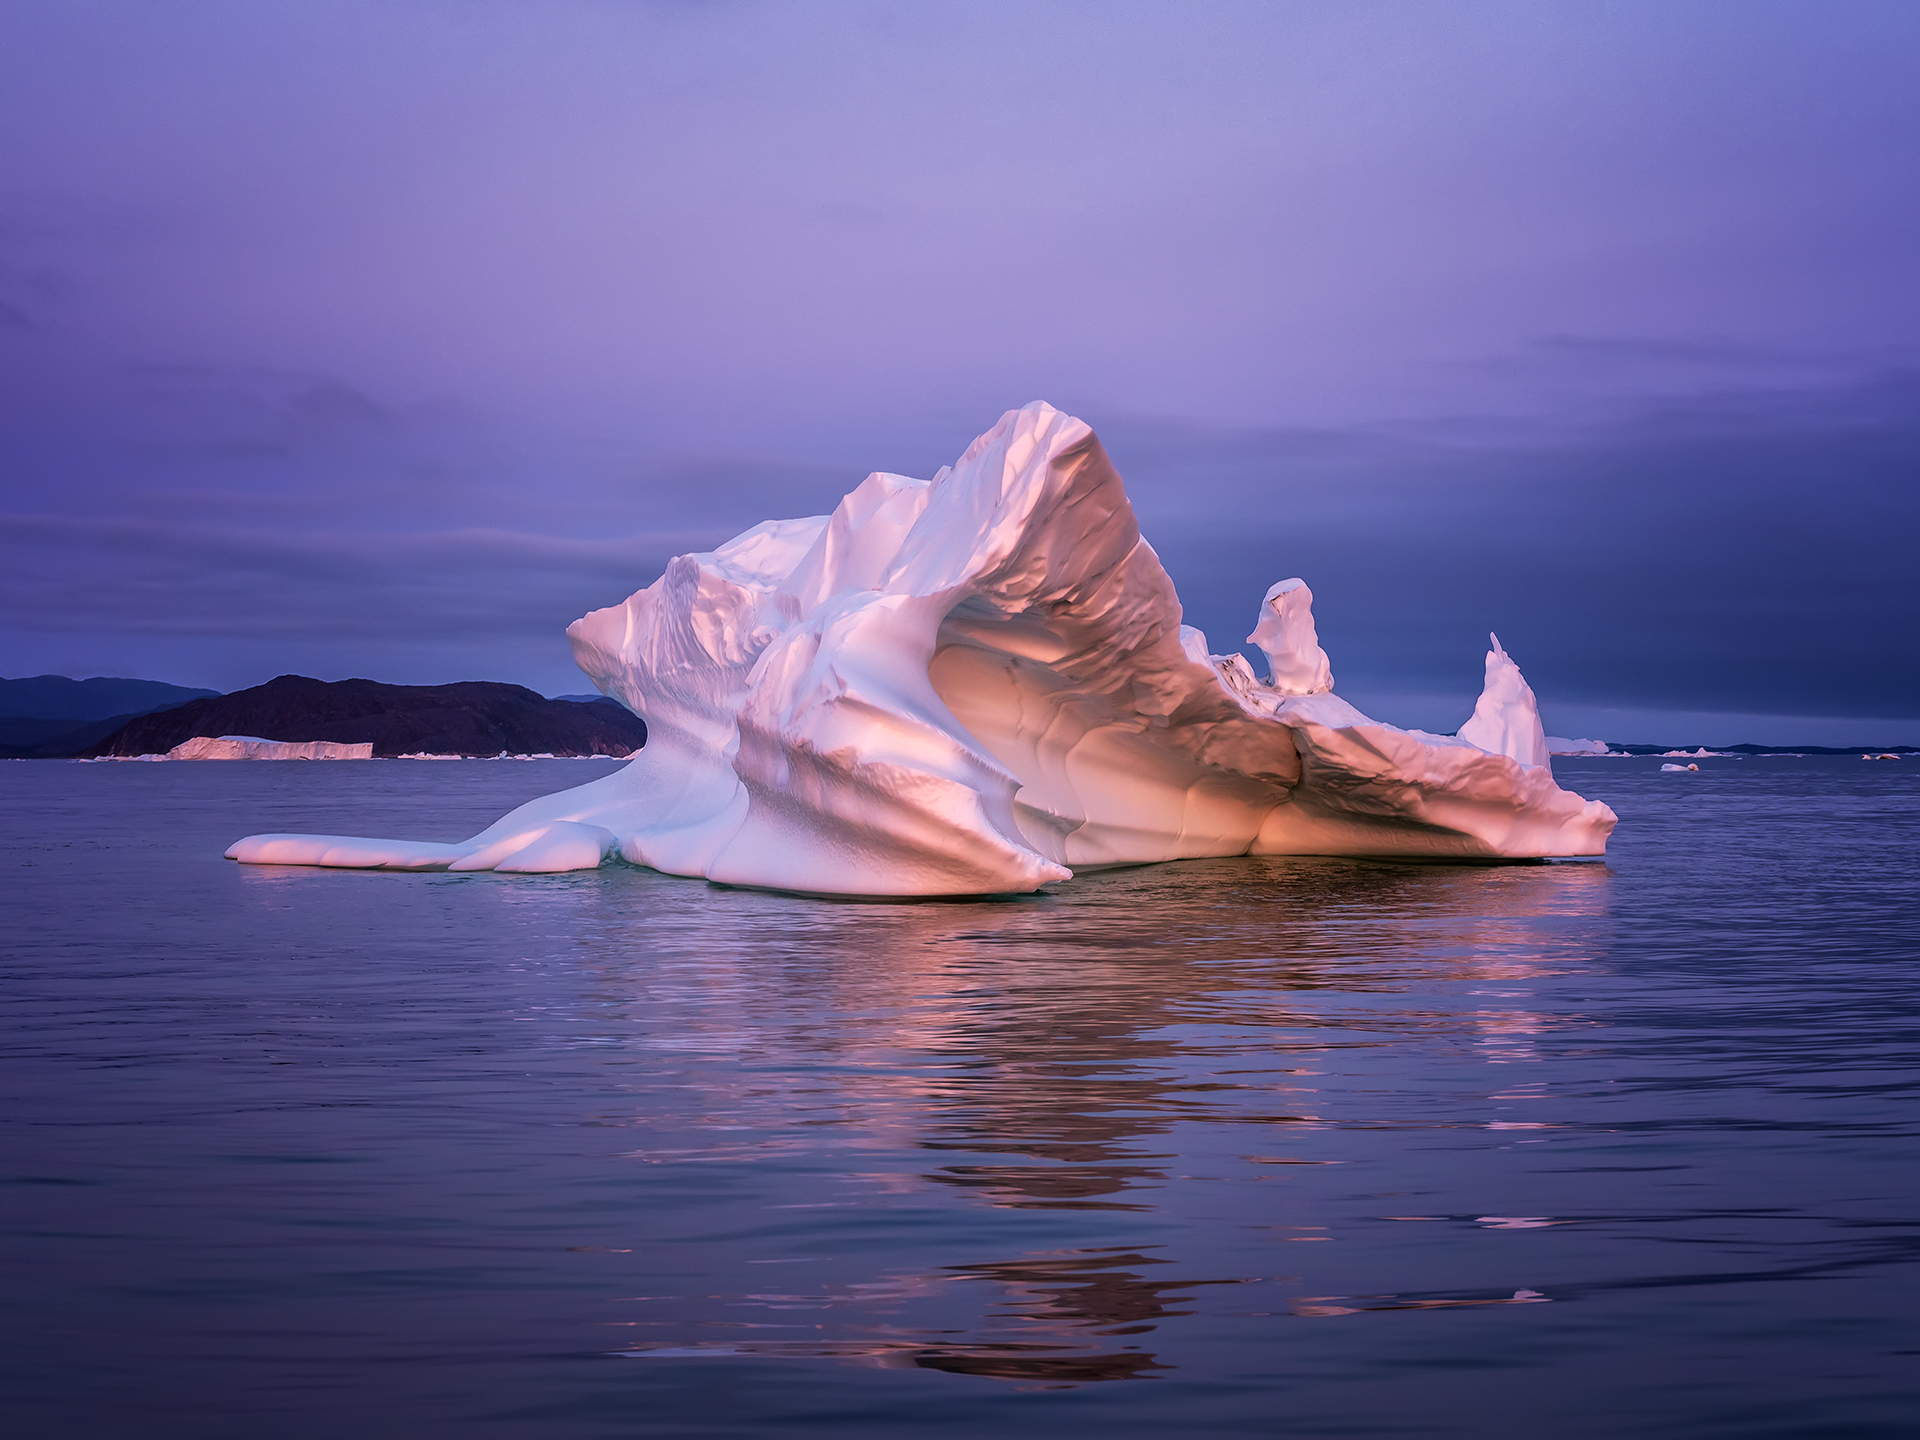 Image 25: Fujifilm GFX 50R, Fujifilm GF 32-64mm @32mm, ISO-250, f/9, 1/50s
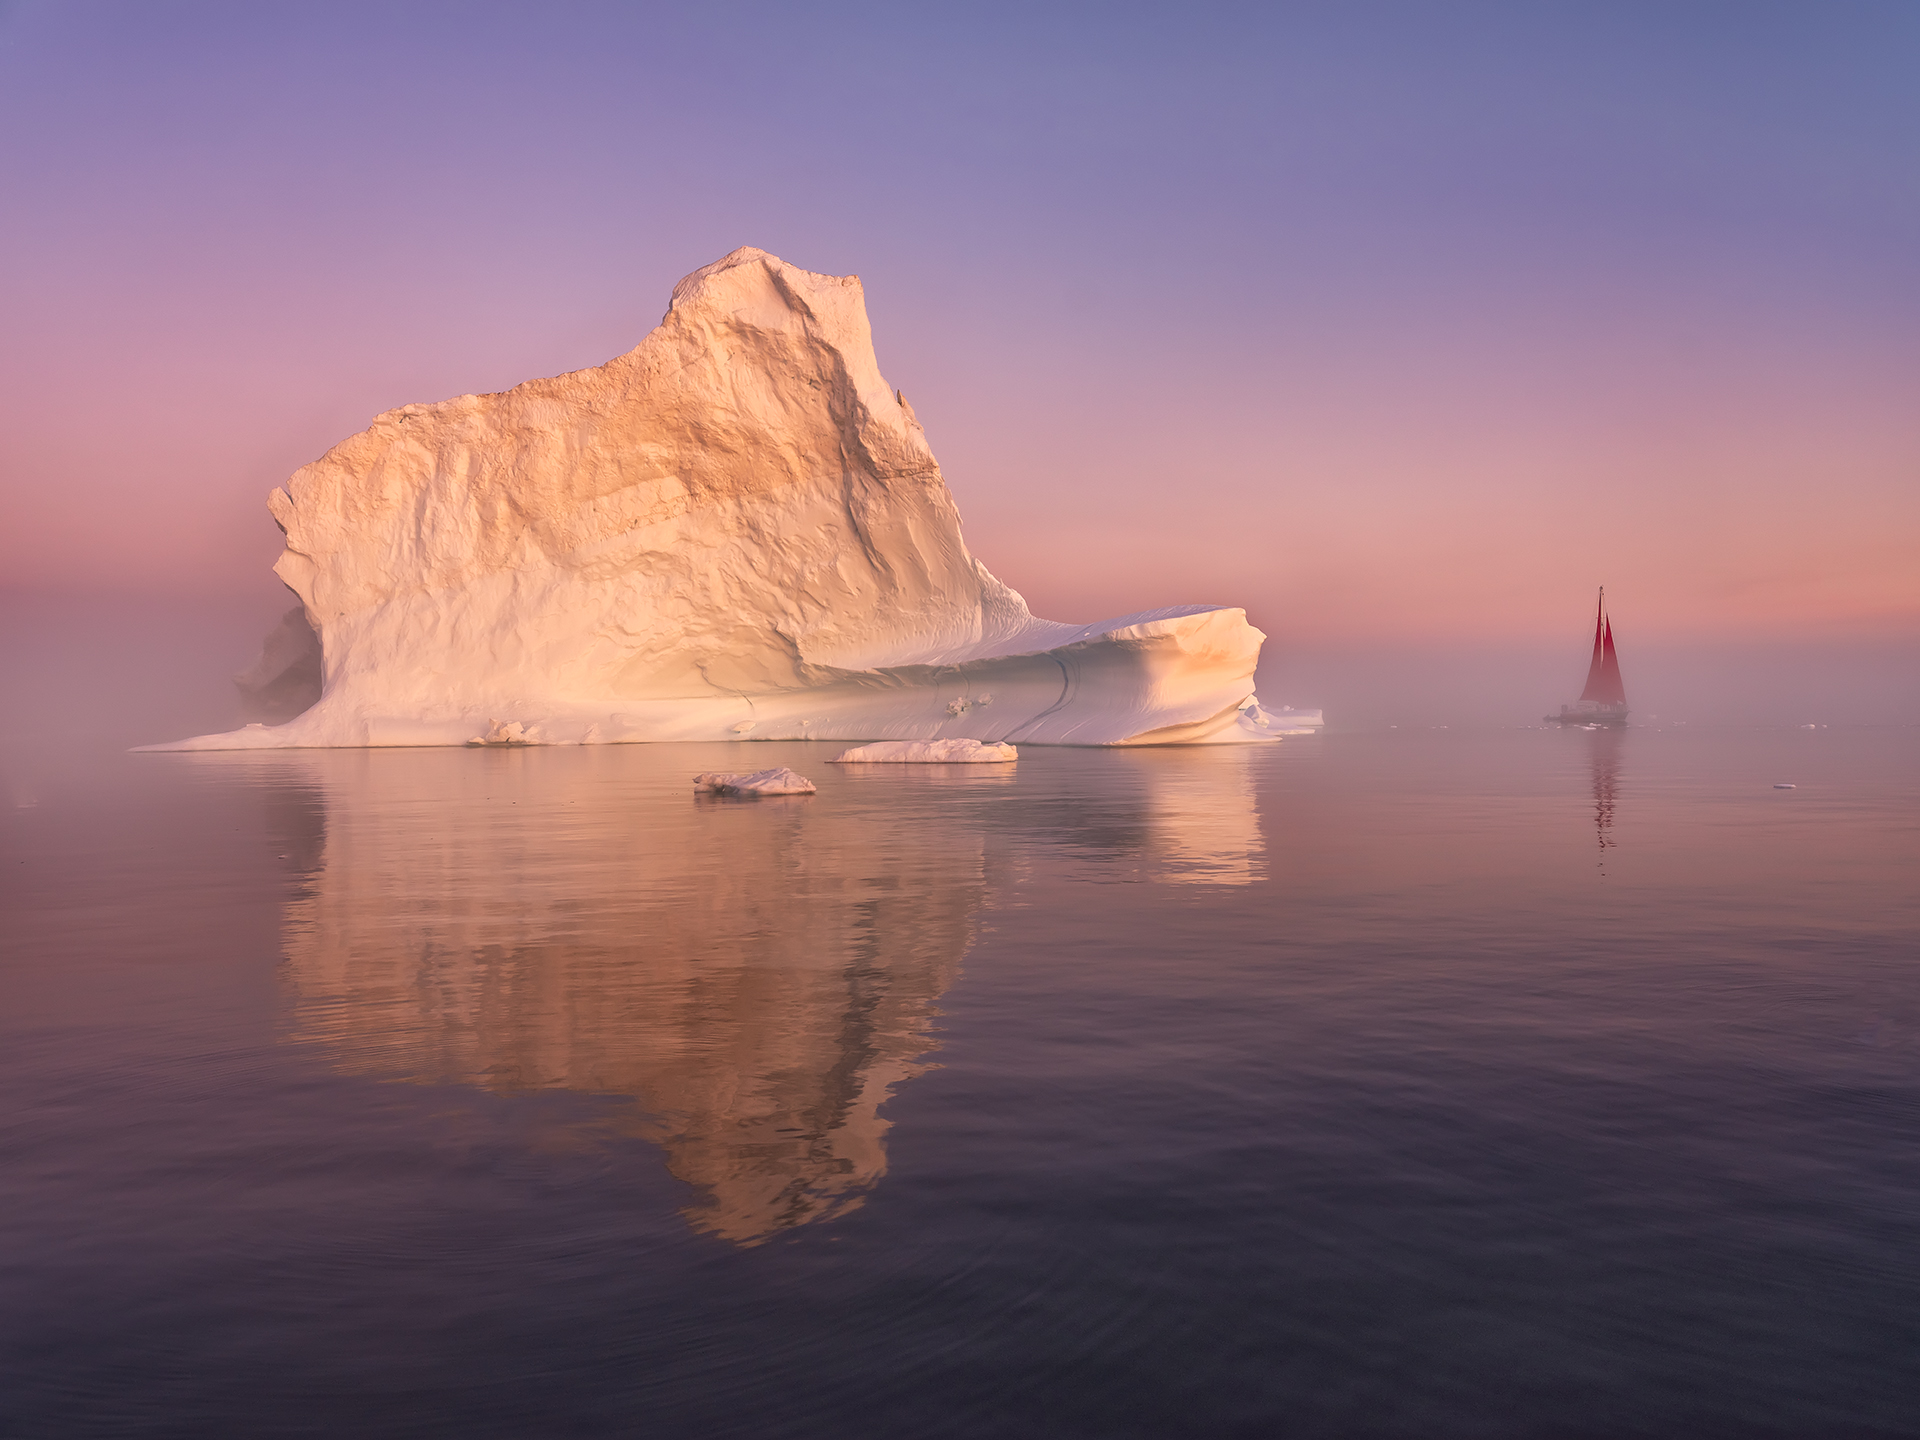 Image 27: Fujifilm GFX 50R, Fujifilm GF 32-64mm @32mm, ISO-320, f/11, 1/50s
 Image 28: Fujifilm GFX 50R, Fujifilm GF 32-64mm @43mm, ISO-320, f/11, 1/60s
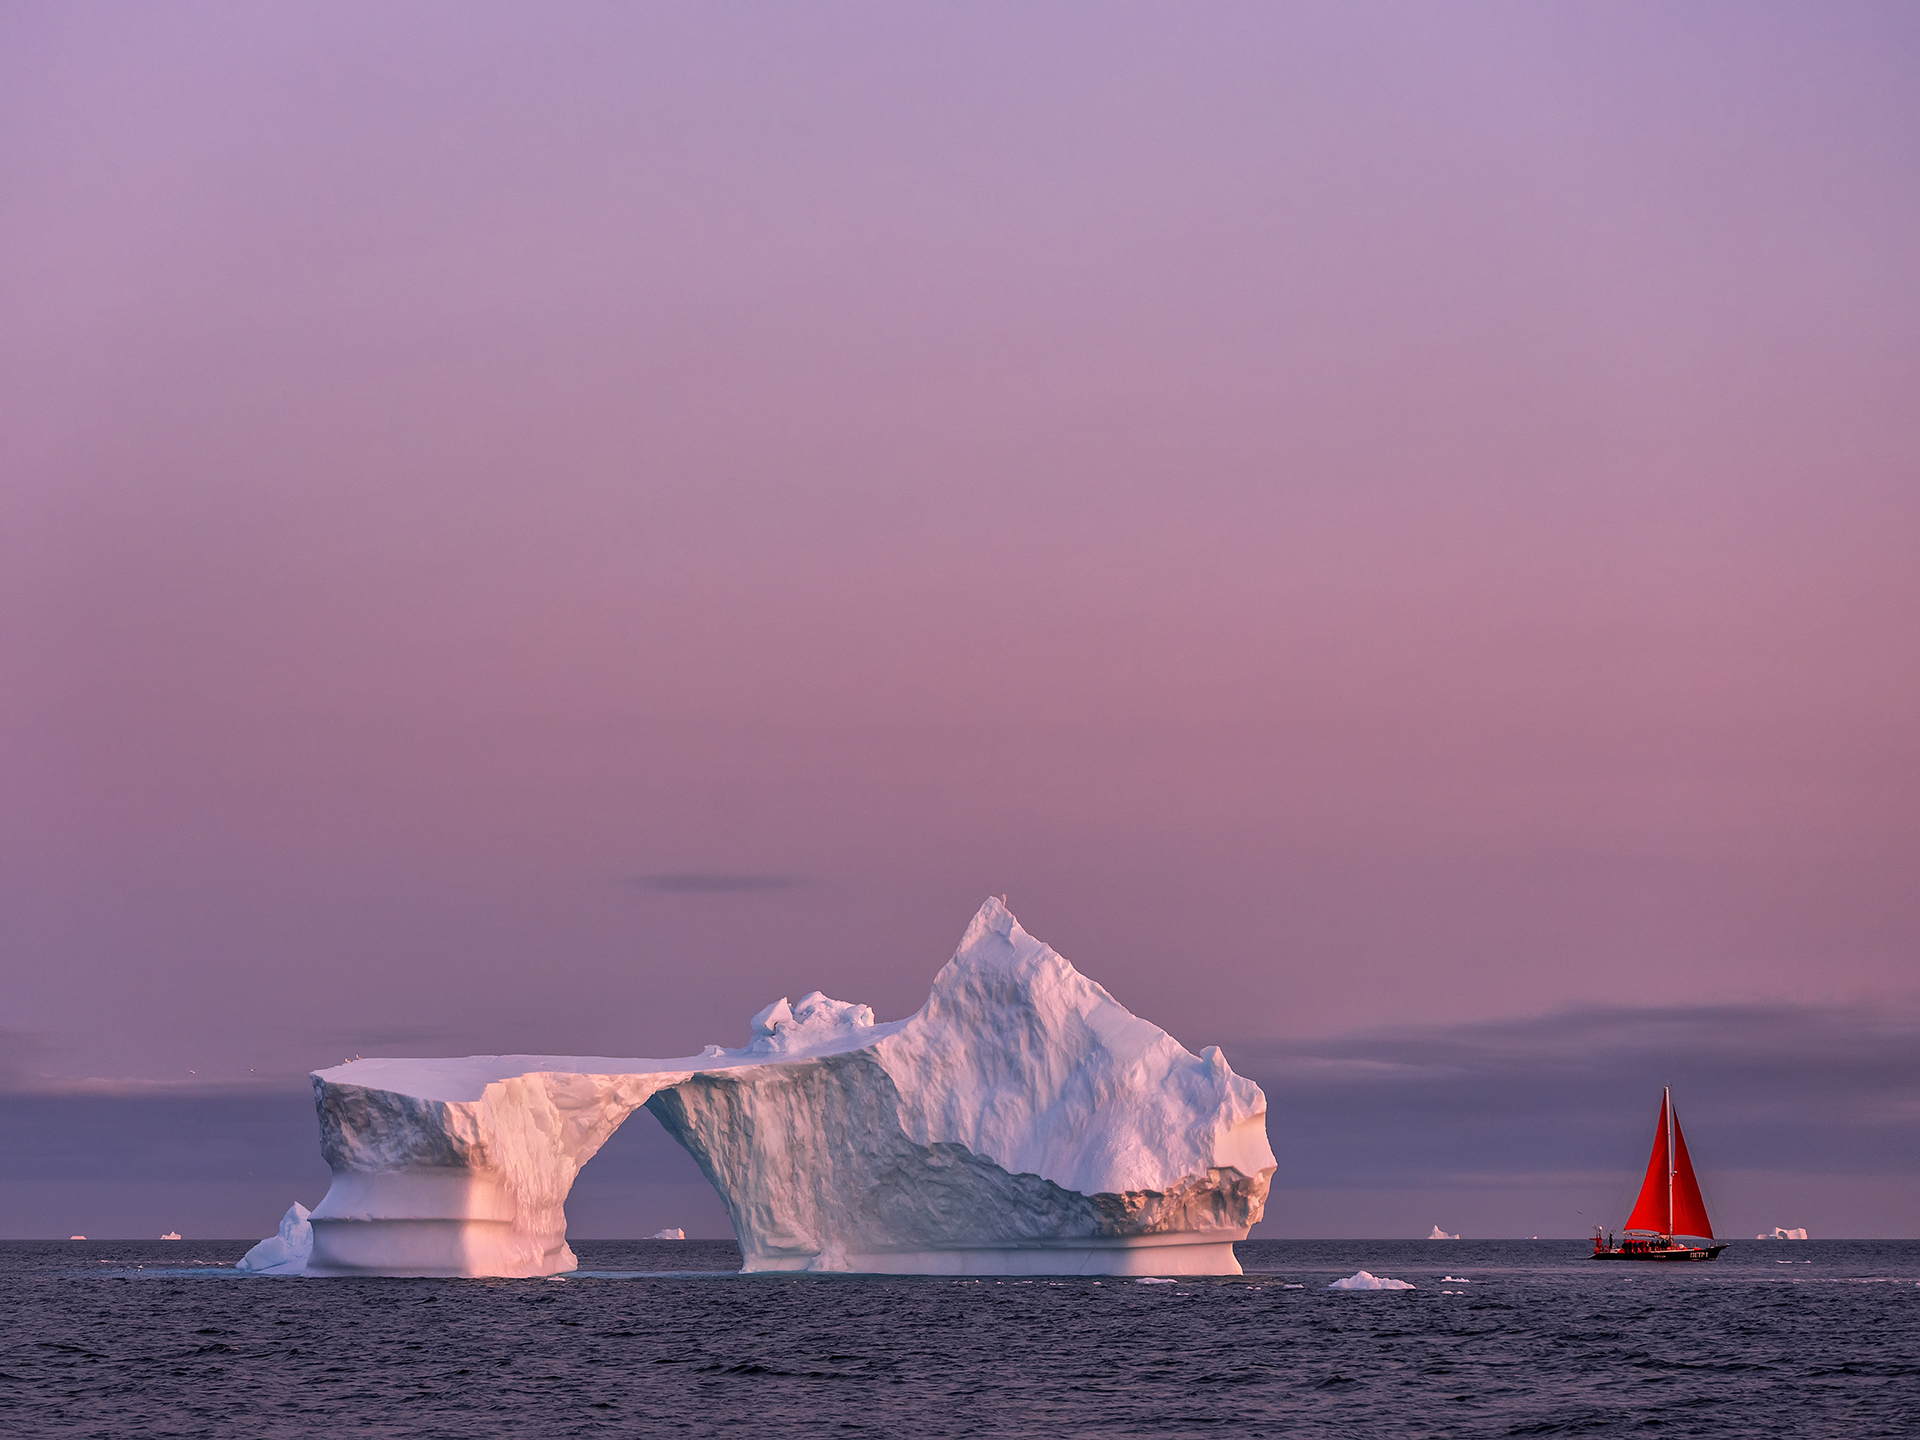 Image 29: Fujifilm GFX 50R, Fujifilm GF 100-200mm @100mm, ISO-500, f/8, 1/80s
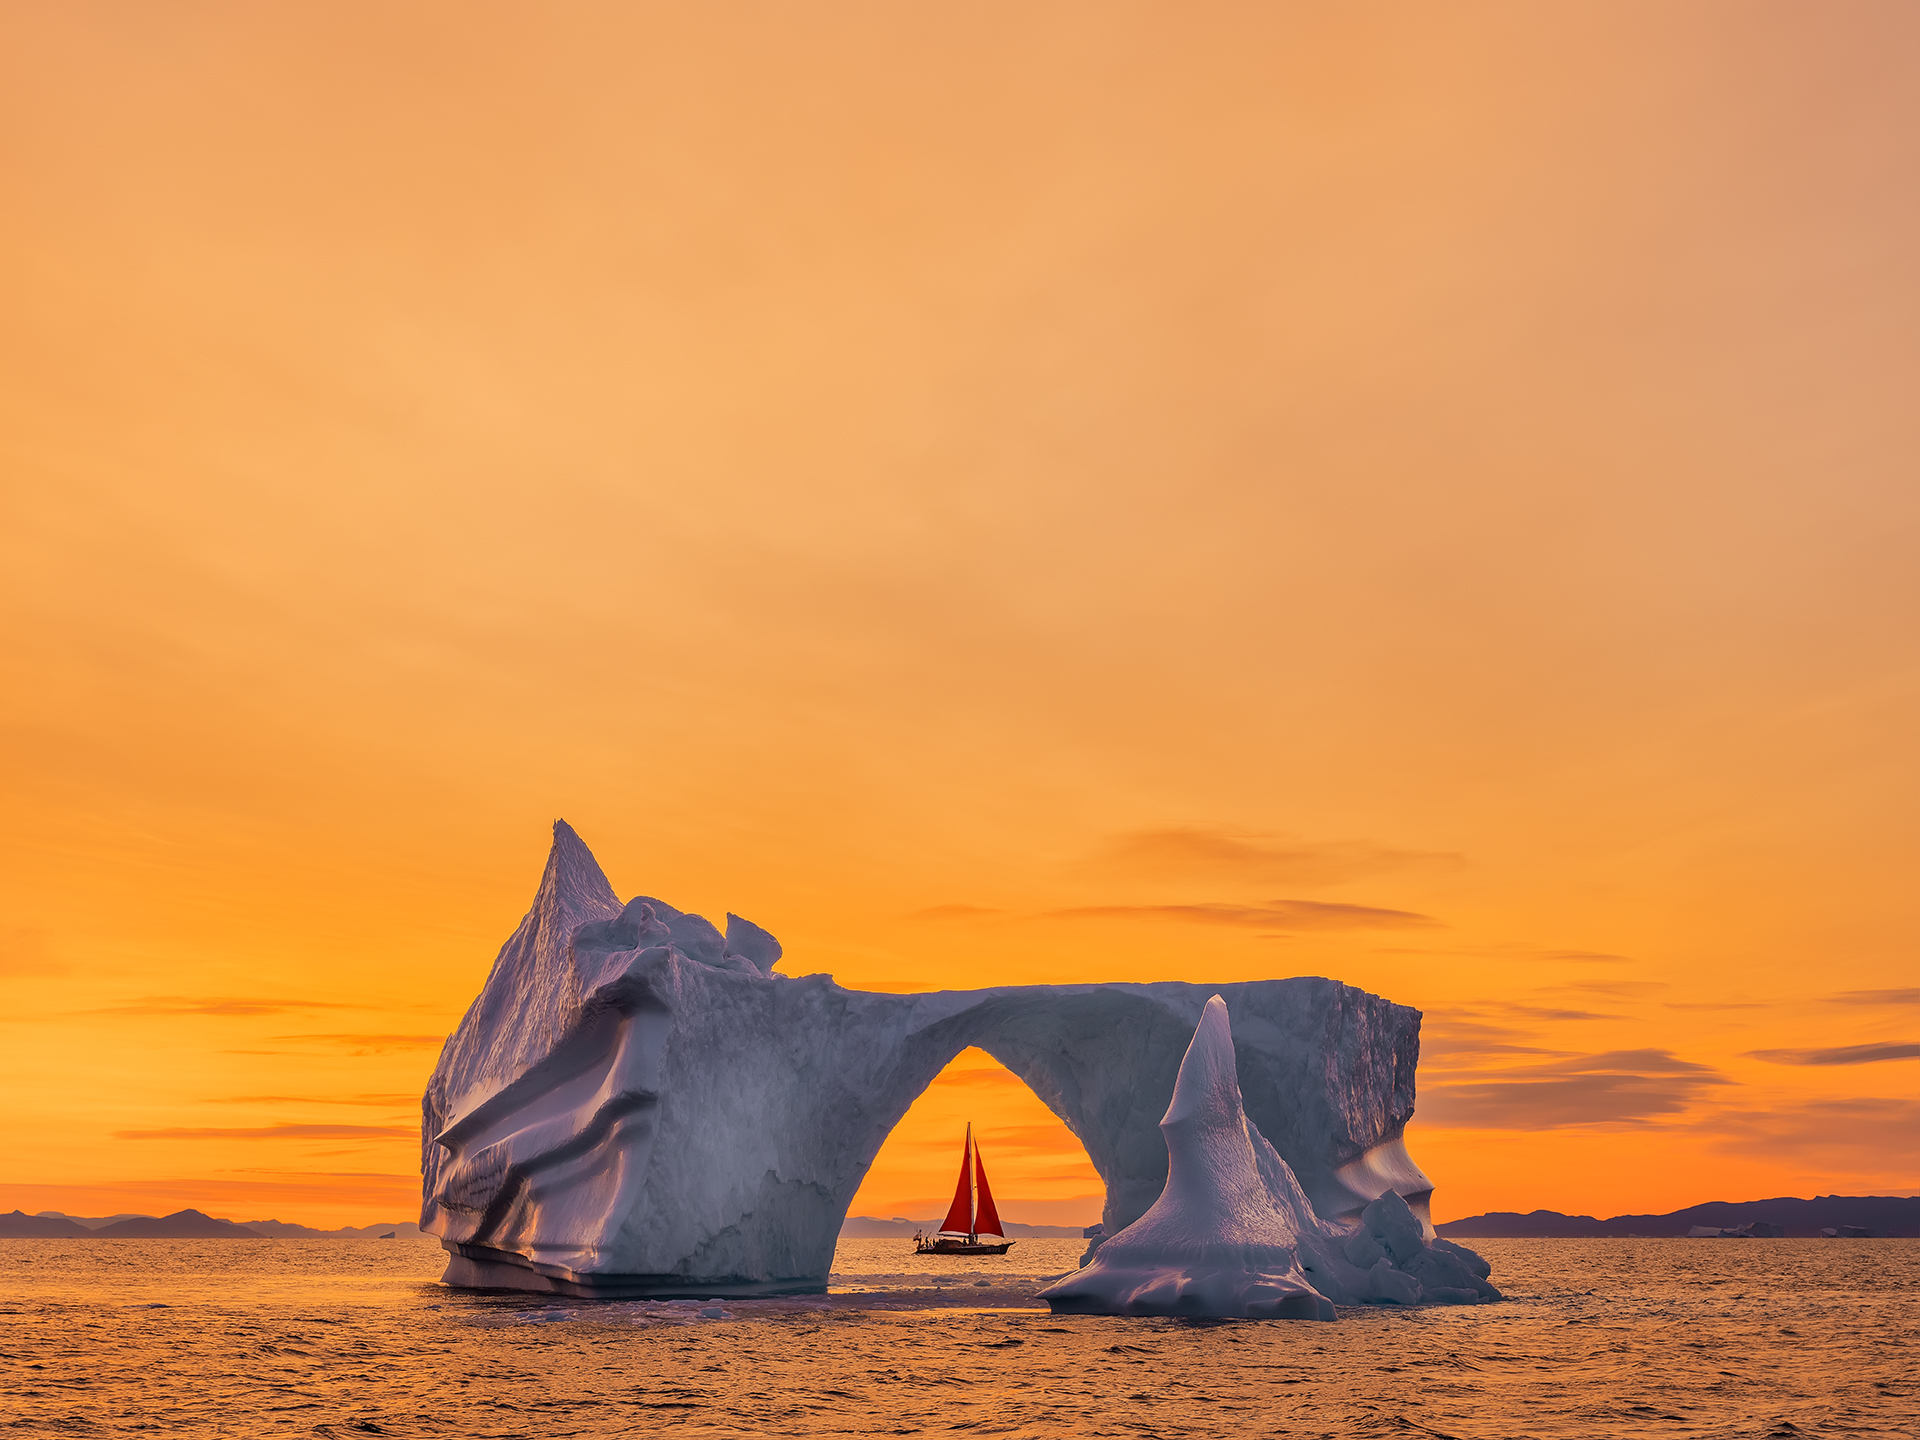 Image 30: Fujifilm GFX 50R, Fujifilm GF 32-64mm @64mm, ISO-400, f/8, 1/125s
 Image 31: Fujifilm GFX 50R, Fujifilm GF 100-200mm @124mm, ISO-500, f/8, 1/80s
Tips 9: Foreground and Sense of Depth
By conveying a three-dimensional world to a two-dimensional image, one need to create the sense of space for the viewer to feel depth of the image, otherwise, the image is absolutely flat and dull. In order to create the sense of depth, you can create the layers by dividing your scenery into three elements, from near to far side: foreground, mid-ground, and background. In our sailing tour, mid-ground can be the sail boat and background can be the iceberg. They are the story and point of interest of your image, and you can exaggerate your story or enhance the sense of depth by adding foreground element to your image.
Foreground can be tricky in the sailing tour because you can’t simply search for it like on the ground and set your tripod to compose. We often use the ice chunks as foreground elements, they can be pieces of ice or bunch of crushed ices forming a leading line. These elements, however, do not stay in the same place for more than a few seconds, they are constantly drifting over your sight and disappear in a short moment (Image 32). Therefore, it is important to stay highly alert and observe any possible foreground elements that might enter your image frame.
Sometimes, the foreground elements can be very close to your boat, so make sure you close down your aperture to ensure the depth of field that is sufficient to make them sharp in focus (Image 33). Further, these foreground elements can drifting fast, so make sure you have shutter speed that is fast enough to freeze the movement.
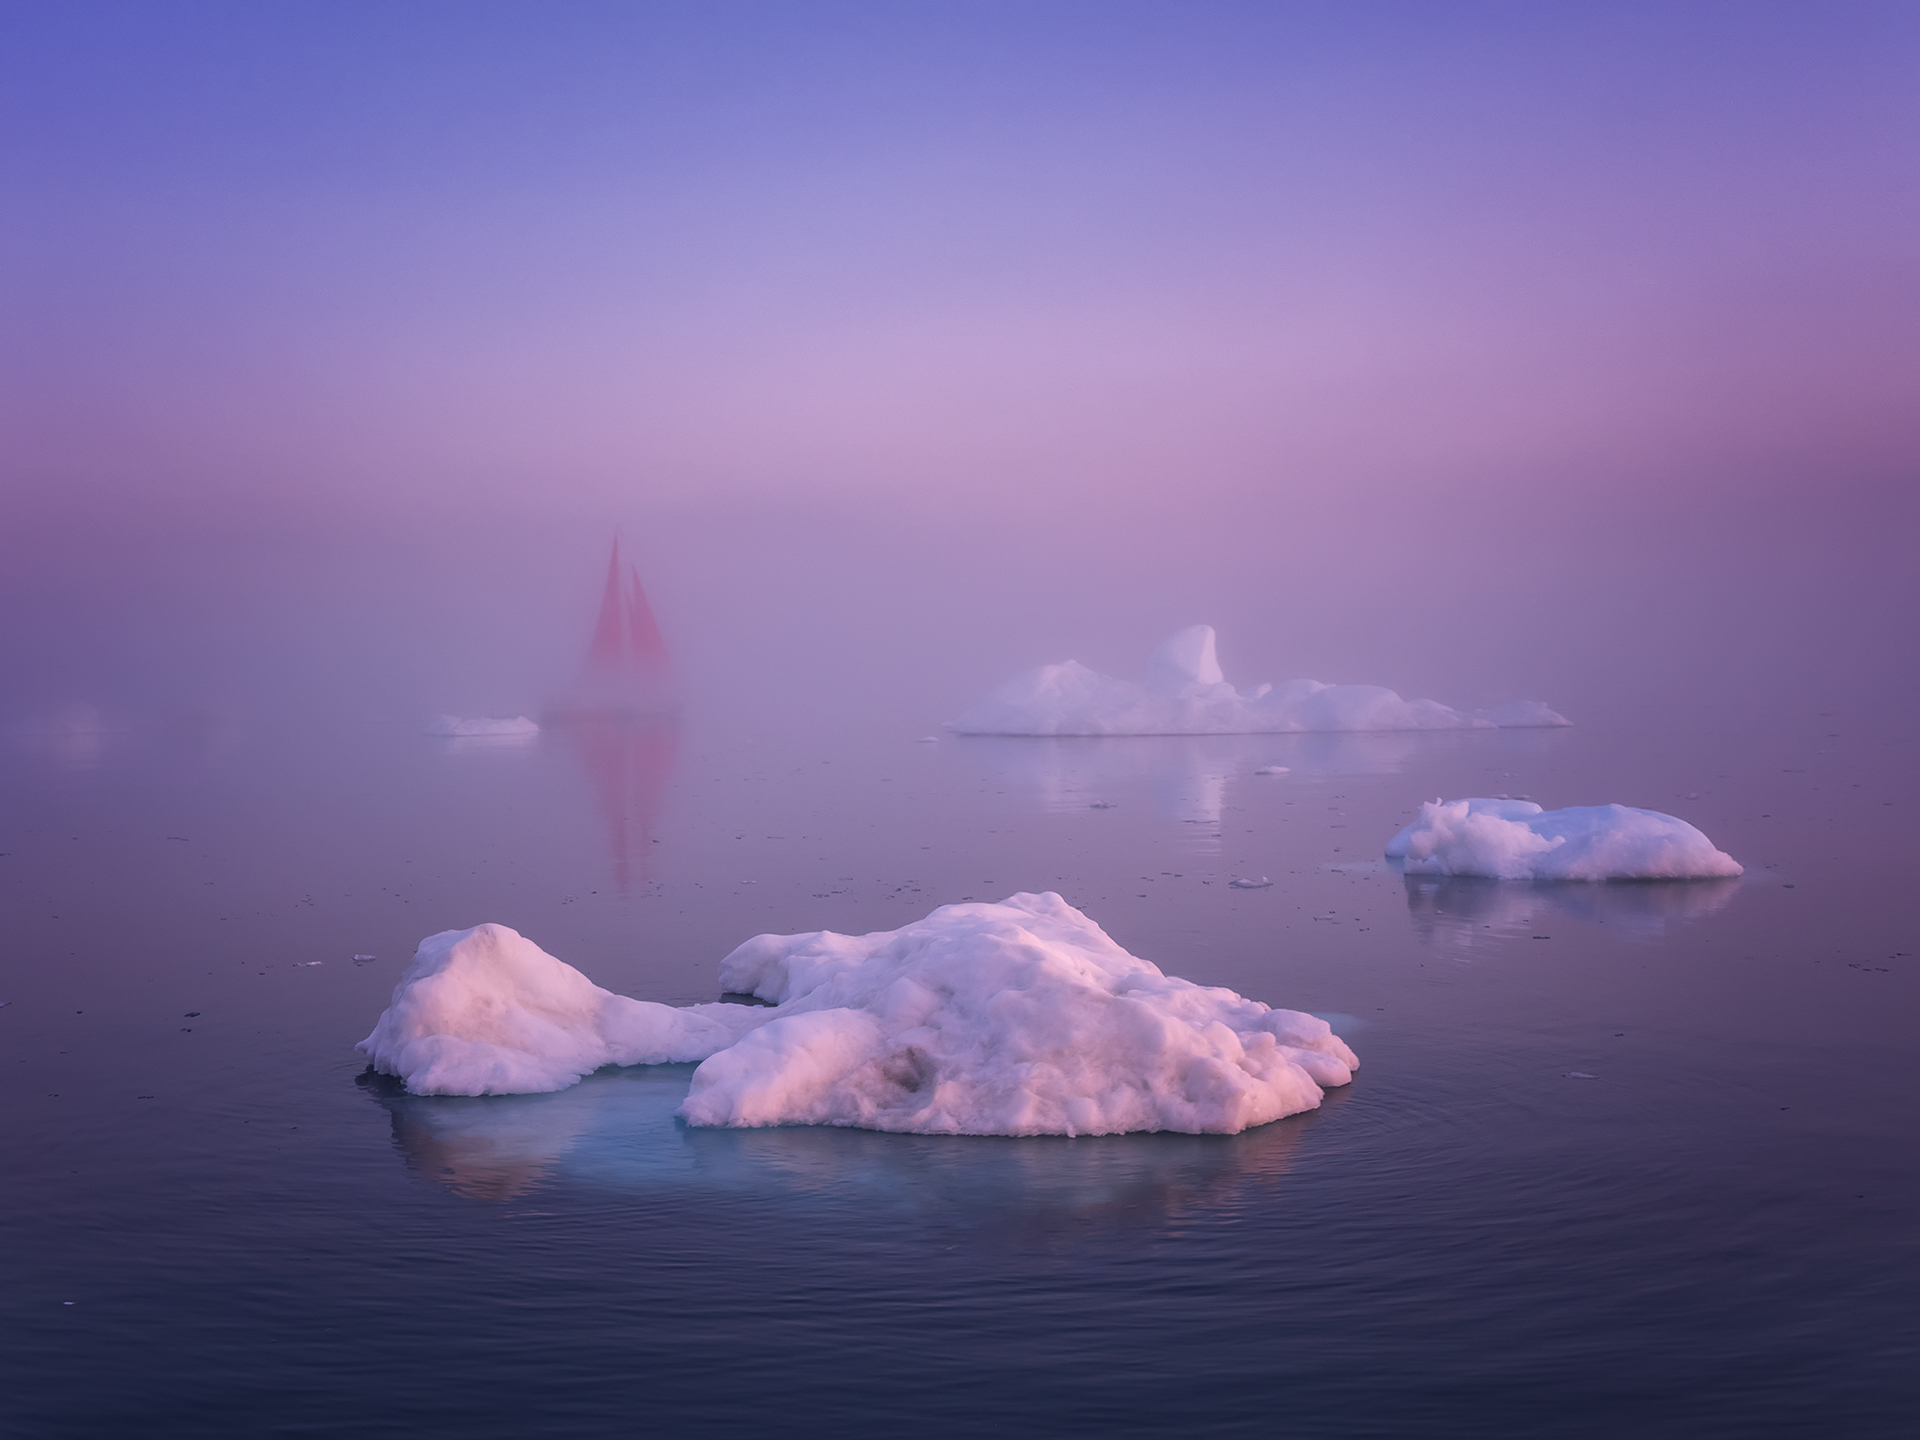 Image 32: Fujifilm GFX 50R, Fujifilm GF 32-64mm @32mm, ISO-320, f/8, 1/80s
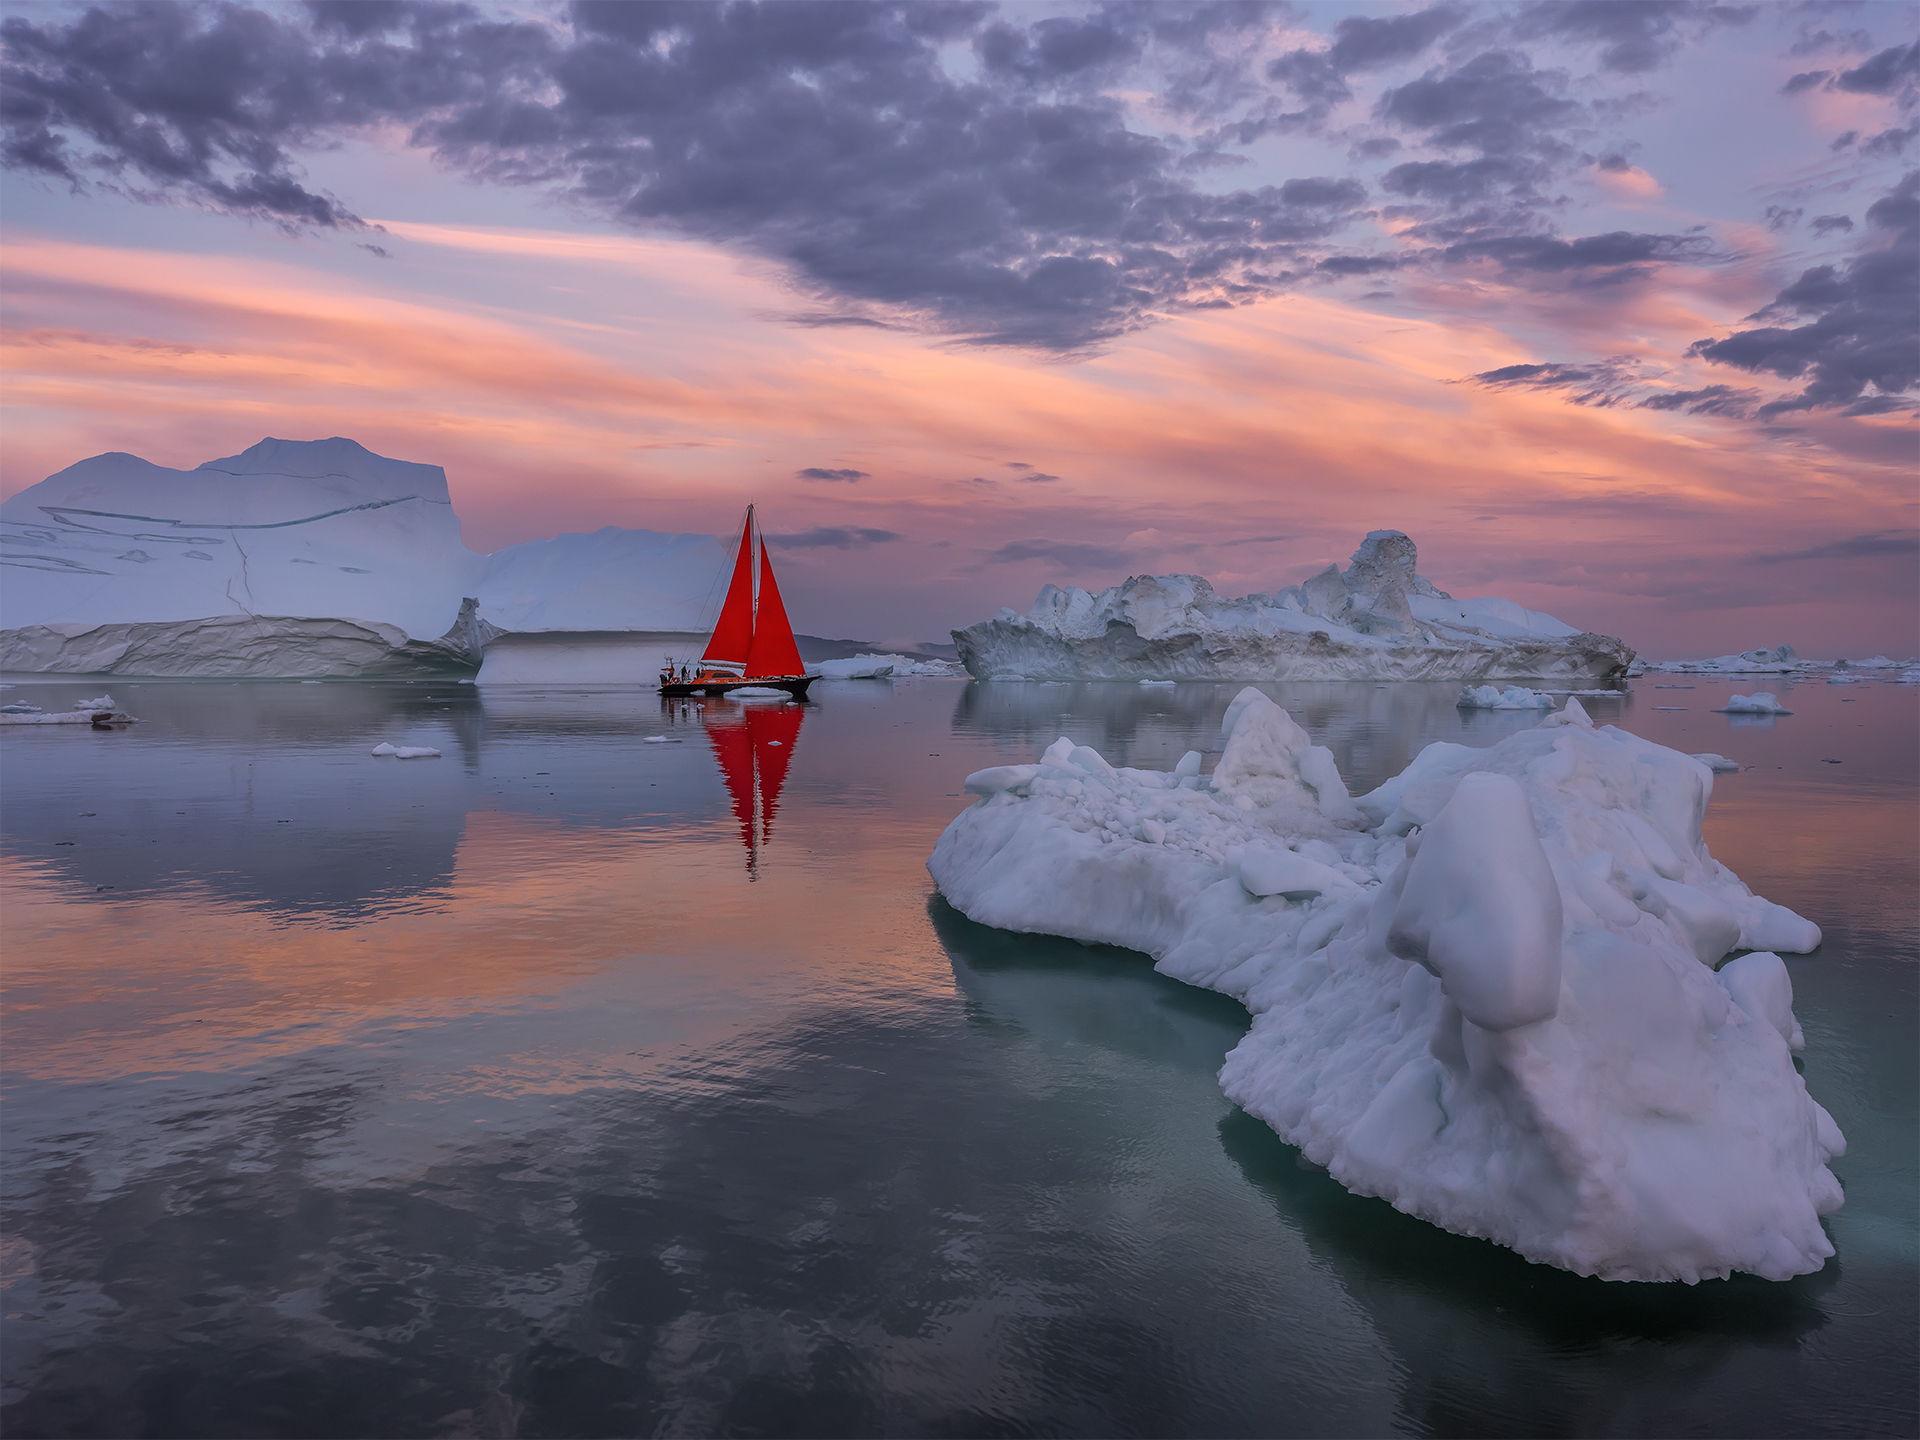 Image 33: Fujifilm GFX 50S, Fujifilm GF 32-64mm @32mm, ISO-250, f/13, 1/125s
Tips 10: Aspect Ratio
The default aspect ratio of an image is determined by the dimension of your camera sensor, for example, they are 4:3 for most of the images in this article that were created with the Fujifilm GFX 50R or 50S medium format camera with 4:3 aspect ratio sensor. For most DSLR or mirrorless cameras today, the aspect ratio are 3:2.
Changing the aspect ratio has several impacts to your images in aesthetical point of view. By using different aspect ratio, you change the position of your objects in relationship with the edges of the frame and the overall configuration of space. One aspect ratio that I often use in the Greenland sailing tour is 16:9, which is considered as panoramic format. These images have one common scene, i.e. one or more icebergs that are positioned in horizontal array (Image 34 – 37). The aspect ratio of 16:9 has wider horizontal dimension and thus emphasize the vastness of the scenery.
One can change the aspect ratio in camera or crop it in post-processing. I would recommend the latter, as cropping allows you to be more flexible in configurating the placement of objects within the frame. Sometimes, you need to shot multiple images across the scene and stitch them in the post-processing and crop in the aspect ratio of 16:9 (Image 37), this is frequently use when the scene is enormously wide, or when you are very close to the objects.
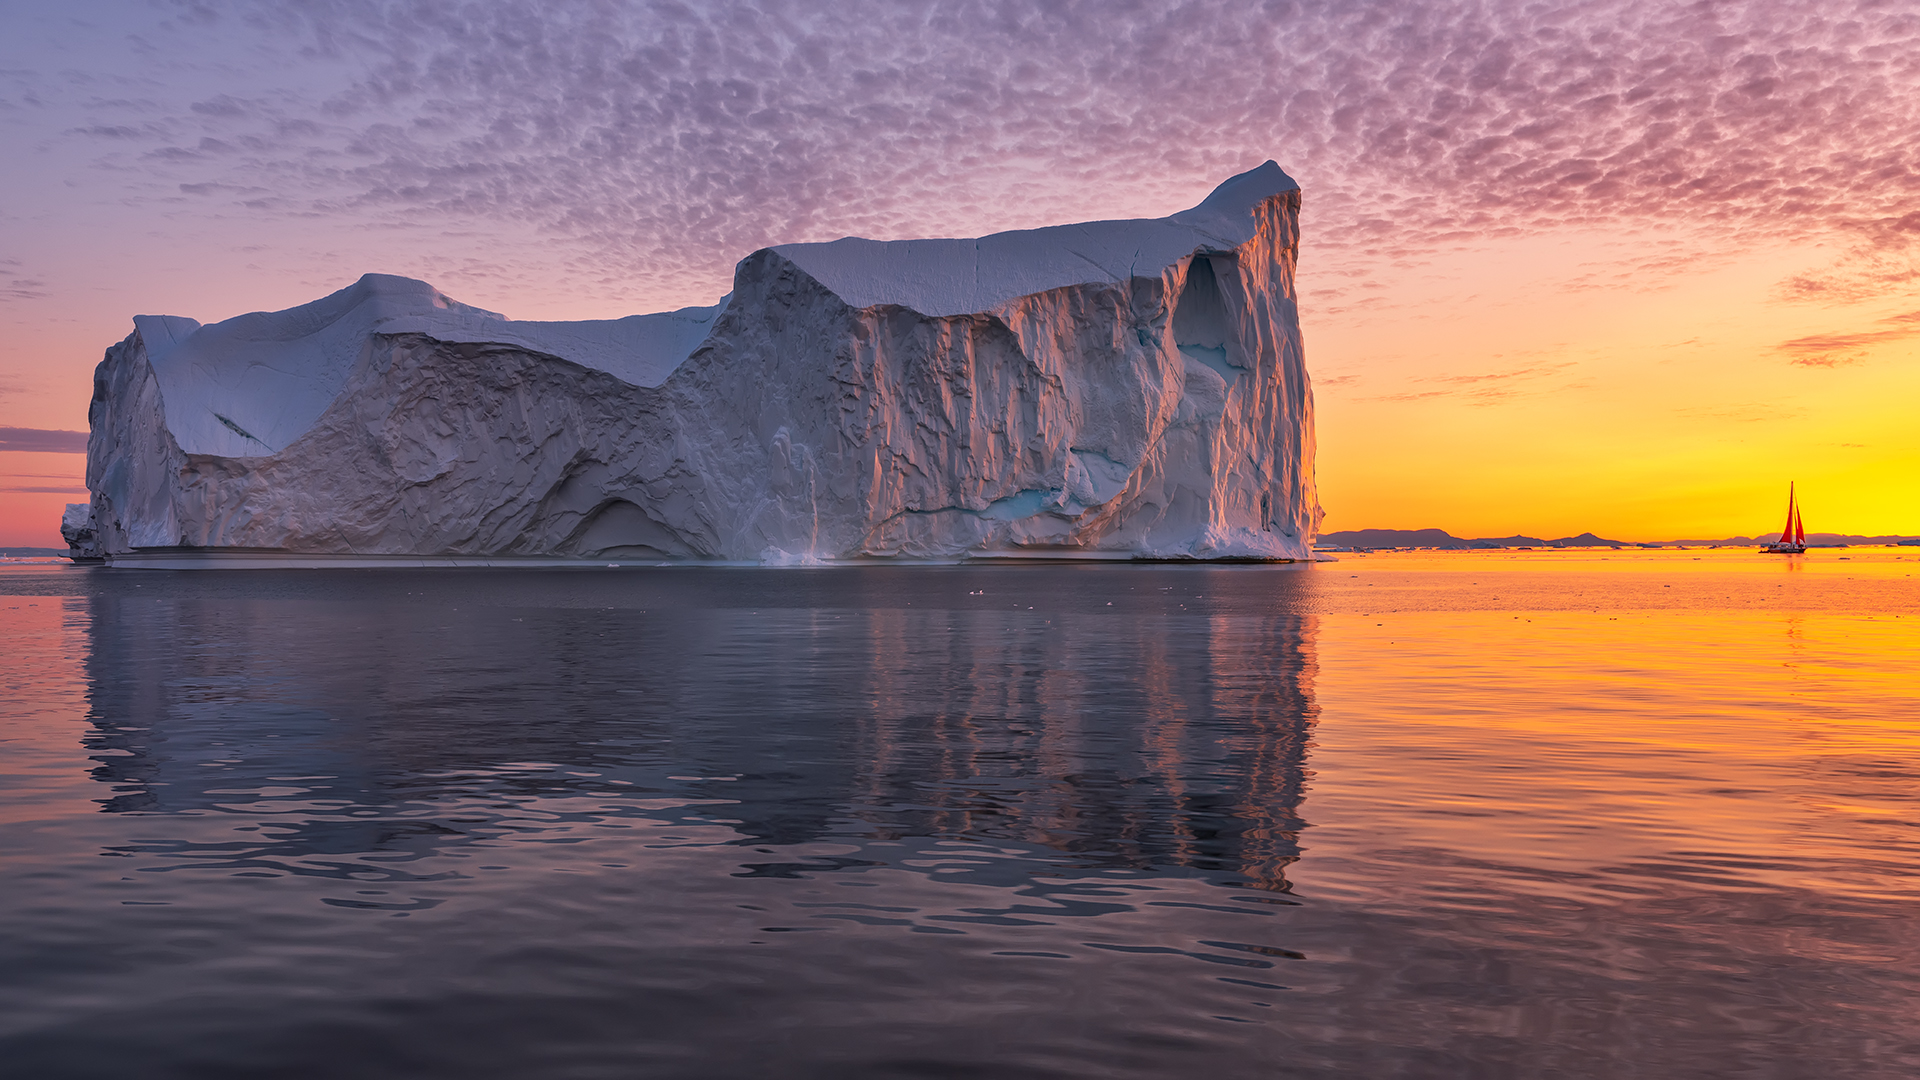 Image 34: Fujifilm GFX 50R, Fujifilm GF 32-64mm @32mm, ISO-320, f/8, 1/50s
 Image 35: Fujifilm GFX 50R, Fujifilm GF 32-64mm @64mm, ISO-320, f/8, 1/80s
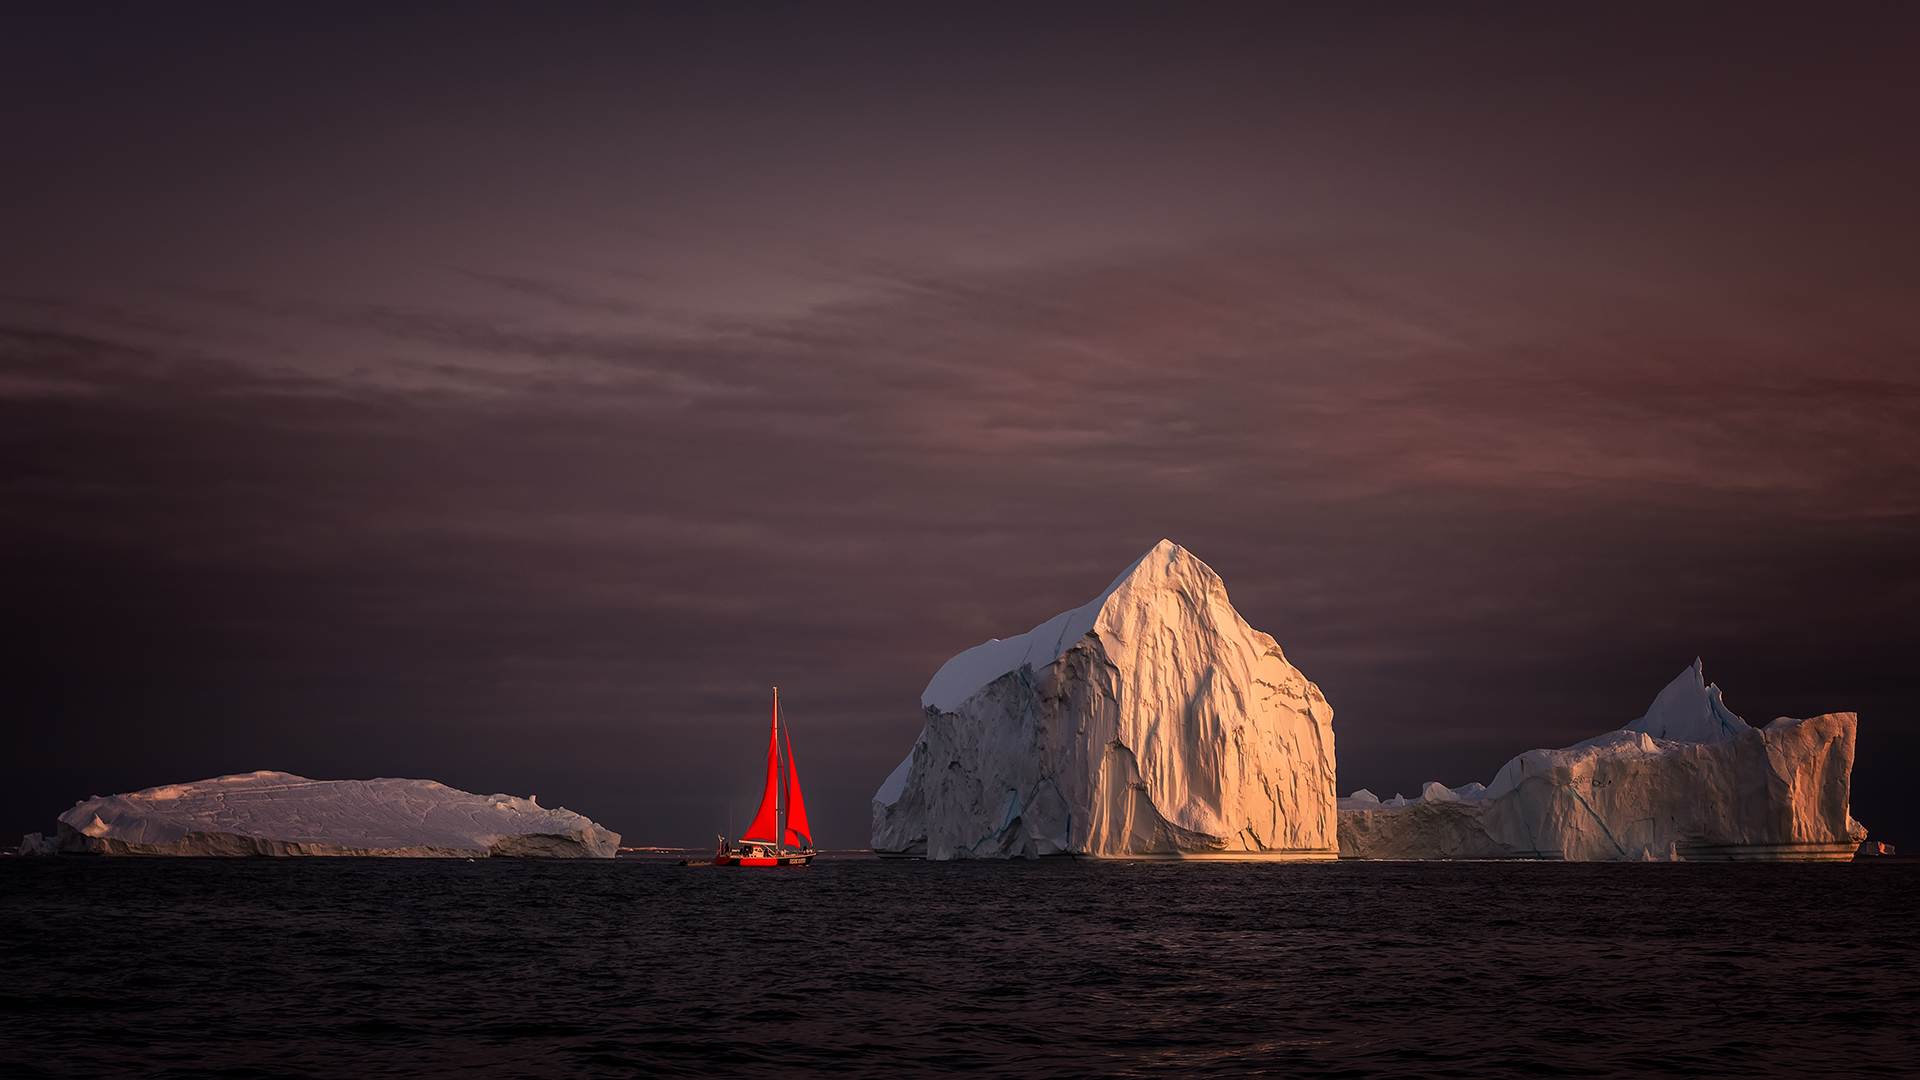 Image 36: Fujifilm GFX 50R, Fujifilm GF 32-64mm @64mm, ISO-640, f/10, 1/60s
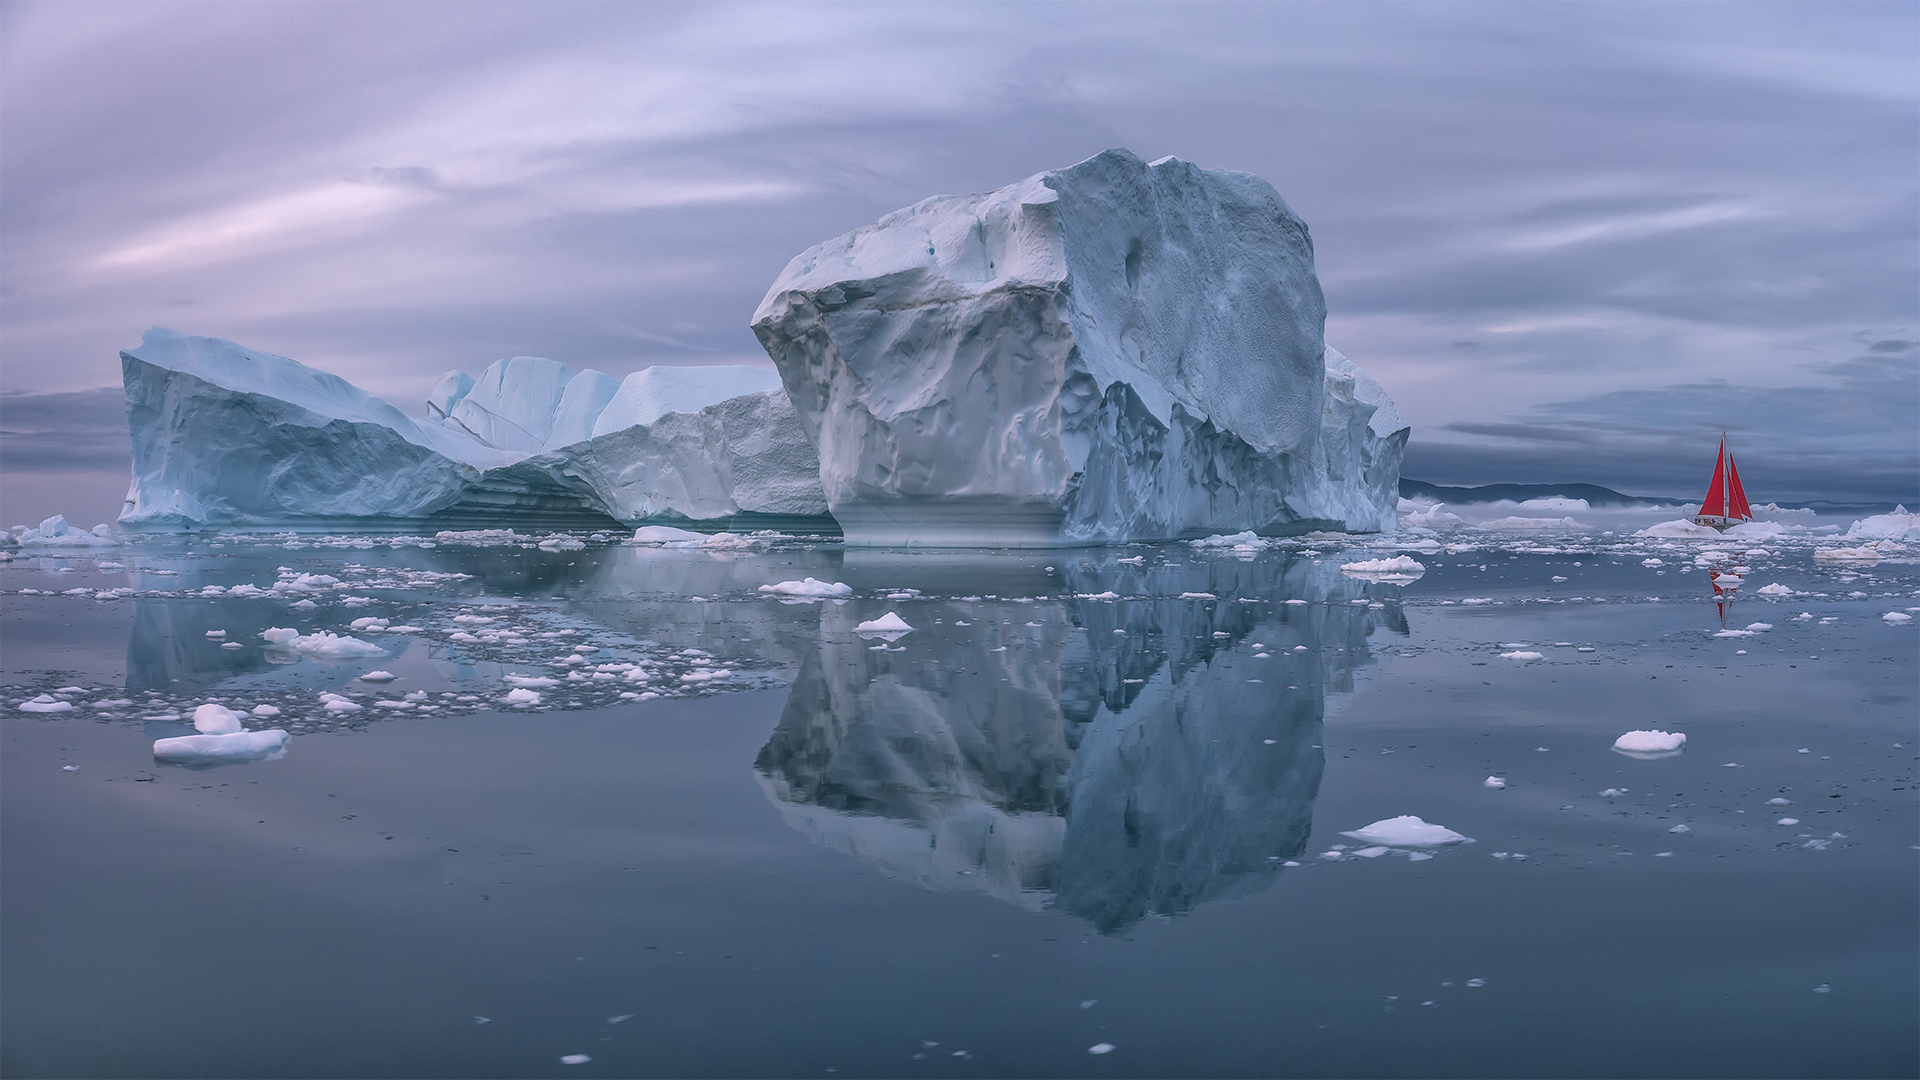 Image 37: Fujifilm GFX 50R, Fujifilm GF 32-64mm @32m, ISO-500, f/8, 1/40s
Bonus Tips: Photographing from the Ground
Ice chunks often drift to the shore of Ilulissat, one can create some amazing images by using these ice chunks as foreground elements and the icebergs in the ocean as the backdrop, like in Image 38 and 39. These images are highly visual appealing, they are picture perfect from both aesthetical and technical point of view.
On the aesthetical side, these images use several pieces of ices as foreground elements. The ices in Image 38 were configured in the way to guide the viewer eyes go deeper to the far side, while two ice chunks of different color in Image 39 created layers that add the depth to the image. These foreground elements, together icebergs in the far side, create the classical near-far style of composition with the sense of space and depth.
On the technical side, these images are 30 seconds long exposure images captured using NiSi 6-stops ND filter. The reason to use 30 seconds exposure is to smoothen the ripples of water and motion blur the clouds. The image looks simpler and less distracting, as well as the sense of dynamism rendered by moving clouds. In this particular case, if I use longer exposure than 30 seconds, the icebergs in the background will be blurry as they are drifting slowing.
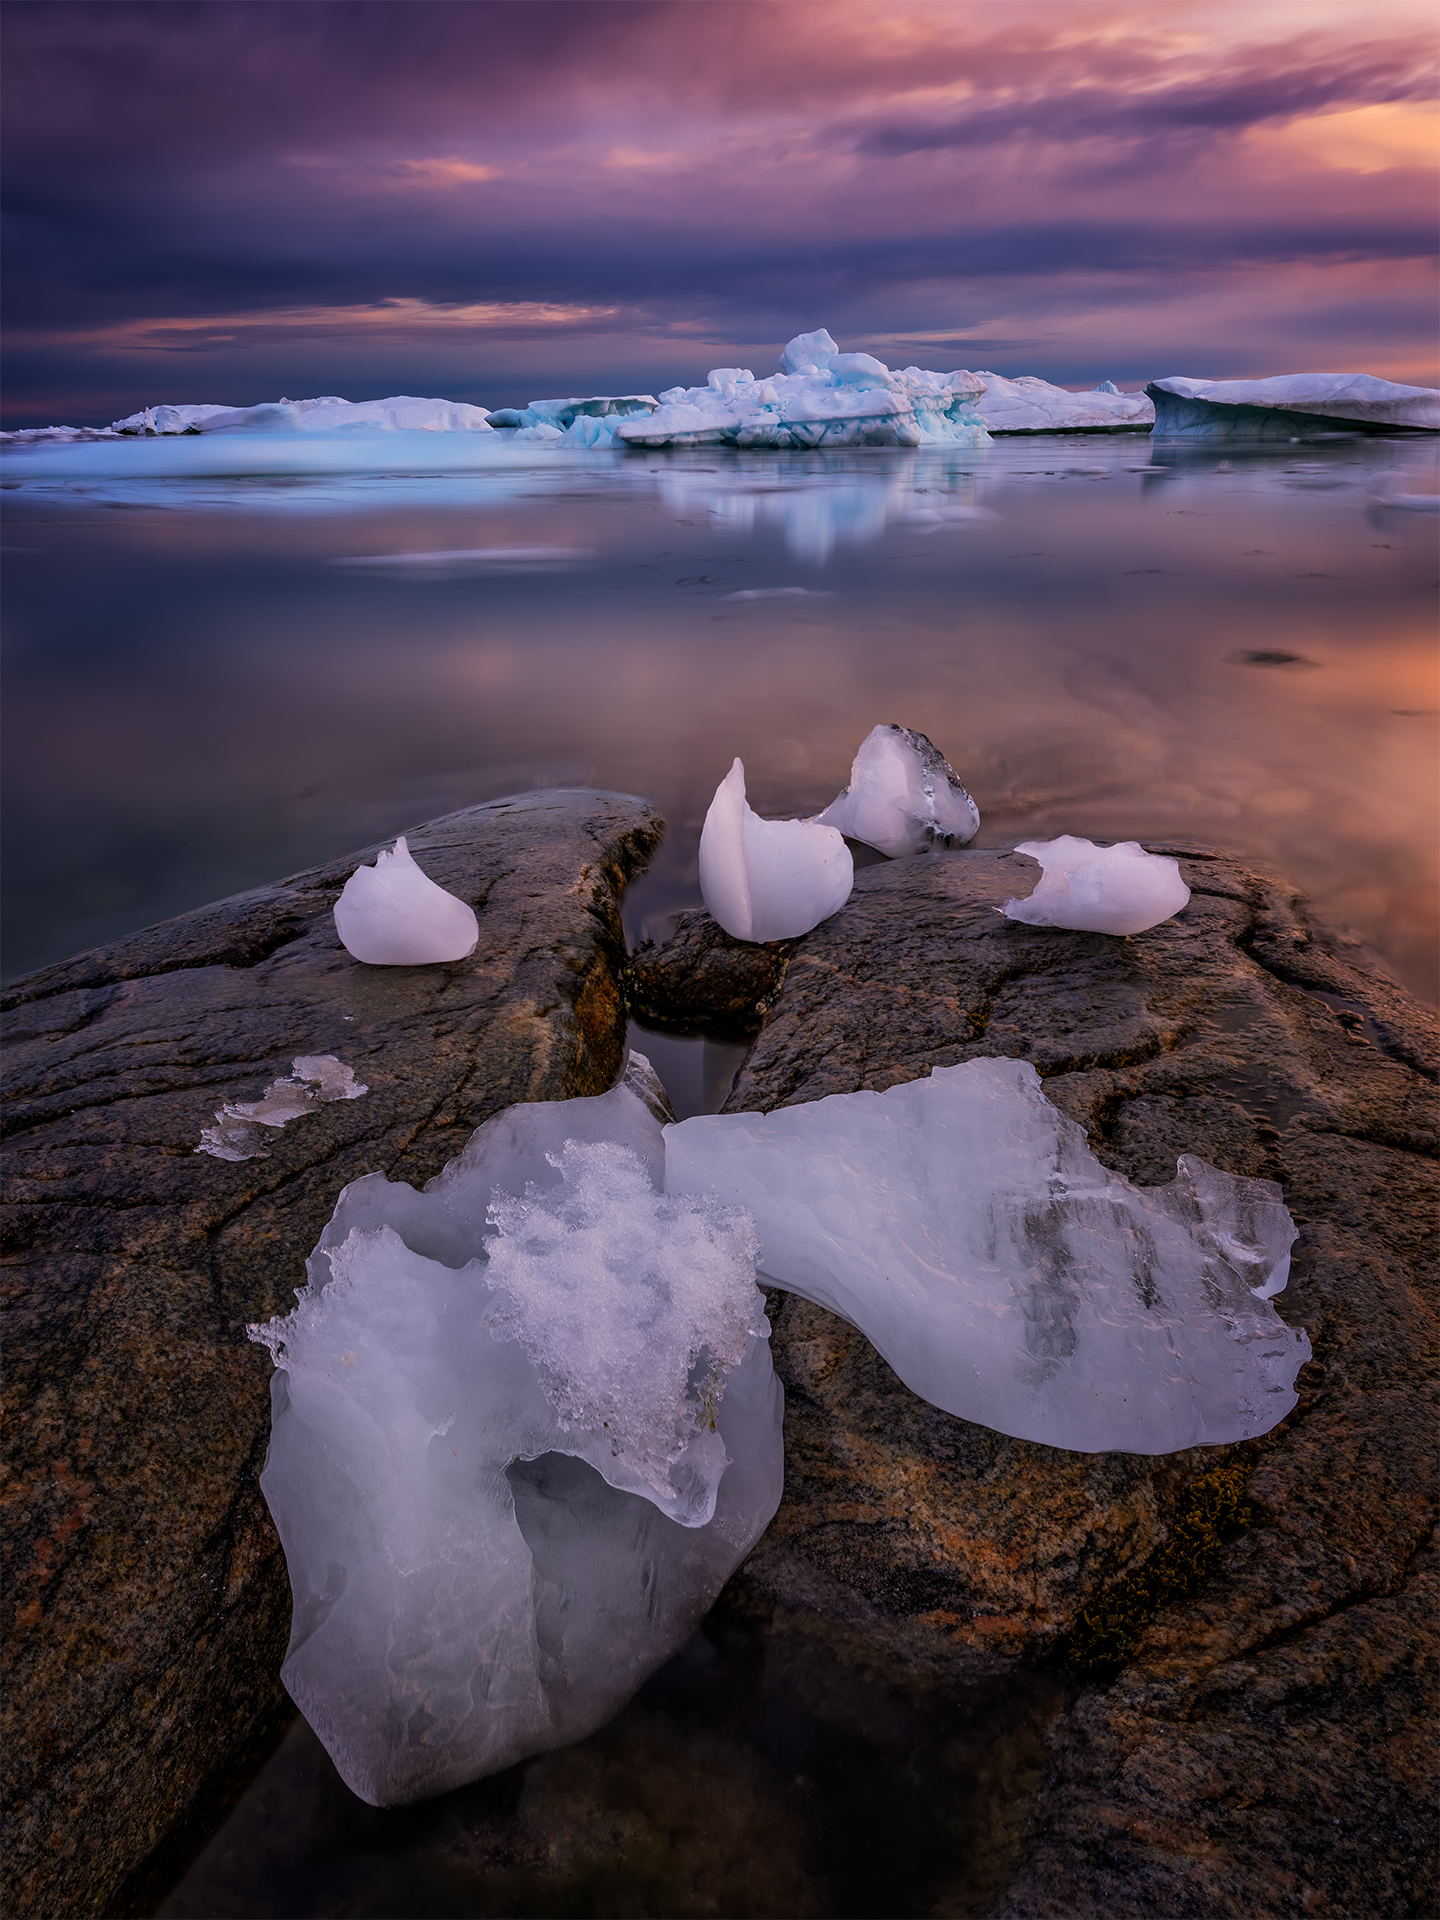 Image 38. Fujifilm GFX 50S, Fujifilm GF 32-64mm @34mm, NiSi 6-stops ND filter, ISO-100, f/18, 30s
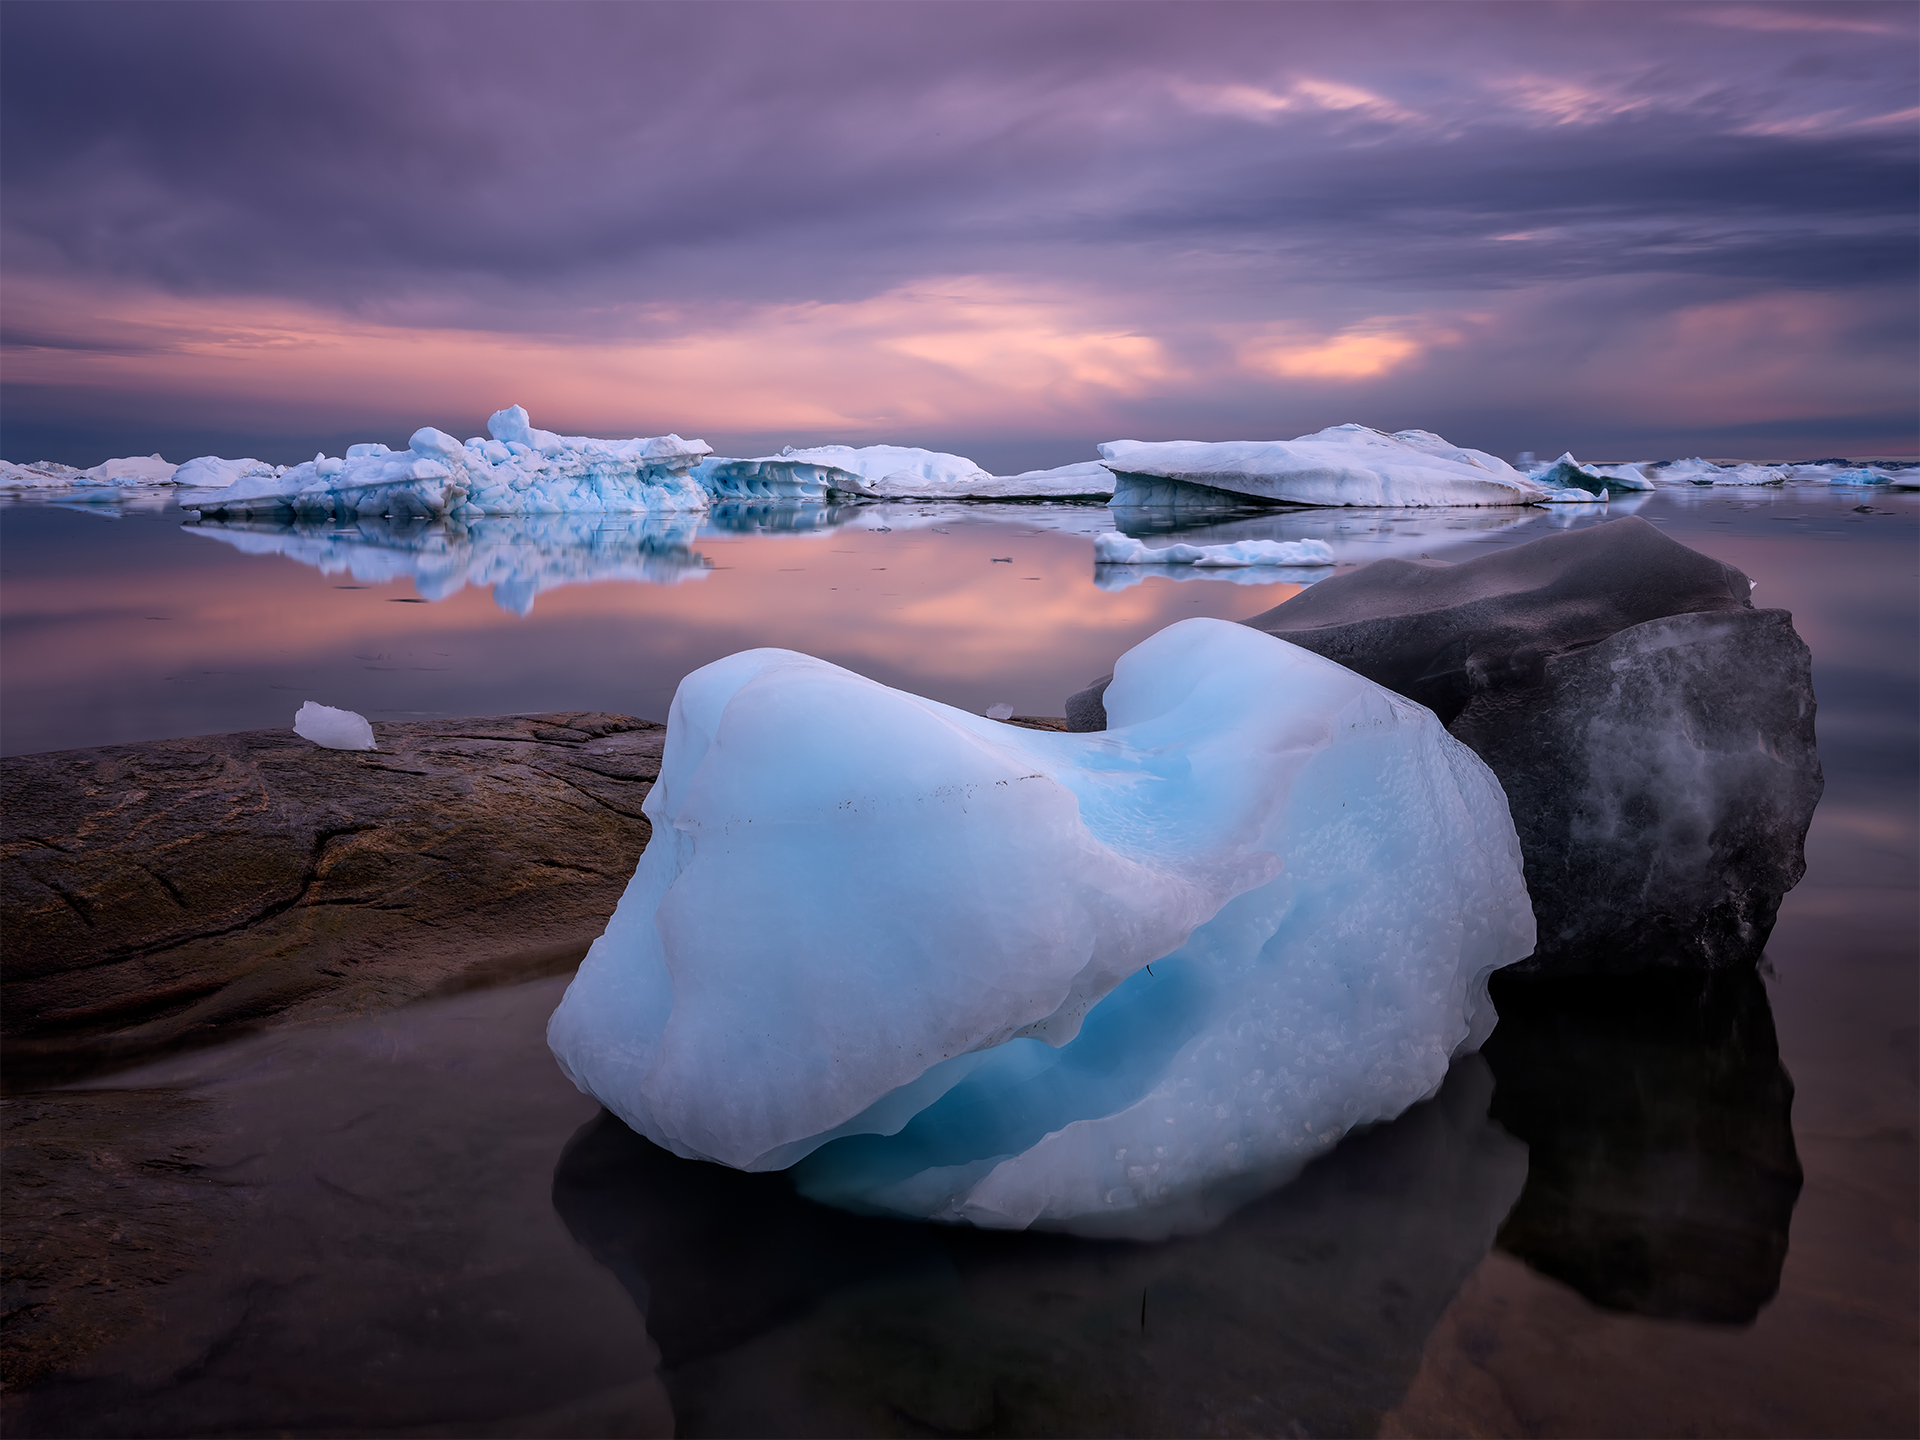 Image 39. Fujifilm GFX 50S, Fujifilm GF 32-64mm @43mm, NiSi 6-stops ND filter, ISO-100, f/20, 30s